# Welcome

## Welcome ALTAVA Creator!

Welcome to ALTAVA creator Guideline page.&#x20;

***

#### Make a profit&#x20;

Our team provides an experience of unlimited scalability along with the opportunity to profit. Our goal is to create a fair and transparent creator ecosystem. Once you **'Publish'** a 3D model, it will be managed as NFTs for each artwork, enabling creators to profit. Creators can benefit from digital ownership and a secure source of income.

#### What is the conversion?

Our innovative conversion solution enables the transformation of a single modeling file into formats compatible with multiple virtual worlds. Experience unlimited scalability!

#### How can I try it?

Simply upload an already-made 3D model without additional rigging, retopology, or texturing work. Or create a 3D model following the guidelines. It transforms into any virtual model files you want through our conversion solution.&#x20;

You have two options for uploading 3D models:

{% hint style="info" %}
**Zepeto to Roblox**: If you're a Zepeto creator, select this option and upload your FBX file. Please note that only Zepeto files can be converted to Roblox.
{% endhint %}

{% hint style="info" %}
**Altava to Roblox/Snapchat**: Create a new 3D model based on the ALTAVA base model following the provided guidelines. This model can be converted to both Roblox and Snapchat.
{% endhint %}

Follow the guide and create 3D models to shine everywhere and earn profits!


# Overview

### 1. Download Software

Prepare a 3D modeling program and the base modeling FBX file.

### 2. 3D Modeling

The ALTAVA team provides several important guidelines to ensure all creators' safety and enjoyable experiences. During the evaluation process, we thoroughly check if the following criteria are met.&#x20;

Please double-check to ensure your modeling work adheres to these standards. Even if it passes the evaluation, it may be deleted without notice if deemed inappropriate content.

* [Design Guidelines](/creator-guide/making-3d-models/design-guidelines)
* [Modeling Guidelines](/creator-guide/modeling-guidelines/units-setup)

{% hint style="info" %}
For the convenience of creators, we are improving to allow the upload of various **virtual world file format models.**
{% endhint %}

{% hint style="info" %}
FBX file size is limited to 10MB or less (Including textures).
{% endhint %}

### 3. Upload a 3D model

{% hint style="warning" %}
Please ensure that you select the correct tab when uploading. Otherwise, the review may be rejected.&#x20;
{% endhint %}

{% hint style="danger" %}
**Please check!**\
\
If you upload a design that someone else has registered on the ALTAVA AI site or re-upload a design you created, the review may be rejected. Here, 'design' refers to files including 3D modeling and textures.&#x20;
{% endhint %}

The created 3D clothing must be saved as an FBX file. Therefore, Upload tap can be divided into two depending on the base model used:

* **Zepeto to Roblox**: FBX file based on the Zepeto base model

<figure><img src="https://328555605-files.gitbook.io/~/files/v0/b/gitbook-x-prod.appspot.com/o/spaces%2Fqbl3tKh4Tqarpg8Dmgw2%2Fuploads%2FKXvu1v2P8uoXX4s0ZYwO%2Fzepeto%20upload.png?alt=media&amp;token=469e0130-931c-4af2-8fac-f71093599f36" alt=""><figcaption></figcaption></figure>

{% hint style="info" %}
The Zepeto base model file can only be converted to Roblox. For upload precautions, refer to [\[Setting up Modeling- Zepeto\]](/creator-guide/making-3d-models/preparing-for-modeling/zepeto).
{% endhint %}

* **Altava to Roblox/Snapchat:** FBX file based on the Altava base model

<figure><img src="https://328555605-files.gitbook.io/~/files/v0/b/gitbook-x-prod.appspot.com/o/spaces%2Fqbl3tKh4Tqarpg8Dmgw2%2Fuploads%2FPb5sPEtY4aJhYB2tkafr%2Faltava%20upload.png?alt=media&amp;token=da6d1a26-c3ae-4e1b-8417-a83328558857" alt=""><figcaption></figcaption></figure>

{% hint style="info" %}
The Altava base model file can be converted to Roblox or Snapchat. For production guidelines, refer to [\[Setting up Modeling\]](/creator-guide/making-3d-models/preparing-for-modeling/altava).
{% endhint %}

### 4. Request 3D Model Evaluation

Please select the required items before submitting.&#x20;

* **Select Virtual world(s)**

Select which virtual world item(s) you would like to create. Multiple selections are possible. However, in the case of Zepeto to Roblox, only Roblox can be converted.

* **Select Category**

Please set a category that matches the modeling you created.

<table><thead><tr><th width="172">Category</th><th width="269">Items</th><th data-hidden></th></tr></thead><tbody><tr><td>Top</td><td>Top, Shirt, etc.</td><td></td></tr><tr><td>Outwear</td><td>Jacket, Coat, etc.</td><td></td></tr><tr><td>Pants</td><td>Short/Midi/Long pants, etc.</td><td></td></tr><tr><td>Skirt</td><td>Short/Midi/Long skirt, etc.</td><td></td></tr><tr><td>Dress</td><td>All items where the top and bottom are attached, such as Dresses, Suits, Jumpsuits, etc.</td><td></td></tr><tr><td>Shoes</td><td>All items worn on the feet, such as sneakers, boots, etc. </td><td></td></tr><tr><td>Headwear</td><td>Caps, Hats etc.</td><td></td></tr><tr><td>Bags</td><td>All bag-shaped items are attached to the back.</td><td></td></tr></tbody></table>

* **Select the Base model type**

Please select this only if you create a 3D model based on the Altava model.

### 5. 3D Model Management

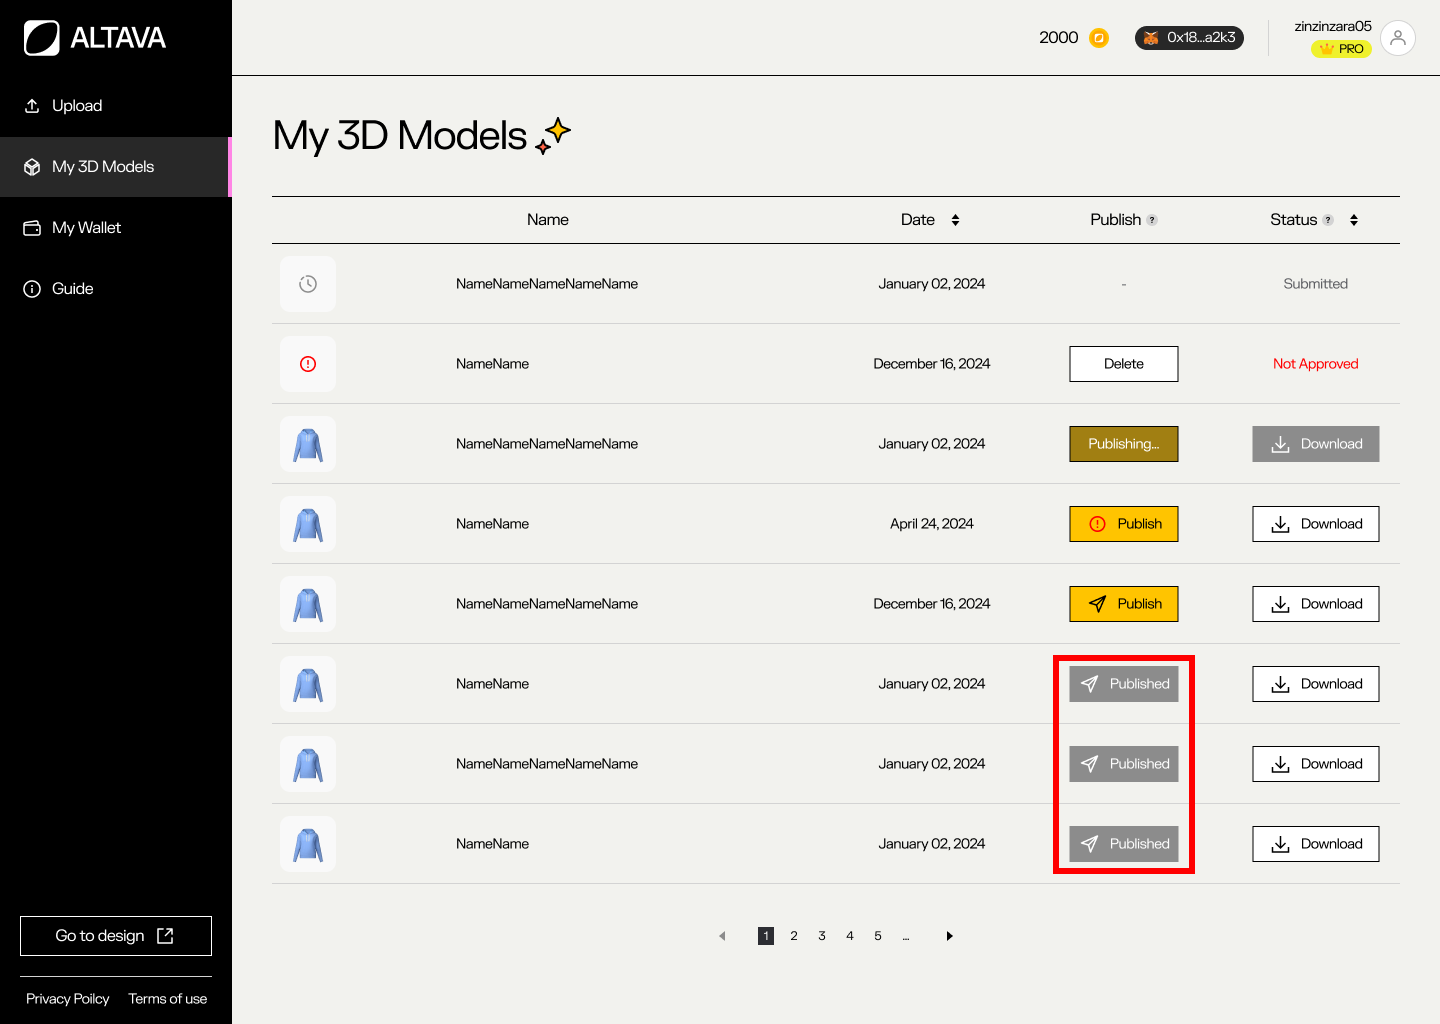
After downloading the desired conversion file, click the Publish button to share your design. You can check the review status here. Once a 3D model has passed the review process, you can download and publish the 3D model.

{% hint style="info" %}
**Download:** you can download the converted file.
{% endhint %}

{% hint style="info" %}
**Publish:** your 3D model will be tokenized as an NFT and displayed on the ALTAVA AI platform.&#x20;
{% endhint %}

&#x20;For more details, click [\[My 3D Model\]](/creator-guide/managing-your-3d-models/my-3d-models).

### 6. Request Payment

ALTAVA provides creators with the opportunity to make a profit.

One of our main goals is to create a system that prioritizes creators' rights, transparency, and fair and swift financial settlements. As a result, All published 3D models are tokenized as NFTs for protection and management.

Tokenized 3D models are settled according to internal regulations, and once a certain amount of revenue is generated, settlements can be made in TAVA.

{% hint style="info" %}
Only 3D models that have completed **publishing** can make a profit.
{% endhint %}


# Preparing for Modeling

Before starting the modeling, please review the setup methods. These differ depending on the base model. Currently, we provide two base models:

* [Zepeto](/creator-guide/making-3d-models/preparing-for-modeling/zepeto)
* [Altava](/creator-guide/making-3d-models/preparing-for-modeling/altava)

Click the link for more details.


# Zepeto

## Zepeto to Roblox Conversion

{% hint style="info" %}
Before converting the clothing, please refer to and follow several guidelines.
{% endhint %}

<figure><img src="https://328555605-files.gitbook.io/~/files/v0/b/gitbook-x-prod.appspot.com/o/spaces%2Fqbl3tKh4Tqarpg8Dmgw2%2Fuploads%2F8z92EBT1A94lHwtSw2PX%2Fimage.png?alt=media&amp;token=0807c91c-7403-4a3b-bde2-380150606ca4" alt=""><figcaption></figcaption></figure>

1. The clothing must be made according to the Zepeto guidelines.
2. Please upload 3D model adjusted to the T-pose or A-pose using the Zepeto base model. Please remove rigging and bone information cleanly.
3. The clothing must be a single mesh.
4. If vertices are connected, welding must be done correctly.
5. Textures must be included in the FBX. Please refer to the [\[Exporting\] ](/creator-guide/3d-modeling/exporting/blender)section.

## Multi - Material&#x20;

{% hint style="warning" %}
Using tools from Roblox or Altava does not support multi-material usage for clothing.
{% endhint %}

{% hint style="success" %}
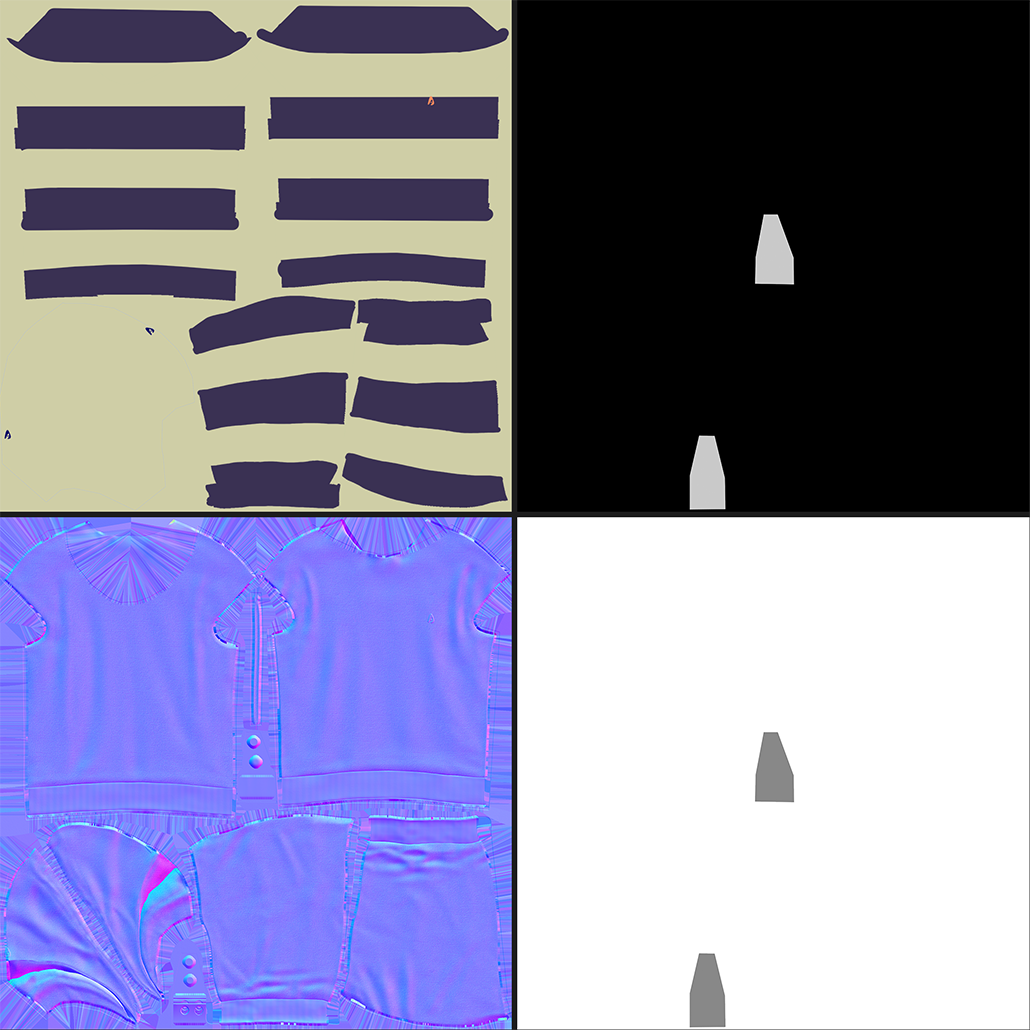
During the conversion process, multi-material textures will be automatically combined into a single texture.
{% endhint %}

For example, textures corresponding to two PBR materials (8 textures) will be automatically converted and combined into one material (4 textures).

Please refer to the [\[Texture\]](/creator-guide/modeling-guidelines/texture) section for more details.

<figure><img src="https://328555605-files.gitbook.io/~/files/v0/b/gitbook-x-prod.appspot.com/o/spaces%2Fqbl3tKh4Tqarpg8Dmgw2%2Fuploads%2F12K8Zb1EtkPAu01xl6TJ%2Fimage.png?alt=media&amp;token=9395999e-5e74-4da3-8d38-30eca2af2ae6" alt=""><figcaption></figcaption></figure>

{% hint style="info" %}
There may be some slight image loss during the automatic combining process.
{% endhint %}


# Altava

### 1. Setting Up Modeling Software

* You can use 3D modeling software such as 3D Blender, 3D Max, and more.
* &#x20;For 3D Max, we recommend versions up to **2023.**
* For high-polygon modeling, we recommend **Zbrush.**
* For texturing, we recommend **Substance 3D Painter or Photoshop.**

### 2. Download Base Model

To create clothing, you must need a base model. Download the base model files below and import them into your chosen modeling tool to create the clothing.

**Male Mannequin Model**

{% file src="/files/BY4IUyMli4azLOWY1gm4" %}

**Female Mannequin Model**

{% file src="/files/RSYxt6dUBxA1r5d1I1qz" %}

<figure><img src="https://328555605-files.gitbook.io/~/files/v0/b/gitbook-x-prod.appspot.com/o/spaces%2Fqbl3tKh4Tqarpg8Dmgw2%2Fuploads%2F1DCVpcLtJ9jvJGIbdQwP%2F%EB%A7%88%EB%84%A4%ED%80%B8%EC%8A%A4%EC%83%B71.png?alt=media&amp;token=8d41aece-bf2c-40d8-84ca-07f1de73bb93" alt=""><figcaption></figcaption></figure>

### 3. Applying Textures

When submitting your modeling work, it must be complete with textures applied.&#x20;

For detailed information on texturing, please refer to the following guide [\[Texture\]](/creator-guide/modeling-guidelines/texture).&#x20;

<figure><img src="https://328555605-files.gitbook.io/~/files/v0/b/gitbook-x-prod.appspot.com/o/spaces%2Fqbl3tKh4Tqarpg8Dmgw2%2Fuploads%2FSaktAp4gcouUWIo04RKi%2FGroup%202%20(2).png?alt=media&amp;token=ddb4d7aa-ba48-4156-8ba6-3d4753464484" alt=""><figcaption></figcaption></figure>

### 4. Export

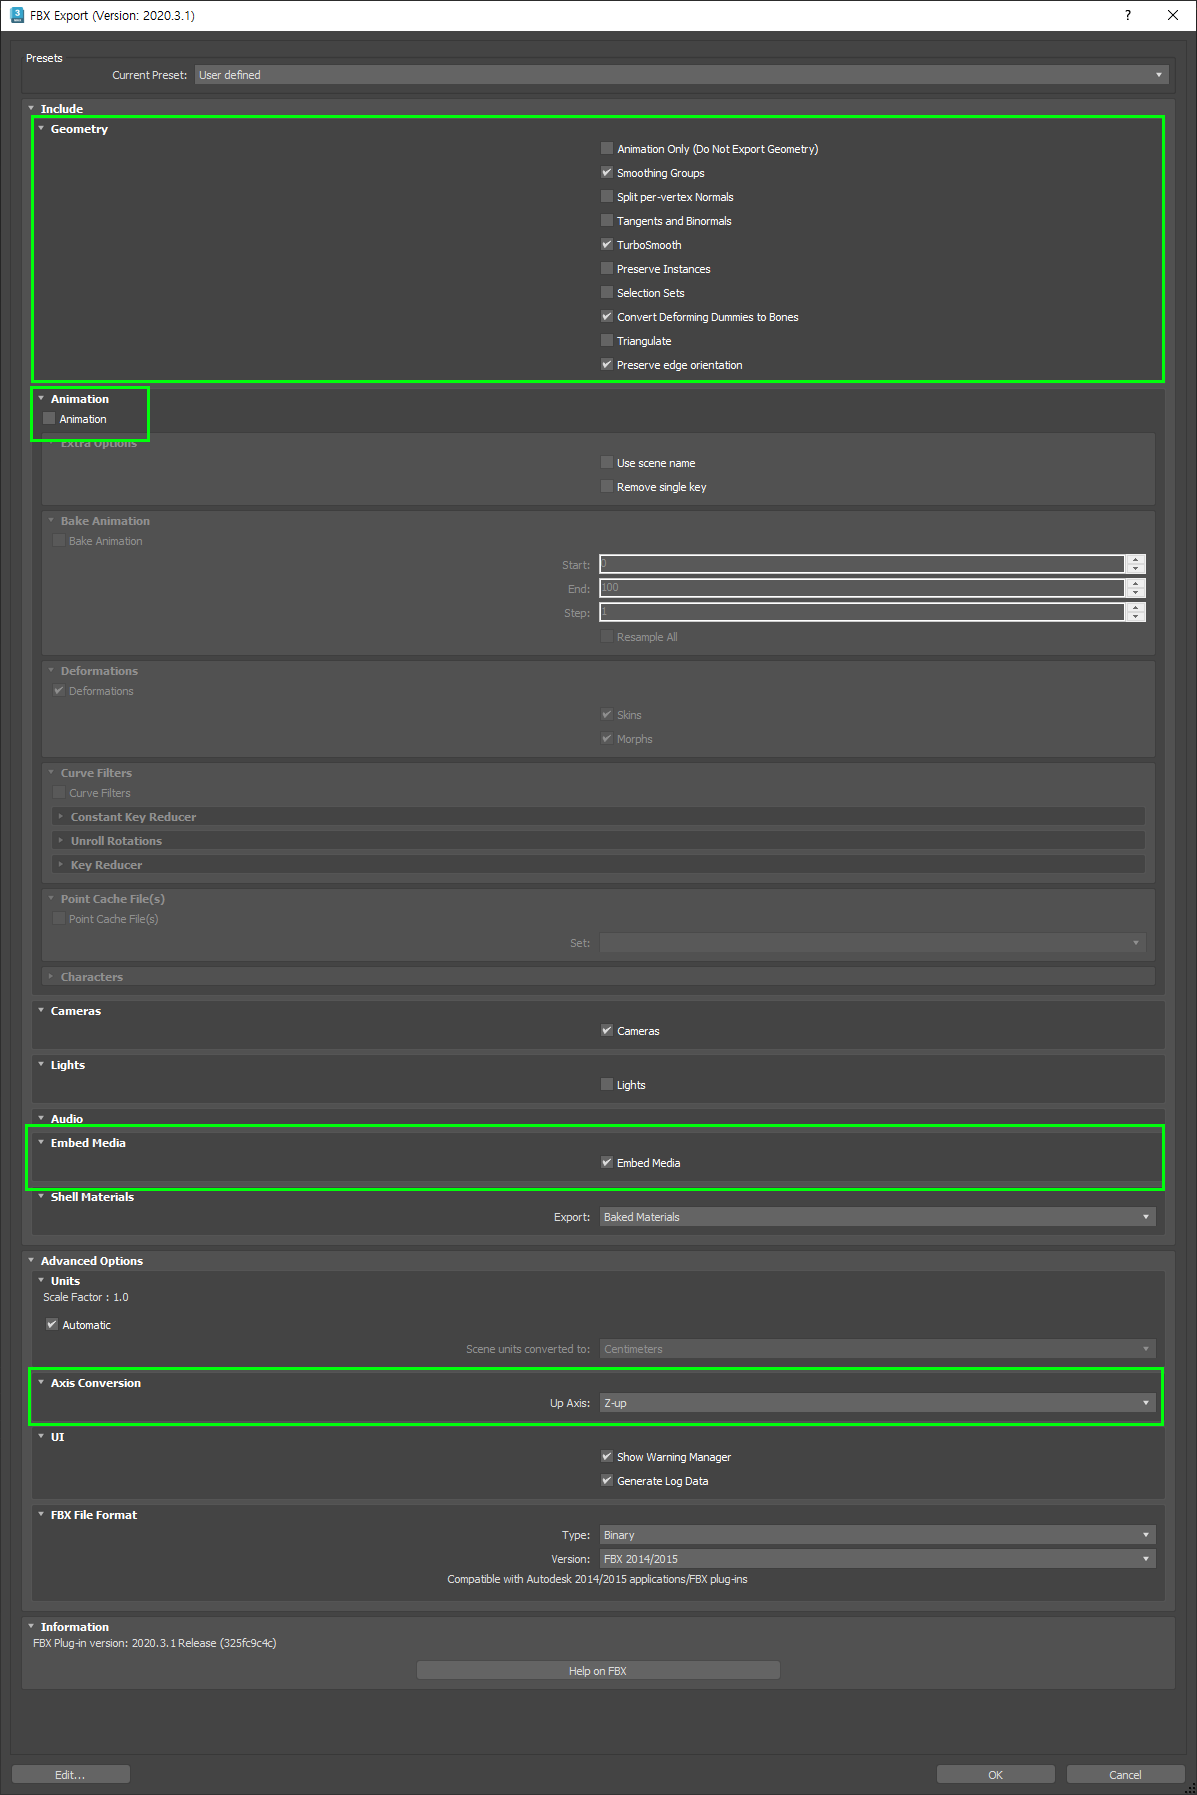
After creating a 3D model, please make sure to check the Export option. For detailed information, please refer to the list below.

* [Exporting - 3ds Max](/creator-guide/3d-modeling/exporting/3ds-max)
* [Exporting - Blender](/creator-guide/3d-modeling/exporting/blender)

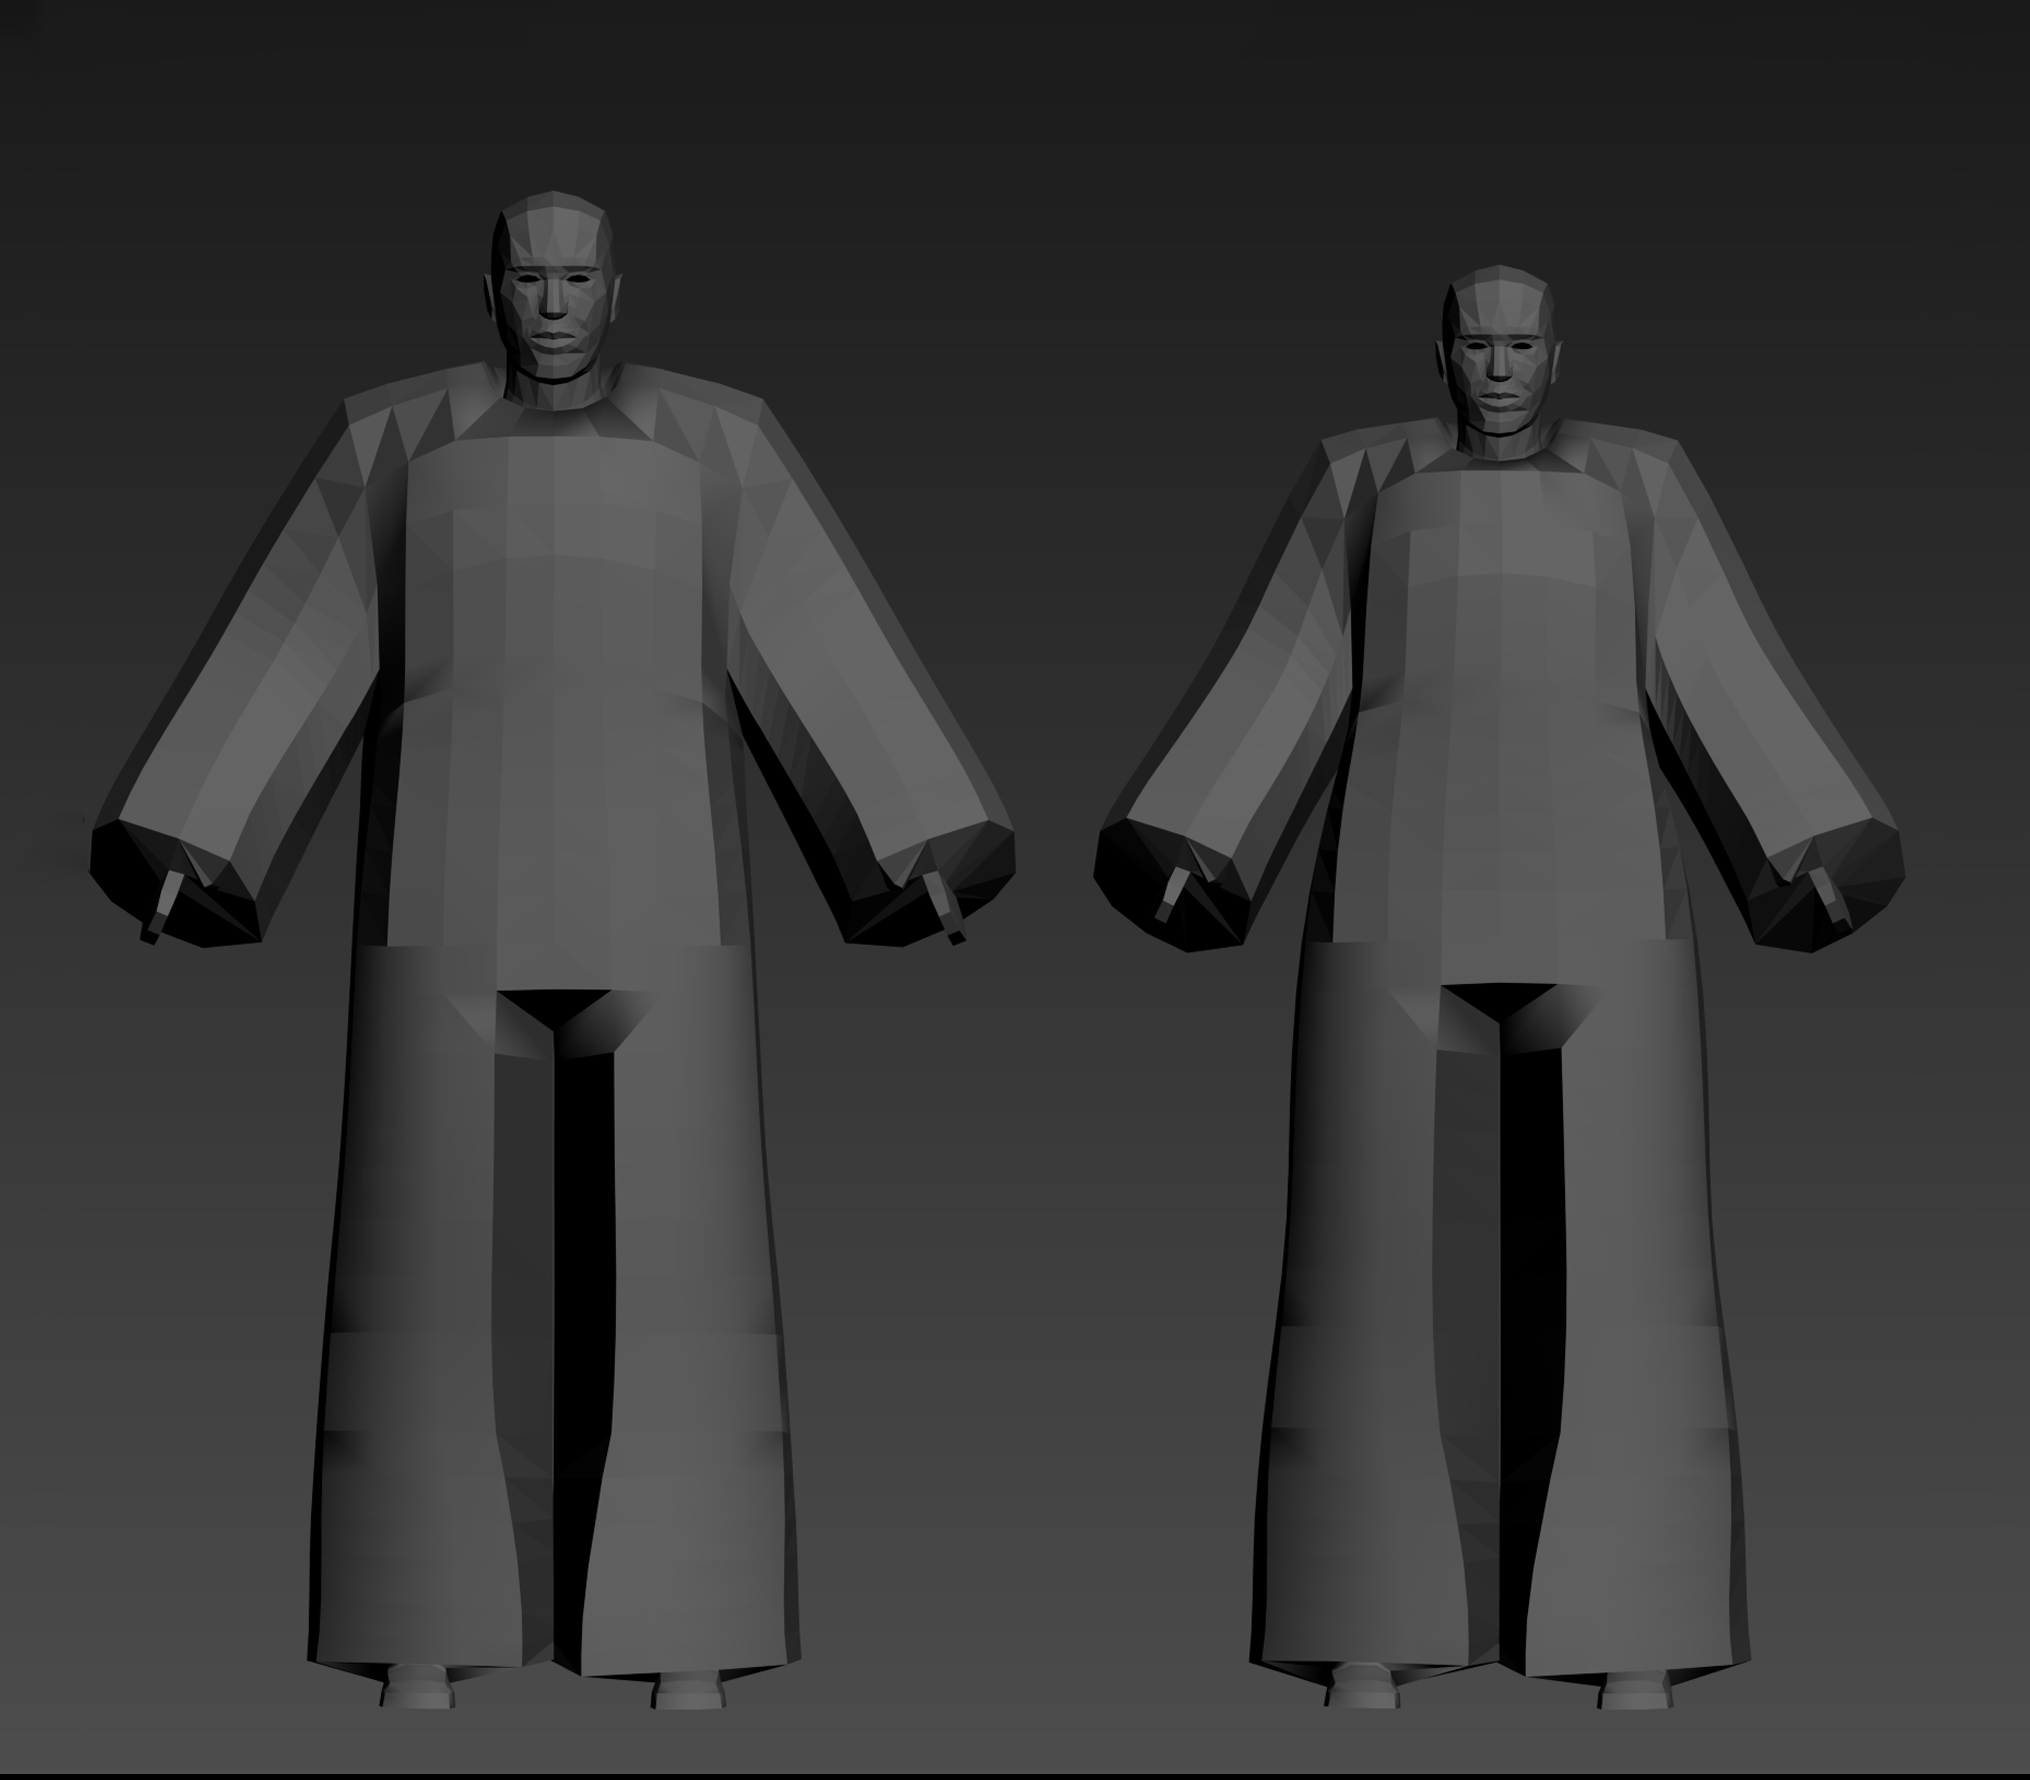
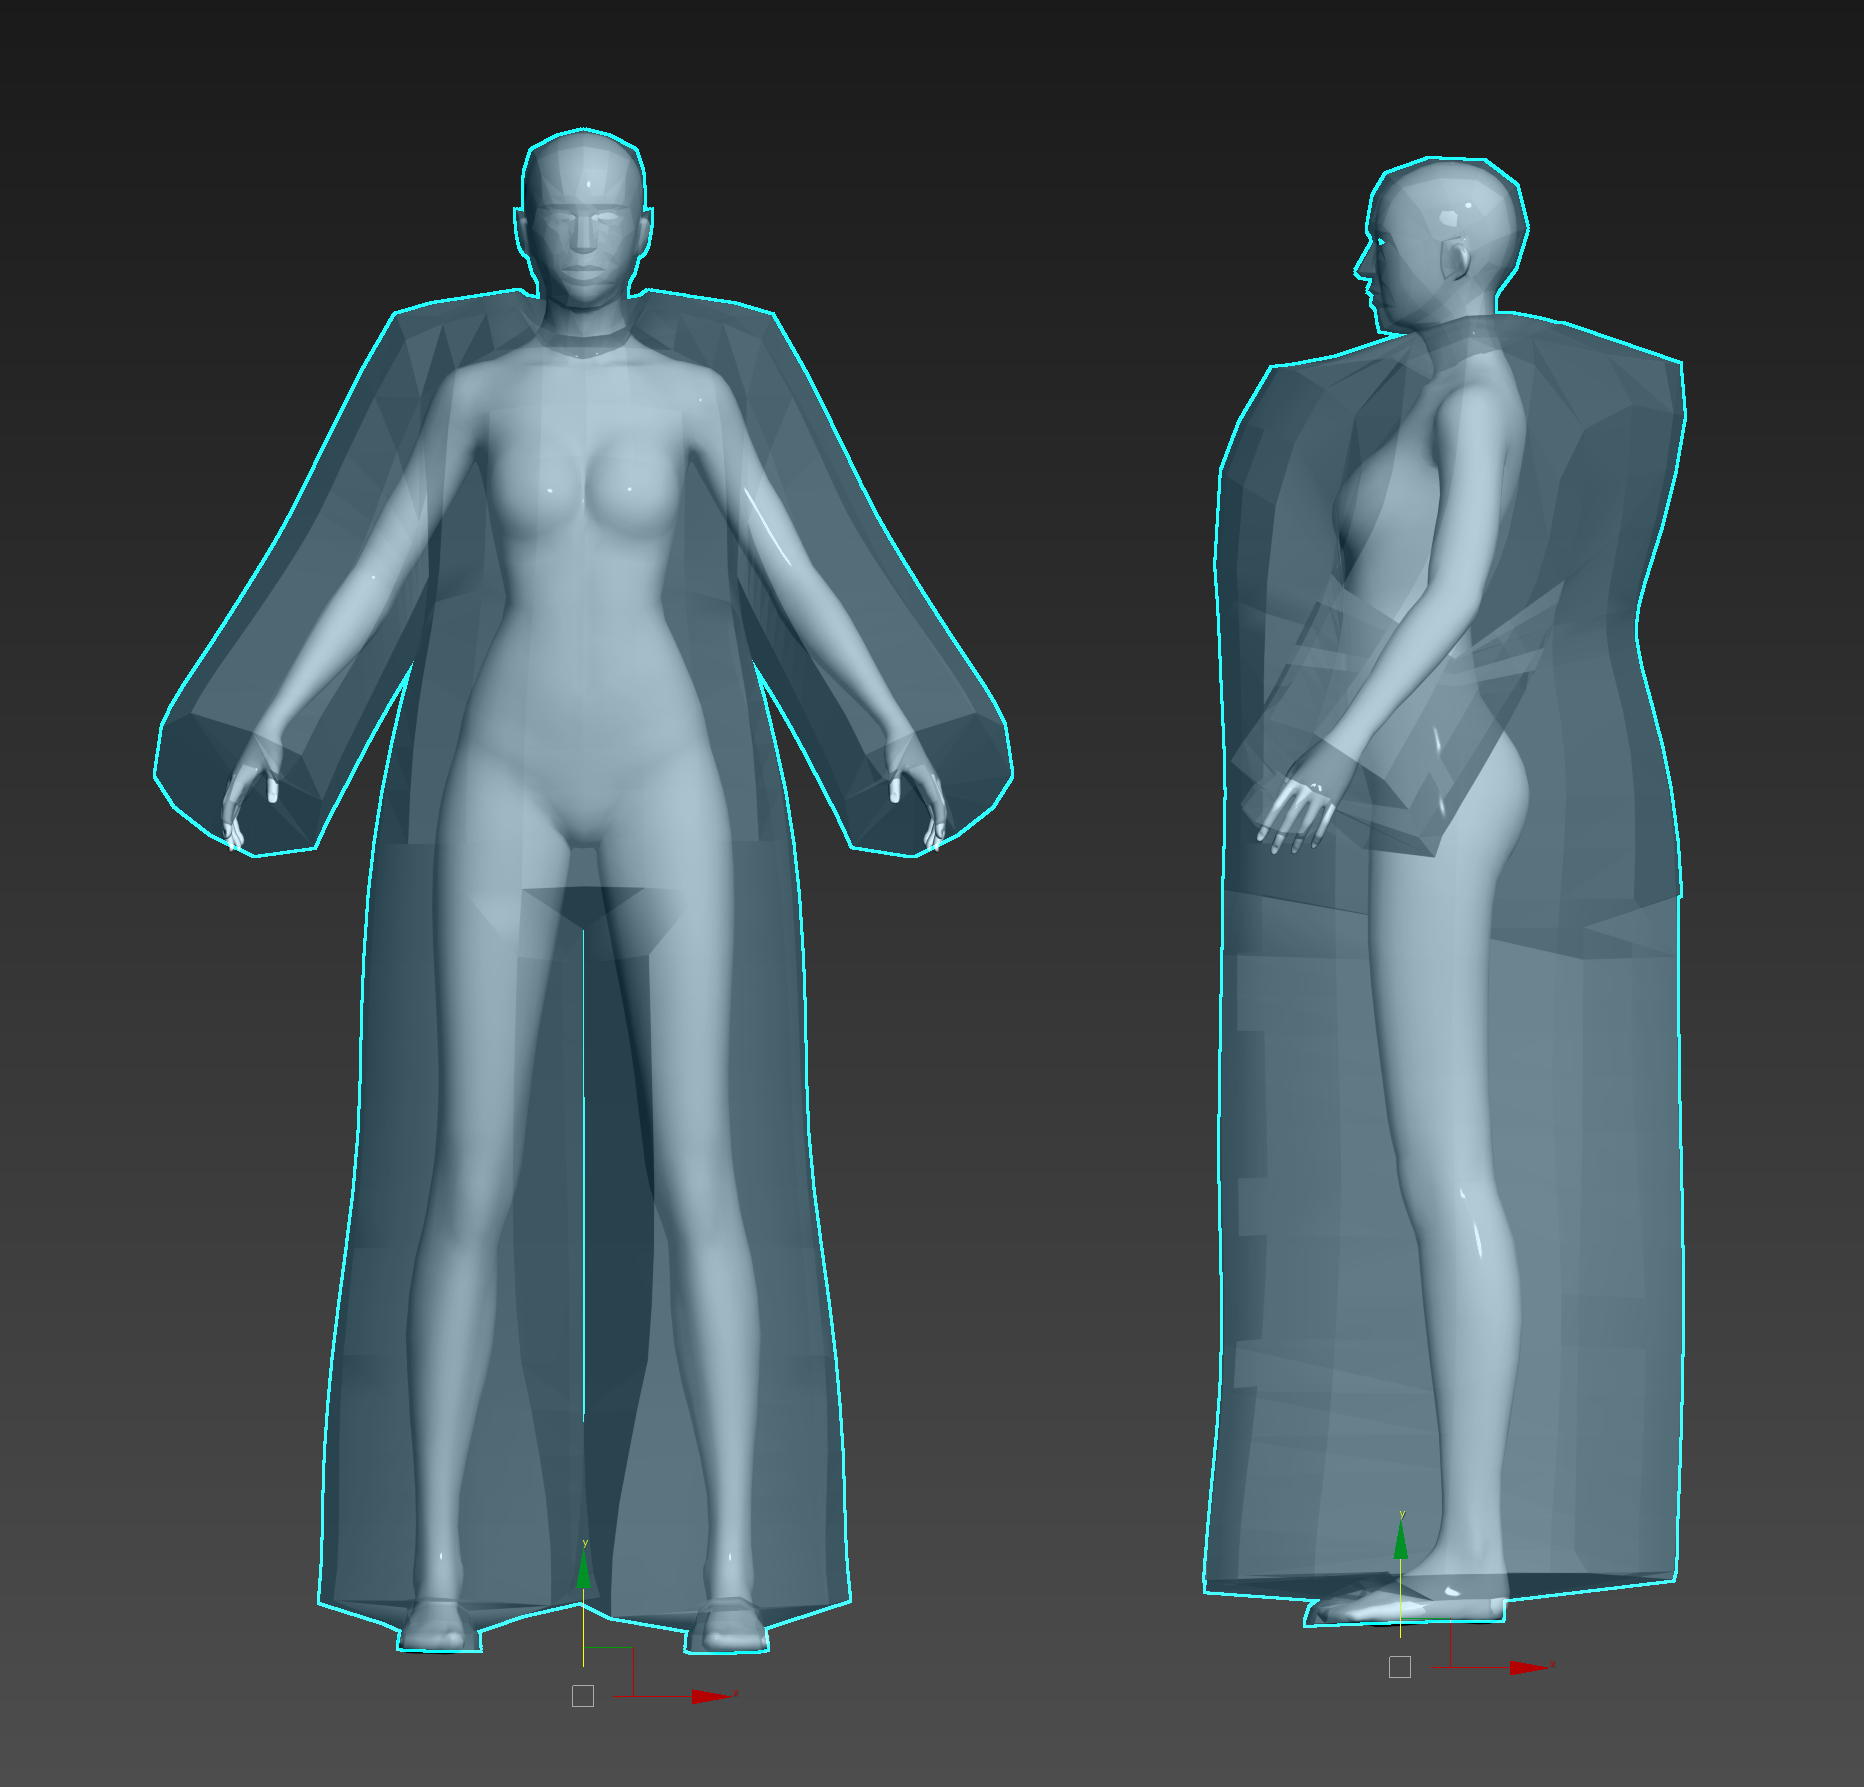
### 5. Mesh Range

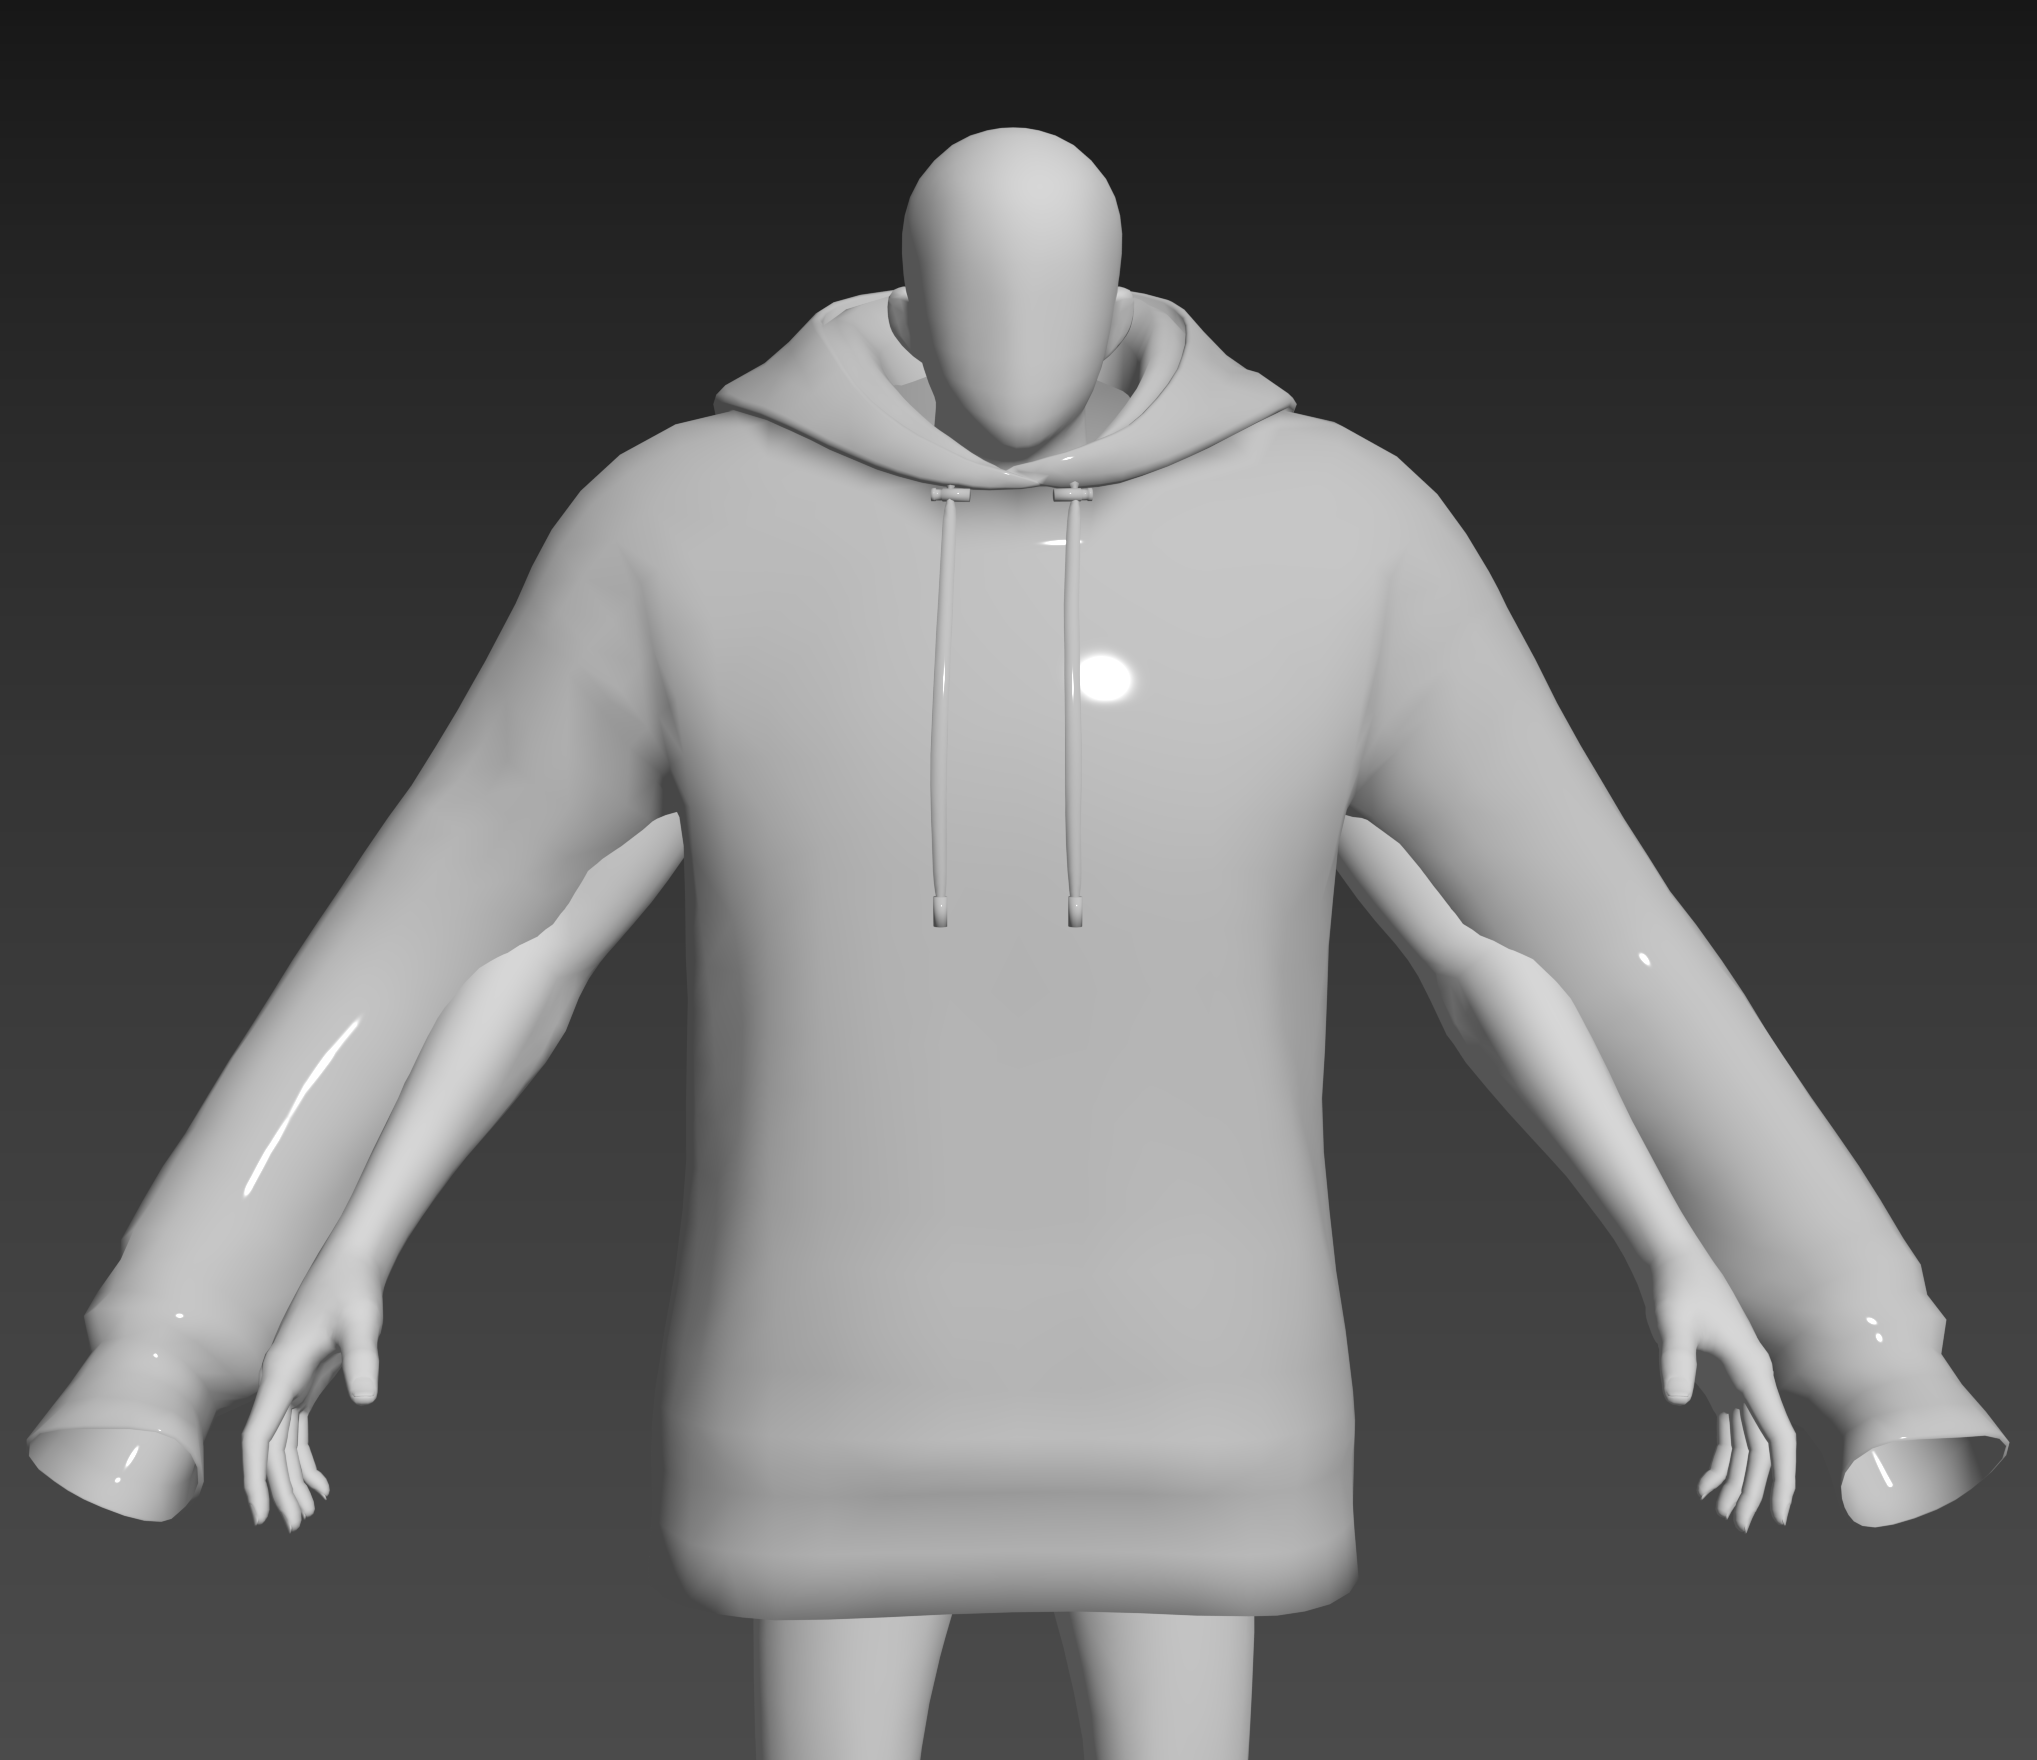
When creating 3D modeling, please ensure that the shape of the clothing does not exceed the boundaries in the files below.

**Male Clothing Range Mesh**

{% file src="/files/ybfFg68JQXyvvW4H05u0" %}

**Female Clothing Range Mesh**

{% file src="/files/mfGFCuqZ4xWUjOslj8M9" %}

<figure><img src="https://328555605-files.gitbook.io/~/files/v0/b/gitbook-x-prod.appspot.com/o/spaces%2Fqbl3tKh4Tqarpg8Dmgw2%2Fuploads%2FJGsCJdf4AtSvaAIgDaU0%2Fimage.png?alt=media&amp;token=9f1fc14e-969d-4094-9065-eba469ff88f0" alt=""><figcaption></figcaption></figure>


# Design Guidelines

The ALTAVA team provides the design guidelines to support creators' freedom of expression, safety, and creativity. During the review process, we review in detail whether the following items are observed or violated.

All creators are responsible for adhering to the provided design guidelines. Even if a model passes the review, we may restrict content without notice if it violates the guidelines. If you consistently violate our design guidelines, your account may be suspended.

## 1. Prohibited content

### 1.1 Exposure and Sexual Content

* Content containing explicit or NSFW content that may cause discomfort or confusion
* Excessive exposure or accentuation of specific body parts
* Content that suggests or overtly depicts sexual objectification

### 1.2 Sensitive Content

1.2.1 Political and Social Issues

* Deliberate depiction or divisive portrayal of topics like race, gender, sexuality, religion, etc.

1.2.2 Trauma

* Use of images or text that may evoke traumatic memories or feelings, such as tragic disasters.

1.2.3 Violence

* Content containing violent, hateful, or cruel images or text, including bruises, scars, tattoos, etc.
* Content that may cause discomfort to others

1.2.4 Profanity/Insults

* Images or text containing profanity, insults, or derogatory language

### 1.3 Copyright Infringement

1.3.1 Invasion of Privacy

* Content featuring specific individuals' faces or body parts without permission. This includes celebrities, public figures, and private individuals
* When using another person's image without permission

1.3.2 Copyright Violation

* Unauthorized reproduction or modification of others' works (characters, photos, images, fonts, etc.)
* Content that evokes or intentionally quotes someone else's creation
* Use or reference of existing content
* Use of content not permitted for commercial use

1.3.3 Trademark Infringement

* Unauthorized use of logos, trademarks, or other symbolic elements may lead to legal issues

### 1.4 Promotional Content

* Content with excessive commercial advertising or sales intent
* Glorification, support, derogation, incitement, or promotion of specific individuals, organizations, or groups
* Text containing QR codes or URLs

### 1.5 Careless Content

* Content that lacks creativity and has significantly low quality

### 1.6 Impersonation and False Information

* Use of images or text containing impersonation or harmful false information

## 2. AI Images

The ALTAVA team strives to create a transparent and responsible creator culture. Please check whether AI-generated images or content are included and indicate their use of AI.

<figure><img src="https://328555605-files.gitbook.io/~/files/v0/b/gitbook-x-prod.appspot.com/o/spaces%2Fqbl3tKh4Tqarpg8Dmgw2%2Fuploads%2FSL44JU5QEZLdUy8h1JCN%2FAI%20(8).png?alt=media&amp;token=f2d2a8b4-282e-4160-993d-219801143c63" alt=""><figcaption></figcaption></figure>


# Setting up Base model

A base model setup is required for creating 3D models in the Altava format. There are various methods for creating 3D models. This guideline covers how to set up the base model using the two programs listed below.

* [3ds Max](/creator-guide/3d-modeling/setting-up-base-model/3ds-max)
* [Blender](/creator-guide/3d-modeling/setting-up-base-model/blender)

Click on the 3D program you want to use for more details.


# 3ds Max

1. Download and open [**3ds Max**](https://www.autodesk.co.kr/products/3ds-max/overview?term=1-YEAR\&tab=subscription).

{% hint style="info" %}
**2023 version or lower recommended**&#x20;
{% endhint %}

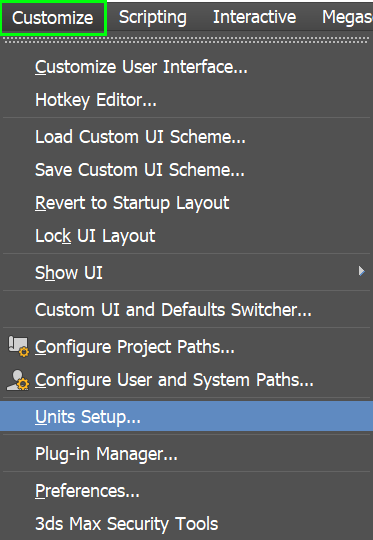
2. Select **\[Customize] - \[Units Setup]**

<figure><img src="https://328555605-files.gitbook.io/~/files/v0/b/gitbook-x-prod.appspot.com/o/spaces%2Fqbl3tKh4Tqarpg8Dmgw2%2Fuploads%2FAvxCufxrAUD6OiZ5zzc4%2F%EC%9C%A0%EB%8B%9B%EC%85%8B%EC%97%85_1.png?alt=media&amp;token=eb14fb1a-e9e4-466d-8cbb-87d4f8707a7d" alt=""><figcaption></figcaption></figure>

3. Select **\[Display Unit Scale] - \[Metric] - \[Centimeters]**

<figure><img src="https://328555605-files.gitbook.io/~/files/v0/b/gitbook-x-prod.appspot.com/o/spaces%2Fqbl3tKh4Tqarpg8Dmgw2%2Fuploads%2F7jYDmYPZhgb2MGSR2pZJ%2F%EC%9C%A0%EB%8B%9B%EC%85%8B%EC%97%85_2.png?alt=media&amp;token=e2029996-f665-4686-88e2-8c012fa52c9d" alt=""><figcaption></figcaption></figure>

4. Make sure **\[1 Unit - 1.0 Centimeters]** is selected and press the **\[OK]** button.

<figure><img src="https://328555605-files.gitbook.io/~/files/v0/b/gitbook-x-prod.appspot.com/o/spaces%2Fqbl3tKh4Tqarpg8Dmgw2%2Fuploads%2FaKHJgus6bOWAGW4MYPWG%2Fimage.png?alt=media&amp;token=c0dfd17a-7e35-4a34-92a3-45d1b1122ae1" alt=""><figcaption></figcaption></figure>

4. Import Base Model FBX file.\
   \[File] - \[Import] - \[**M\_Mannequin.FBX  or F\_Mannequin.FBX**] **file**

<figure><img src="https://328555605-files.gitbook.io/~/files/v0/b/gitbook-x-prod.appspot.com/o/spaces%2Fqbl3tKh4Tqarpg8Dmgw2%2Fuploads%2FV18m0uQ1NEeRqHChFcKV%2F%EC%9E%84%ED%8F%AC%ED%8A%B81.png?alt=media&amp;token=1f2b7b82-4095-4a00-8e5b-ffab95140d96" alt=""><figcaption></figcaption></figure>

6. Check \[**Geometry] - \[Smoothing Groups]**

<figure><img src="https://328555605-files.gitbook.io/~/files/v0/b/gitbook-x-prod.appspot.com/o/spaces%2Fqbl3tKh4Tqarpg8Dmgw2%2Fuploads%2Fl5KhLlH59Wb9RWyn7mHg%2F%EC%9E%84%ED%8F%AC%ED%8A%B82.png?alt=media&amp;token=fff9870d-32dd-477c-aa5d-76e3cbc1cc05" alt=""><figcaption></figcaption></figure>

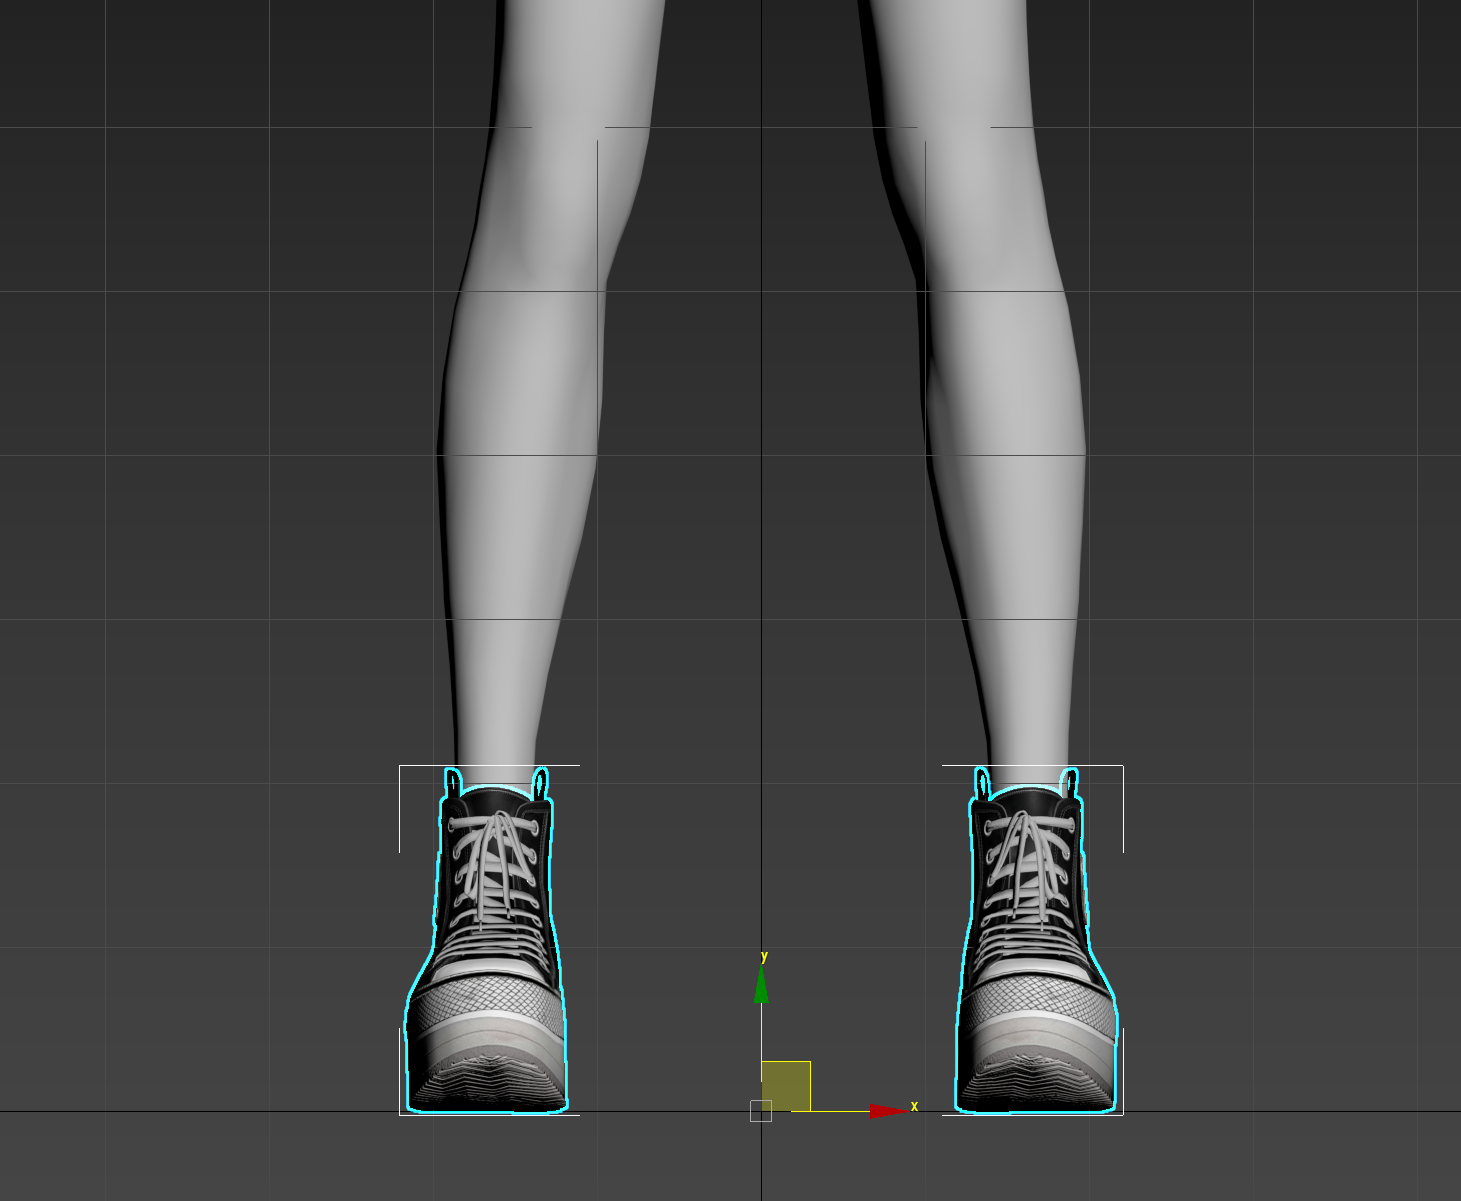
7. Check the Pivot position. **(X:0.0cm , Y:0.0cm , Z:0.0cm)**

<figure><img src="https://328555605-files.gitbook.io/~/files/v0/b/gitbook-x-prod.appspot.com/o/spaces%2Fqbl3tKh4Tqarpg8Dmgw2%2Fuploads%2F8Ve5YOFS3JBrtd33BsA2%2Fimage.png?alt=media&amp;token=acbaf352-2963-4fe7-9b8e-46bc10984930" alt=""><figcaption></figcaption></figure>

<figure><img src="https://328555605-files.gitbook.io/~/files/v0/b/gitbook-x-prod.appspot.com/o/spaces%2Fqbl3tKh4Tqarpg8Dmgw2%2Fuploads%2FOrNpqMZWlLO37gHuBRiE%2Fimage.png?alt=media&amp;token=0323a324-ceed-4b9c-9ca1-2472e96ba10d" alt=""><figcaption></figcaption></figure>

<figure><img src="https://328555605-files.gitbook.io/~/files/v0/b/gitbook-x-prod.appspot.com/o/spaces%2Fqbl3tKh4Tqarpg8Dmgw2%2Fuploads%2FW9ohmQxB6d61k6rL5y2n%2F%ED%94%BC%EB%B4%872.png?alt=media&amp;token=310709b5-5b84-413a-ad7d-8bb08fa07d36" alt=""><figcaption><p>X:0.0cm , Y:0.0cm , Z:0.0cm</p></figcaption></figure>


# Blender

1. Download and open [Blender](https://www.blender.org/download/).
2. Press the **A key** to select everything and then press the **Delete** key to remove everything in the Scene.
3. Import Base Model FBX file. \
   **\[File] - \[Import] - \[M\_Mannequin.FBX or F\_Mannequin.FBX]** file

<figure><img src="https://328555605-files.gitbook.io/~/files/v0/b/gitbook-x-prod.appspot.com/o/spaces%2Fqbl3tKh4Tqarpg8Dmgw2%2Fuploads%2Ffm8OM7mC9rrVmNpRVMcI%2Fblender_import_fbx.png?alt=media&amp;token=028521f2-0721-4159-8c92-d3be361e0f9d" alt=""><figcaption></figcaption></figure>

4. Check **\[Transform] - \[Apply Transform]**

<figure><img src="https://328555605-files.gitbook.io/~/files/v0/b/gitbook-x-prod.appspot.com/o/spaces%2Fqbl3tKh4Tqarpg8Dmgw2%2Fuploads%2F4qEuIcKofXGDIvzZVnZ1%2Fblender_import_fbx_transform.png?alt=media&amp;token=bfe8aa99-4830-4fd5-a10b-c584720404bf" alt=""><figcaption></figcaption></figure>

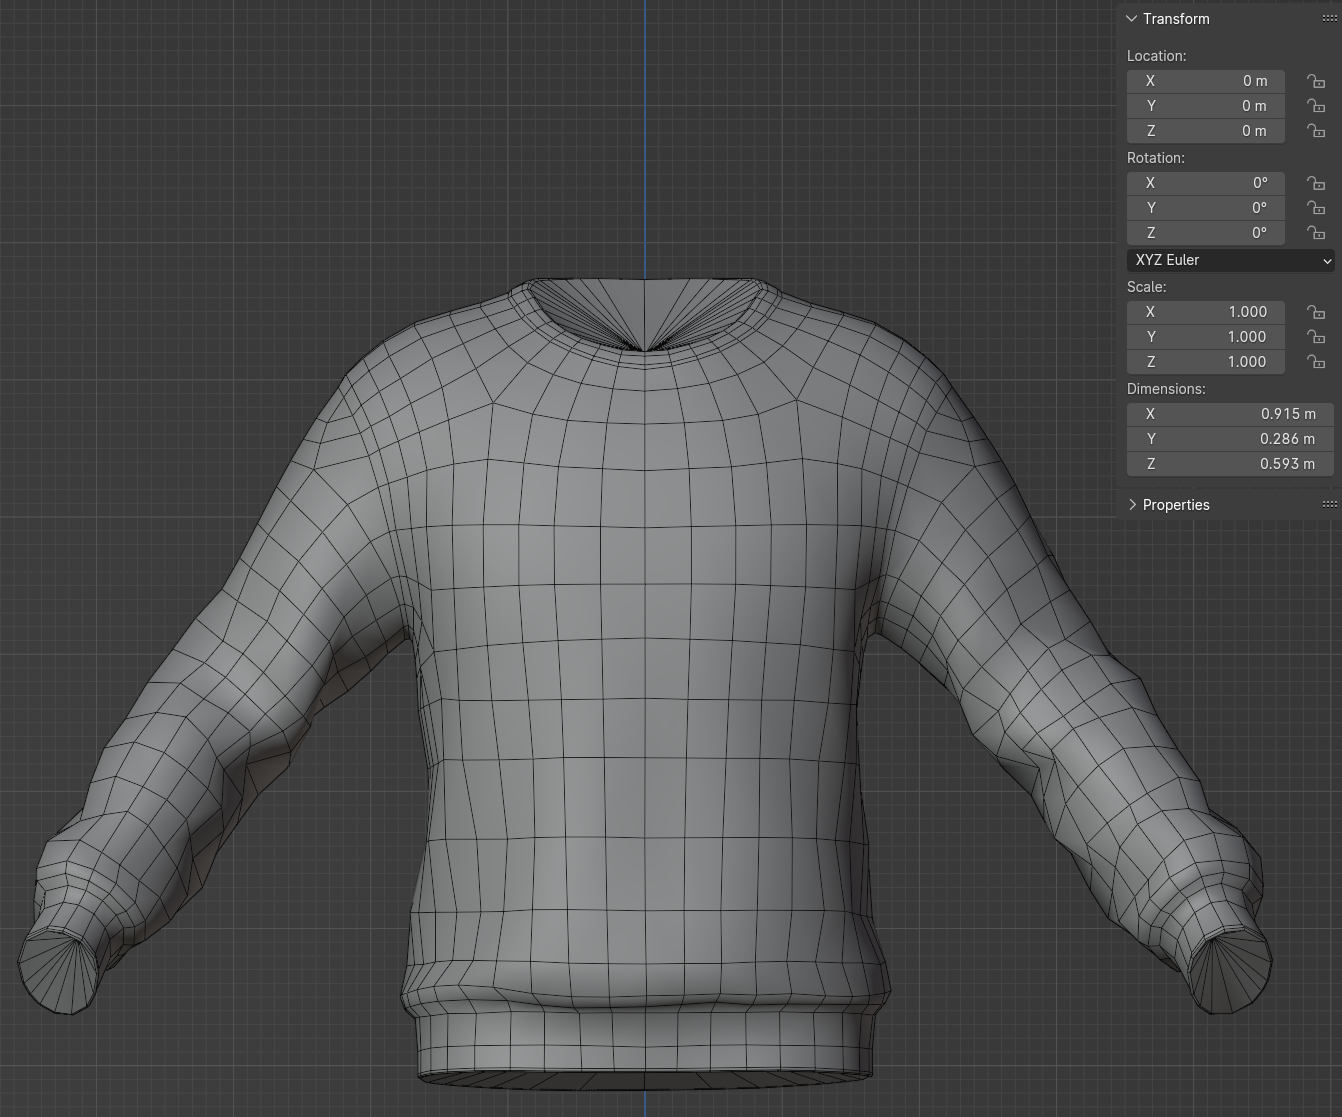
5. Select the object and press the **N** **key** to check t**he Location, Rotation, and Scale values.**

<figure><img src="https://328555605-files.gitbook.io/~/files/v0/b/gitbook-x-prod.appspot.com/o/spaces%2Fqbl3tKh4Tqarpg8Dmgw2%2Fuploads%2FoKX2I5Iv5yCAmwRAzVPb%2Fblender_item_transform.png?alt=media&amp;token=bc9725cc-20dd-4eeb-8e7f-0174551e87cf" alt=""><figcaption><p>[Location, Rotation] X:0, Y:0, Z:0 / [Scale] X:1.000, Y:1.000, Z:1.000</p></figcaption></figure>


# High Polygons

{% hint style="info" %}
This guide is based on ZBrush.\
\
You can create high-polygons using various tools like 3ds Max, Blender, CLO, and Marvelous Designer.
{% endhint %}

## 3ds Max

1. Creating a base mesh in 3dsMax

<figure><img src="https://328555605-files.gitbook.io/~/files/v0/b/gitbook-x-prod.appspot.com/o/spaces%2Fqbl3tKh4Tqarpg8Dmgw2%2Fuploads%2FLynIcqHqUND7v7GW6X6I%2Fimage%20-%202024-04-18T185319.400.png?alt=media&amp;token=adab2912-e68e-4c53-94ce-88b78ca36633" alt=""><figcaption><p><strong>3dsMax</strong></p></figcaption></figure>

2. High-detail expression in Zbrush

<figure><img src="https://328555605-files.gitbook.io/~/files/v0/b/gitbook-x-prod.appspot.com/o/spaces%2Fqbl3tKh4Tqarpg8Dmgw2%2Fuploads%2FDfsLm3umhpKlMV2J20Us%2Fimage.png?alt=media&amp;token=664d9710-3ae0-4fae-a393-eccdd264b659" alt=""><figcaption><p><strong>Zbrush</strong></p></figcaption></figure>

## Marvelous Designer ( CLO )

1. Create patterns using Marvelous Designer

<figure><img src="https://328555605-files.gitbook.io/~/files/v0/b/gitbook-x-prod.appspot.com/o/spaces%2Fqbl3tKh4Tqarpg8Dmgw2%2Fuploads%2F9e7iVa21IForSblm8nYX%2Fimage%20(1).png?alt=media&amp;token=4eb9a3b5-f248-4f14-a698-02e4ea4db8c9" alt=""><figcaption><p>Marvelous Designer</p></figcaption></figure>

<figure><img src="https://328555605-files.gitbook.io/~/files/v0/b/gitbook-x-prod.appspot.com/o/spaces%2Fqbl3tKh4Tqarpg8Dmgw2%2Fuploads%2FegnD7uBnjWoOqhVAZEOg%2Fimage%20(2).png?alt=media&amp;token=befec109-a175-4008-a8f5-d0a8bb76ff9a" alt=""><figcaption><p>Marvelous Designer</p></figcaption></figure>

2. Add polygon cleanup object in Zbrush, high detail expression

<figure><img src="https://328555605-files.gitbook.io/~/files/v0/b/gitbook-x-prod.appspot.com/o/spaces%2Fqbl3tKh4Tqarpg8Dmgw2%2Fuploads%2F42R1zCUtZ80evm20G6tC%2Fimage%20(3).png?alt=media&amp;token=13ea38b3-3121-40df-94e6-9726c3e0c4ac" alt=""><figcaption><p><strong>Zbrush</strong></p></figcaption></figure>

## Style&#x20;

Before creating the 3D model, collecting various reference materials can be helpful.

<figure><img src="https://328555605-files.gitbook.io/~/files/v0/b/gitbook-x-prod.appspot.com/o/spaces%2Fqbl3tKh4Tqarpg8Dmgw2%2Fuploads%2FhhZOcZTUh0obi97igWhY%2Fimage.png?alt=media&amp;token=27e8525b-1a1b-4fed-b67b-1d50147bea3d" alt=""><figcaption></figcaption></figure>

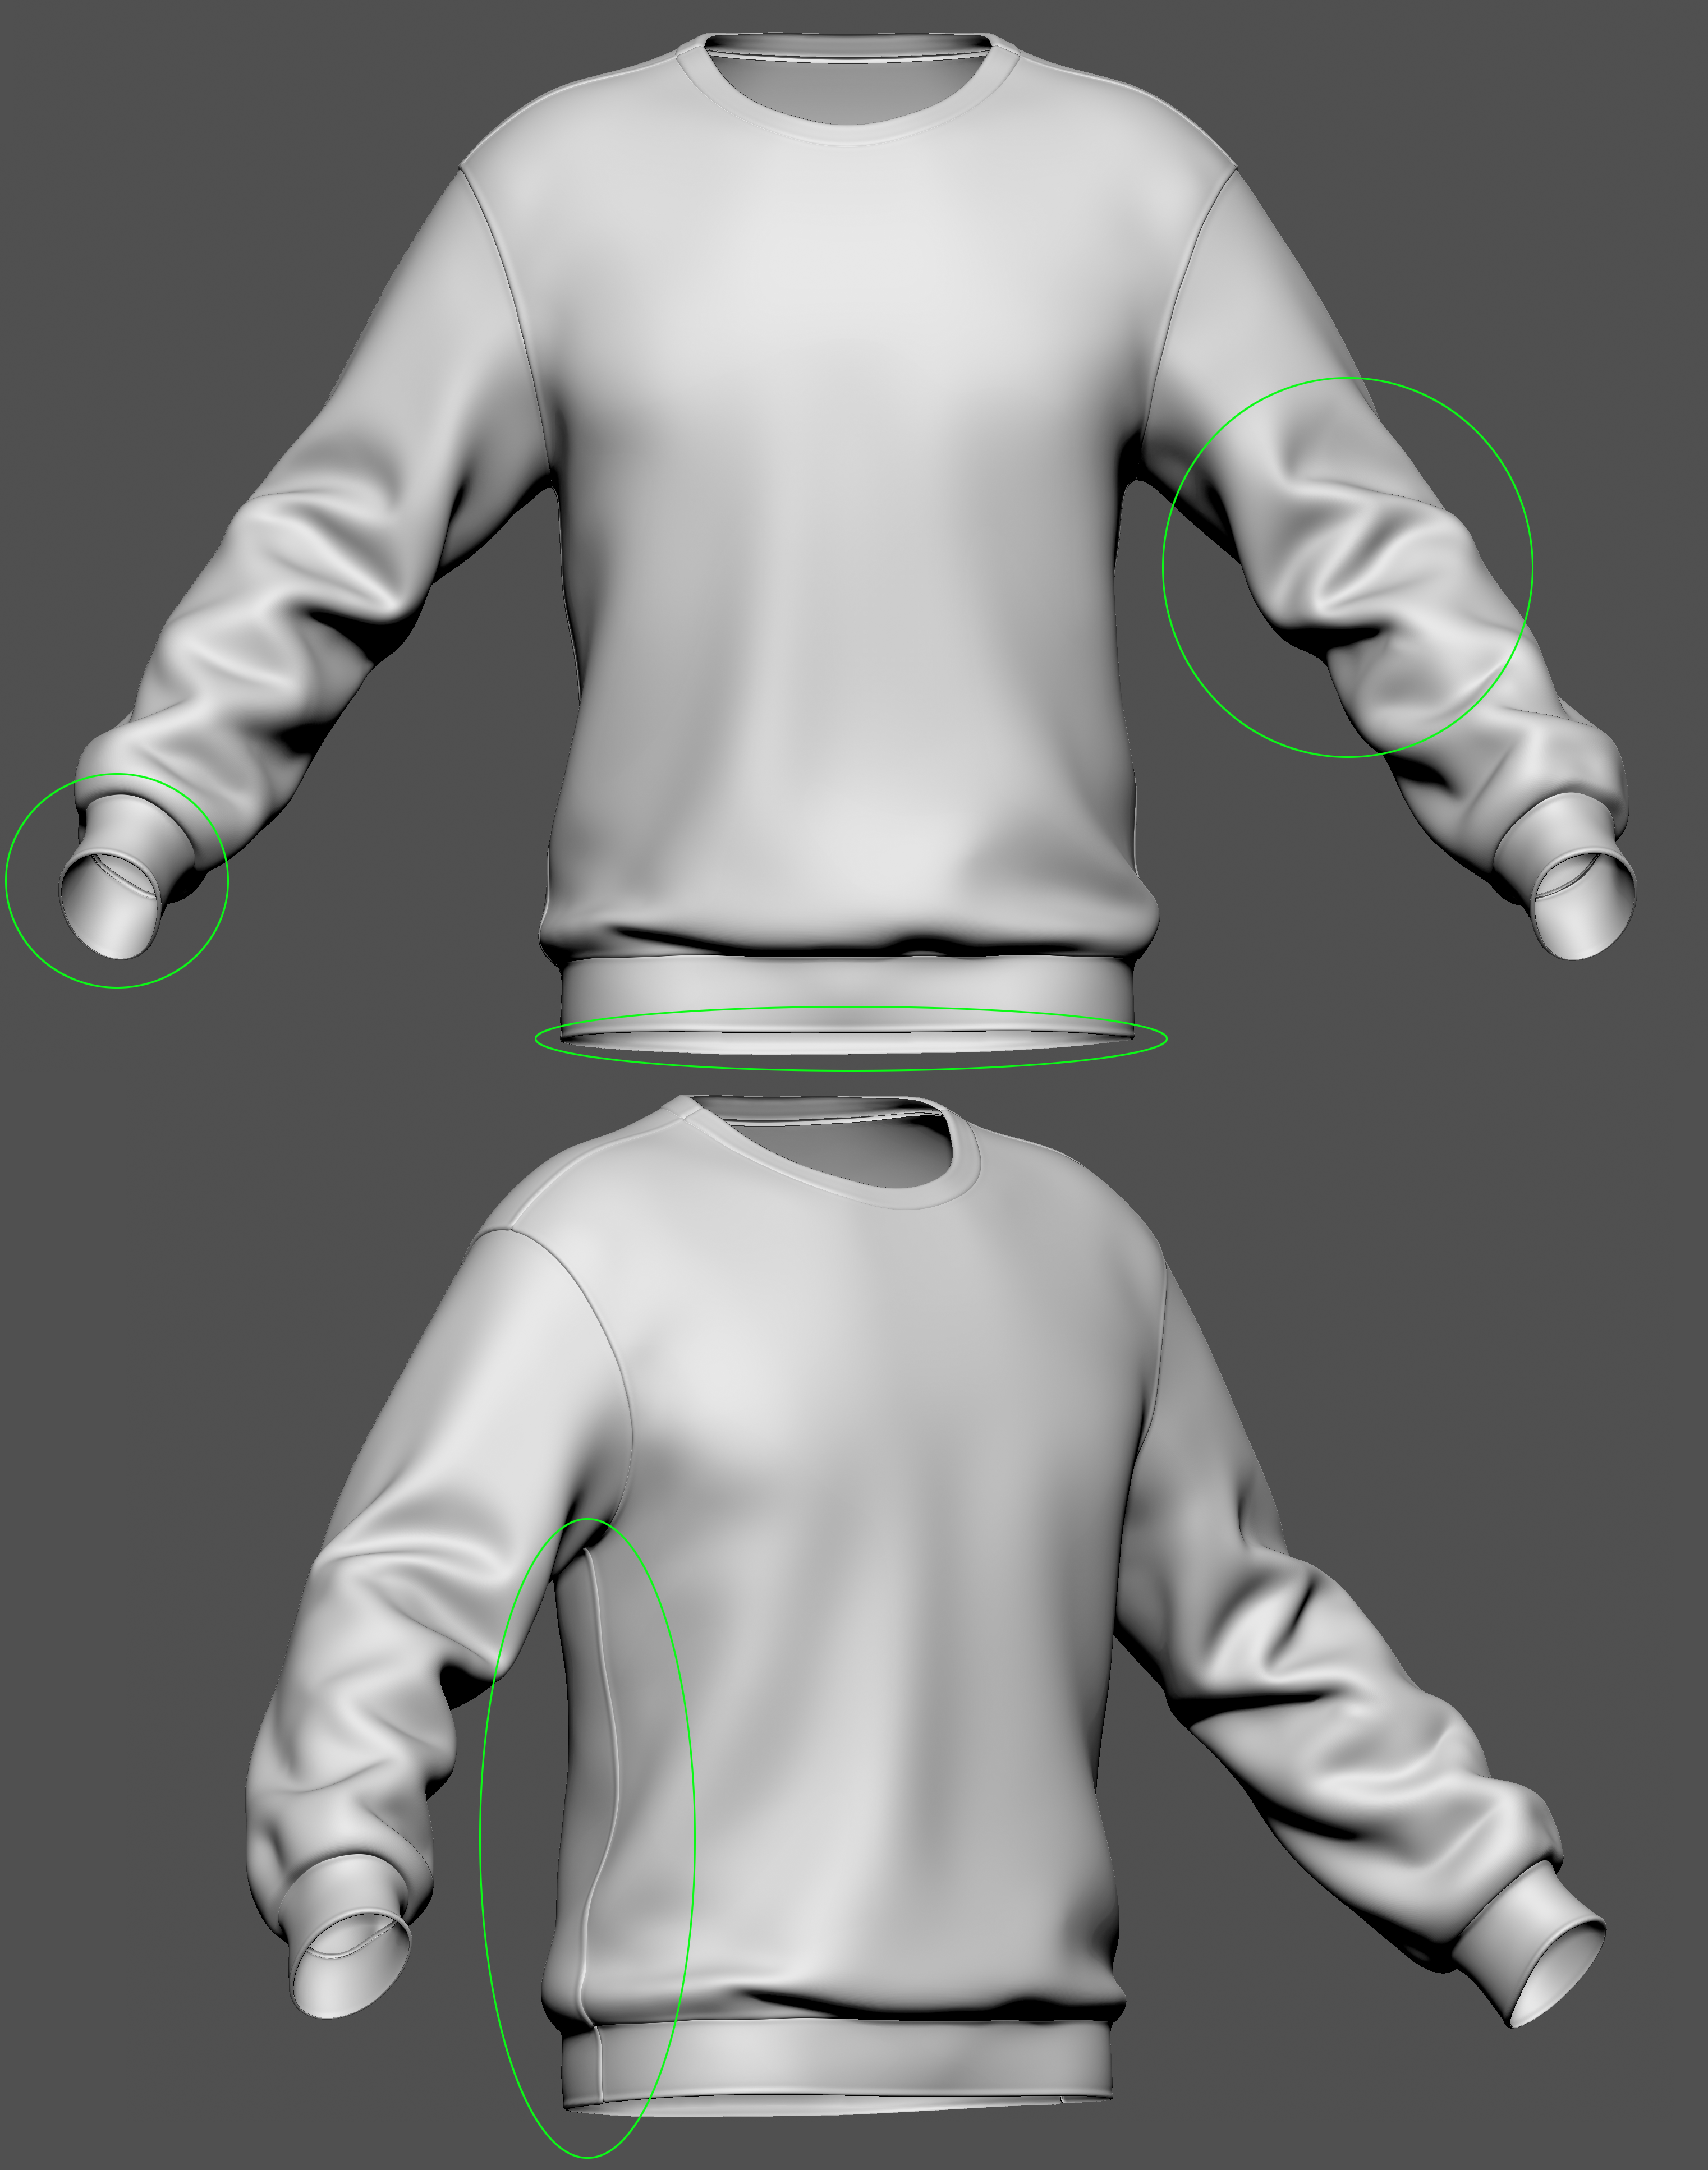
Express folds based on the characteristics of the fabric.

Natural folds created by the thickness of leather, cotton, denim, knit, silk, etc.

{% hint style="info" %}
Express the fit and gravitational fold of the clothing.
{% endhint %}

<figure><img src="https://328555605-files.gitbook.io/~/files/v0/b/gitbook-x-prod.appspot.com/o/spaces%2Fqbl3tKh4Tqarpg8Dmgw2%2Fuploads%2FYgh1iZLocGbrG7IYAYXS%2Fimage.png?alt=media&amp;token=08c7c530-cc5d-45a7-9a0e-e96648fad53b" alt=""><figcaption></figcaption></figure>

{% hint style="info" %}
Prioritize large silhouettes over too many small folds.
{% endhint %}

<figure><img src="https://328555605-files.gitbook.io/~/files/v0/b/gitbook-x-prod.appspot.com/o/spaces%2Fqbl3tKh4Tqarpg8Dmgw2%2Fuploads%2FPUUm5A4fVwOIzng4XpdC%2Fimage.png?alt=media&amp;token=3440d838-245d-4573-b898-aec84ccc400b" alt=""><figcaption></figcaption></figure>

{% hint style="info" %}
Make the large silhouette symmetrical if possible.
{% endhint %}

<figure><img src="https://328555605-files.gitbook.io/~/files/v0/b/gitbook-x-prod.appspot.com/o/spaces%2Fqbl3tKh4Tqarpg8Dmgw2%2Fuploads%2F7TXJnvBTEbSlEhw5pmD5%2Fimage.png?alt=media&amp;token=5e403797-7768-42a1-8aa1-5e05e883c0c0" alt=""><figcaption></figcaption></figure>

<figure><img src="https://328555605-files.gitbook.io/~/files/v0/b/gitbook-x-prod.appspot.com/o/spaces%2Fqbl3tKh4Tqarpg8Dmgw2%2Fuploads%2FFGS4tqClbZWr0wQclfVP%2Fimage.png?alt=media&amp;token=cddec78d-e808-4e31-86f7-a851195aa474" alt=""><figcaption></figcaption></figure>

{% hint style="warning" %}
Detail the part where the center of attention is focused asymmetrically.
{% endhint %}

<figure><img src="https://328555605-files.gitbook.io/~/files/v0/b/gitbook-x-prod.appspot.com/o/spaces%2Fqbl3tKh4Tqarpg8Dmgw2%2Fuploads%2FwpYxw3pwexZx6VLX8pec%2Fimage.png?alt=media&amp;token=28f3a499-dc5f-470c-acba-c9b74121f1fe" alt=""><figcaption></figcaption></figure>

{% hint style="info" %}
Clearly express the characteristics of the attire type (folds held by belts and rubber bands at the waist, etc.)
{% endhint %}

<figure><img src="https://328555605-files.gitbook.io/~/files/v0/b/gitbook-x-prod.appspot.com/o/spaces%2Fqbl3tKh4Tqarpg8Dmgw2%2Fuploads%2Fwj0m4L2LTswqAonhpDXY%2Fimage.png?alt=media&amp;token=d4869269-9135-4074-8a0b-0020848d7355" alt=""><figcaption></figcaption></figure>

<figure><img src="https://328555605-files.gitbook.io/~/files/v0/b/gitbook-x-prod.appspot.com/o/spaces%2Fqbl3tKh4Tqarpg8Dmgw2%2Fuploads%2FZ5T8pLw9MmO9LGX33Ixc%2Fimage.png?alt=media&amp;token=9c9af6cf-8bfc-429e-96c7-a18428643fb3" alt=""><figcaption></figcaption></figure>

<figure><img src="https://328555605-files.gitbook.io/~/files/v0/b/gitbook-x-prod.appspot.com/o/spaces%2Fqbl3tKh4Tqarpg8Dmgw2%2Fuploads%2FOBto9DpptwvuHvRKZHwf%2Fimage.png?alt=media&amp;token=d773d5a4-b294-4fb4-a796-5c5cd8cf295d" alt=""><figcaption></figcaption></figure>

{% hint style="info" %}
In case of accessories, divide objects rather than express them as a single piece.
{% endhint %}

<figure><img src="https://328555605-files.gitbook.io/~/files/v0/b/gitbook-x-prod.appspot.com/o/spaces%2Fqbl3tKh4Tqarpg8Dmgw2%2Fuploads%2FX1WcsUPwgnYjvVtCqpXy%2Fimage.png?alt=media&amp;token=d5cb8e25-5af6-403f-9cf6-5a41a42b9337" alt=""><figcaption></figcaption></figure>

{% hint style="info" %}
Detail the stitching characteristics and joints.
{% endhint %}

<figure><img src="https://328555605-files.gitbook.io/~/files/v0/b/gitbook-x-prod.appspot.com/o/spaces%2Fqbl3tKh4Tqarpg8Dmgw2%2Fuploads%2F58da0eWbyJpjfRCMU4ca%2Fimage.png?alt=media&amp;token=e6834210-44a6-465d-8060-7aa4f3e2cc5d" alt=""><figcaption></figcaption></figure>

{% hint style="success" %}

* Refer to the silhouette of the attire based on references.&#x20;
* The fold representation should consider the characteristics of the fabric material to avoid awkwardness.
* &#x20;Clear detailing is essential in 3D for effective representation.&#x20;
* It's best to neatly and clearly finish the ends.
  {% endhint %}

<figure><img src="https://328555605-files.gitbook.io/~/files/v0/b/gitbook-x-prod.appspot.com/o/spaces%2Fqbl3tKh4Tqarpg8Dmgw2%2Fuploads%2FpDYWodVfJThJdFbjWuby%2Fimage.png?alt=media&amp;token=a92ab844-ec15-40da-956d-e332f82ae99a" alt=""><figcaption></figcaption></figure>

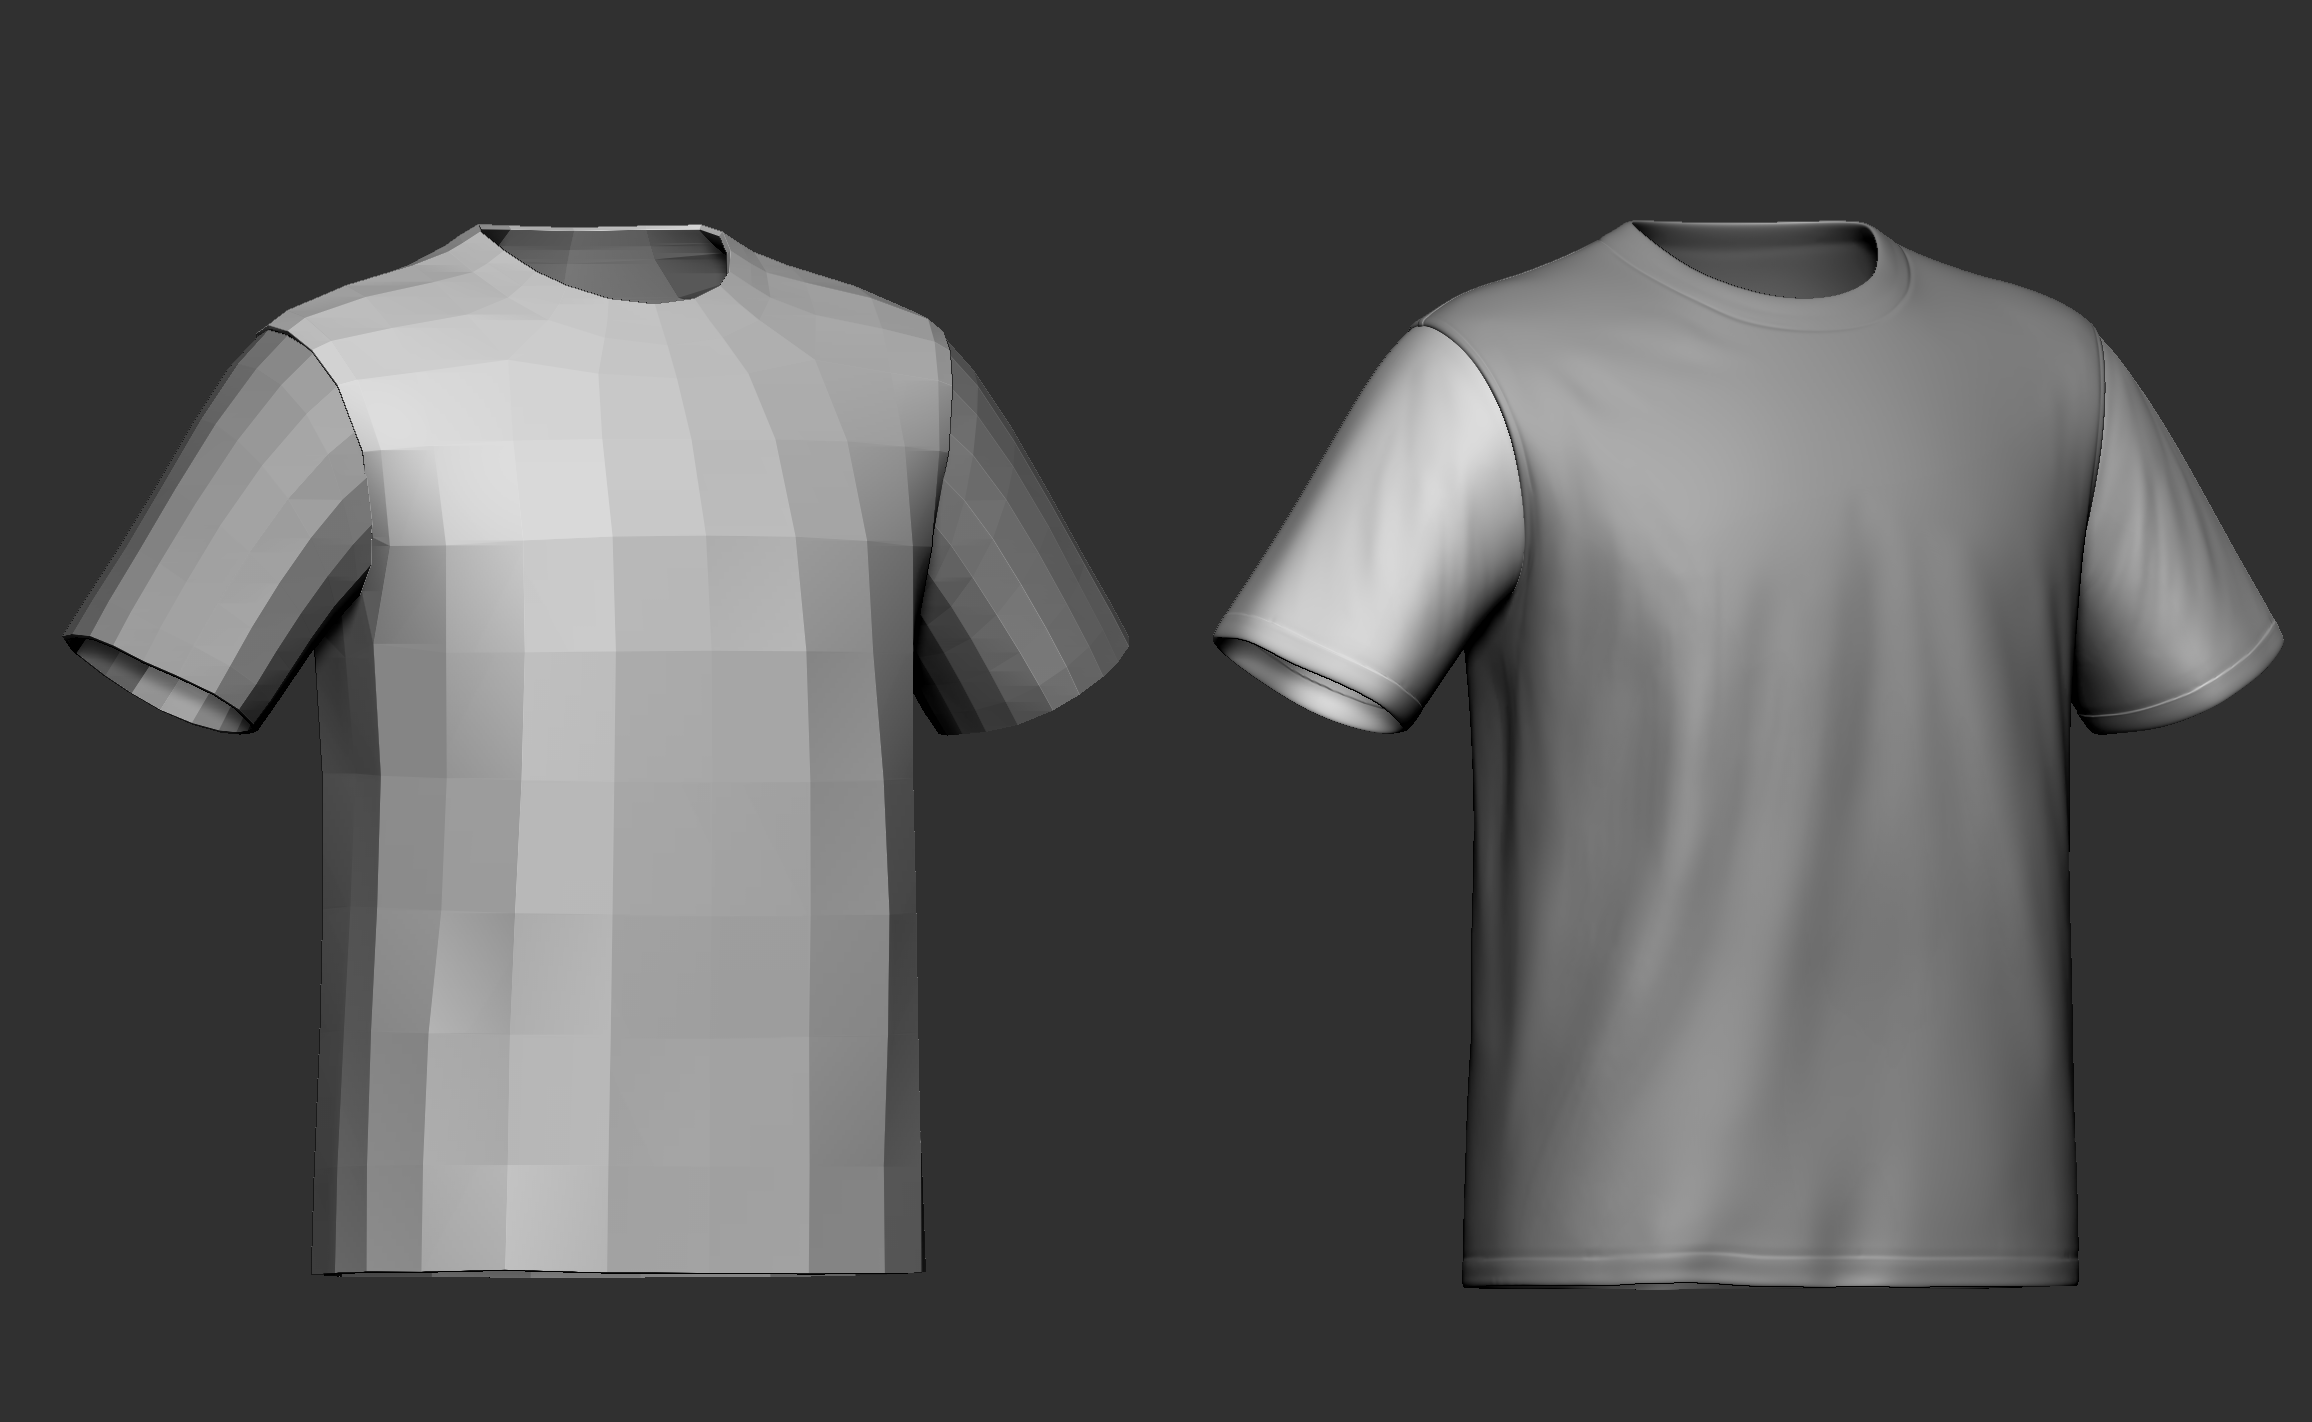
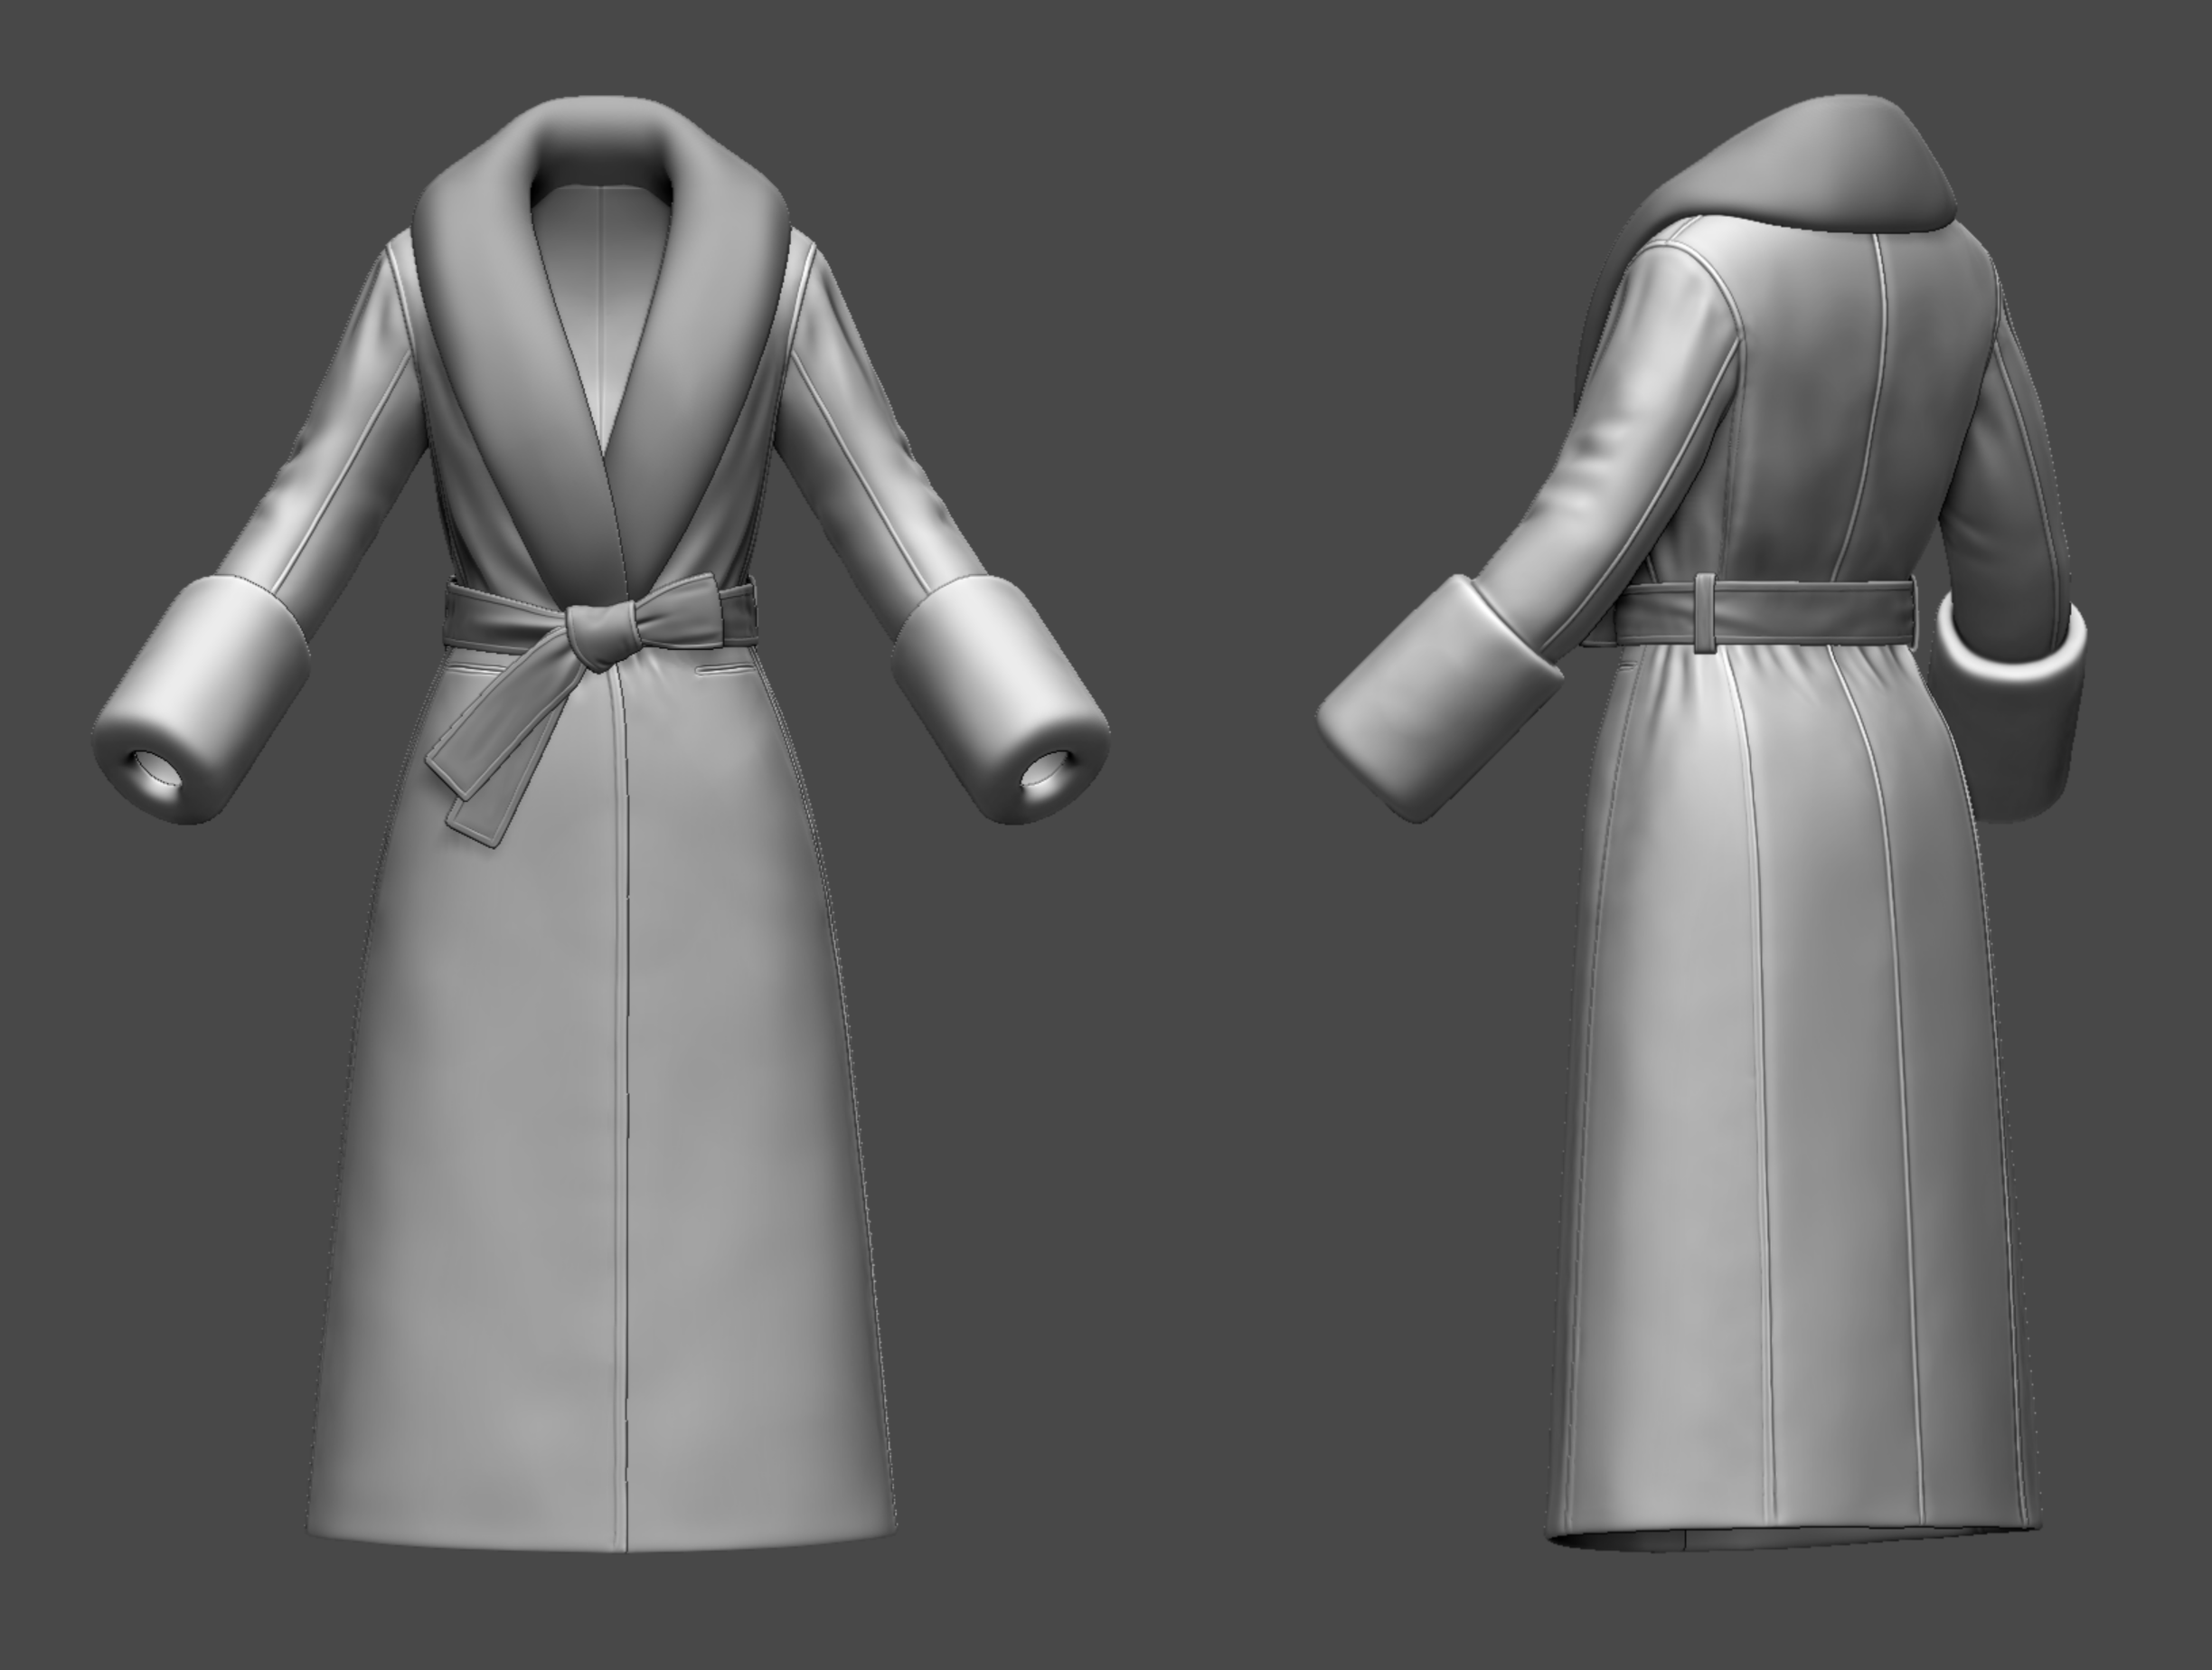
## **Examples of ALTAVA 3D models with highpoly**

<figure><img src="https://328555605-files.gitbook.io/~/files/v0/b/gitbook-x-prod.appspot.com/o/spaces%2Fqbl3tKh4Tqarpg8Dmgw2%2Fuploads%2FGGeFVpJw96hEiK2na80Z%2Fimage.png?alt=media&amp;token=52db3c04-d5bb-49ae-b639-af2f012df1d4" alt=""><figcaption></figcaption></figure>

<figure><img src="https://328555605-files.gitbook.io/~/files/v0/b/gitbook-x-prod.appspot.com/o/spaces%2Fqbl3tKh4Tqarpg8Dmgw2%2Fuploads%2Fv4Dm2qMwIqMBMQRMu9Fq%2Fimage.png?alt=media&amp;token=5b3d87bd-9ede-4130-a411-8dadaca7927e" alt=""><figcaption></figcaption></figure>

<figure><img src="https://328555605-files.gitbook.io/~/files/v0/b/gitbook-x-prod.appspot.com/o/spaces%2Fqbl3tKh4Tqarpg8Dmgw2%2Fuploads%2FBYLWtzAvMBCF3gmYKNBb%2Fimage.png?alt=media&amp;token=2a867417-61af-4f21-a23b-792f621f2580" alt=""><figcaption></figcaption></figure>

<figure><img src="https://328555605-files.gitbook.io/~/files/v0/b/gitbook-x-prod.appspot.com/o/spaces%2Fqbl3tKh4Tqarpg8Dmgw2%2Fuploads%2Fz63jay2O2lpnhlkrBe2j%2Fimage.png?alt=media&amp;token=560fb44d-34f0-4480-957d-1a6ea2bb7c27" alt=""><figcaption></figcaption></figure>


# Low Polygons

{% hint style="info" %}
Optimizing **Low Polygons (Low Poly)** by adding details only where necessary. Add polygons only to important areas, while simplifying or removing unnecessary parts.
{% endhint %}

<figure><img src="https://328555605-files.gitbook.io/~/files/v0/b/gitbook-x-prod.appspot.com/o/spaces%2Fqbl3tKh4Tqarpg8Dmgw2%2Fuploads%2FEg6PsmQ1ayOkNsco6Fpx%2Fimage.png?alt=media&amp;token=cfa2d31e-4a76-4914-bb32-717211f5db37" alt=""><figcaption></figcaption></figure>

1. **Prepare High Poly Model**

Prepare the high-polygon model intended for baking. This model has richer details and a more intricate shape.

2. **Prepare Low Poly Model**

Prepare the low-polygon model where the baking result will be applied. This model has a simpler and geometrically optimized structure.

3. **UV Unwrapping**

Perform UV unwrapping on the low-polygon model. This process is necessary to correctly map textures onto the model.

4. **Baking**

Perform baking to transfer the details of the high-polygon model to the low-polygon model. This process is mainly used to generate textures, normal maps, ambient occlusion maps, etc.

5. **Apply Texture**

Apply the baked results to the low-polygon model to convey the details. This way, the low-polygon and high-polygon can have similar details.

{% hint style="info" %}
**Tips:** Low poly modeling and baking are particularly important techniques in game development and real-time simulation. It's essential to practice and become familiar with these for efficient work.
{% endhint %}

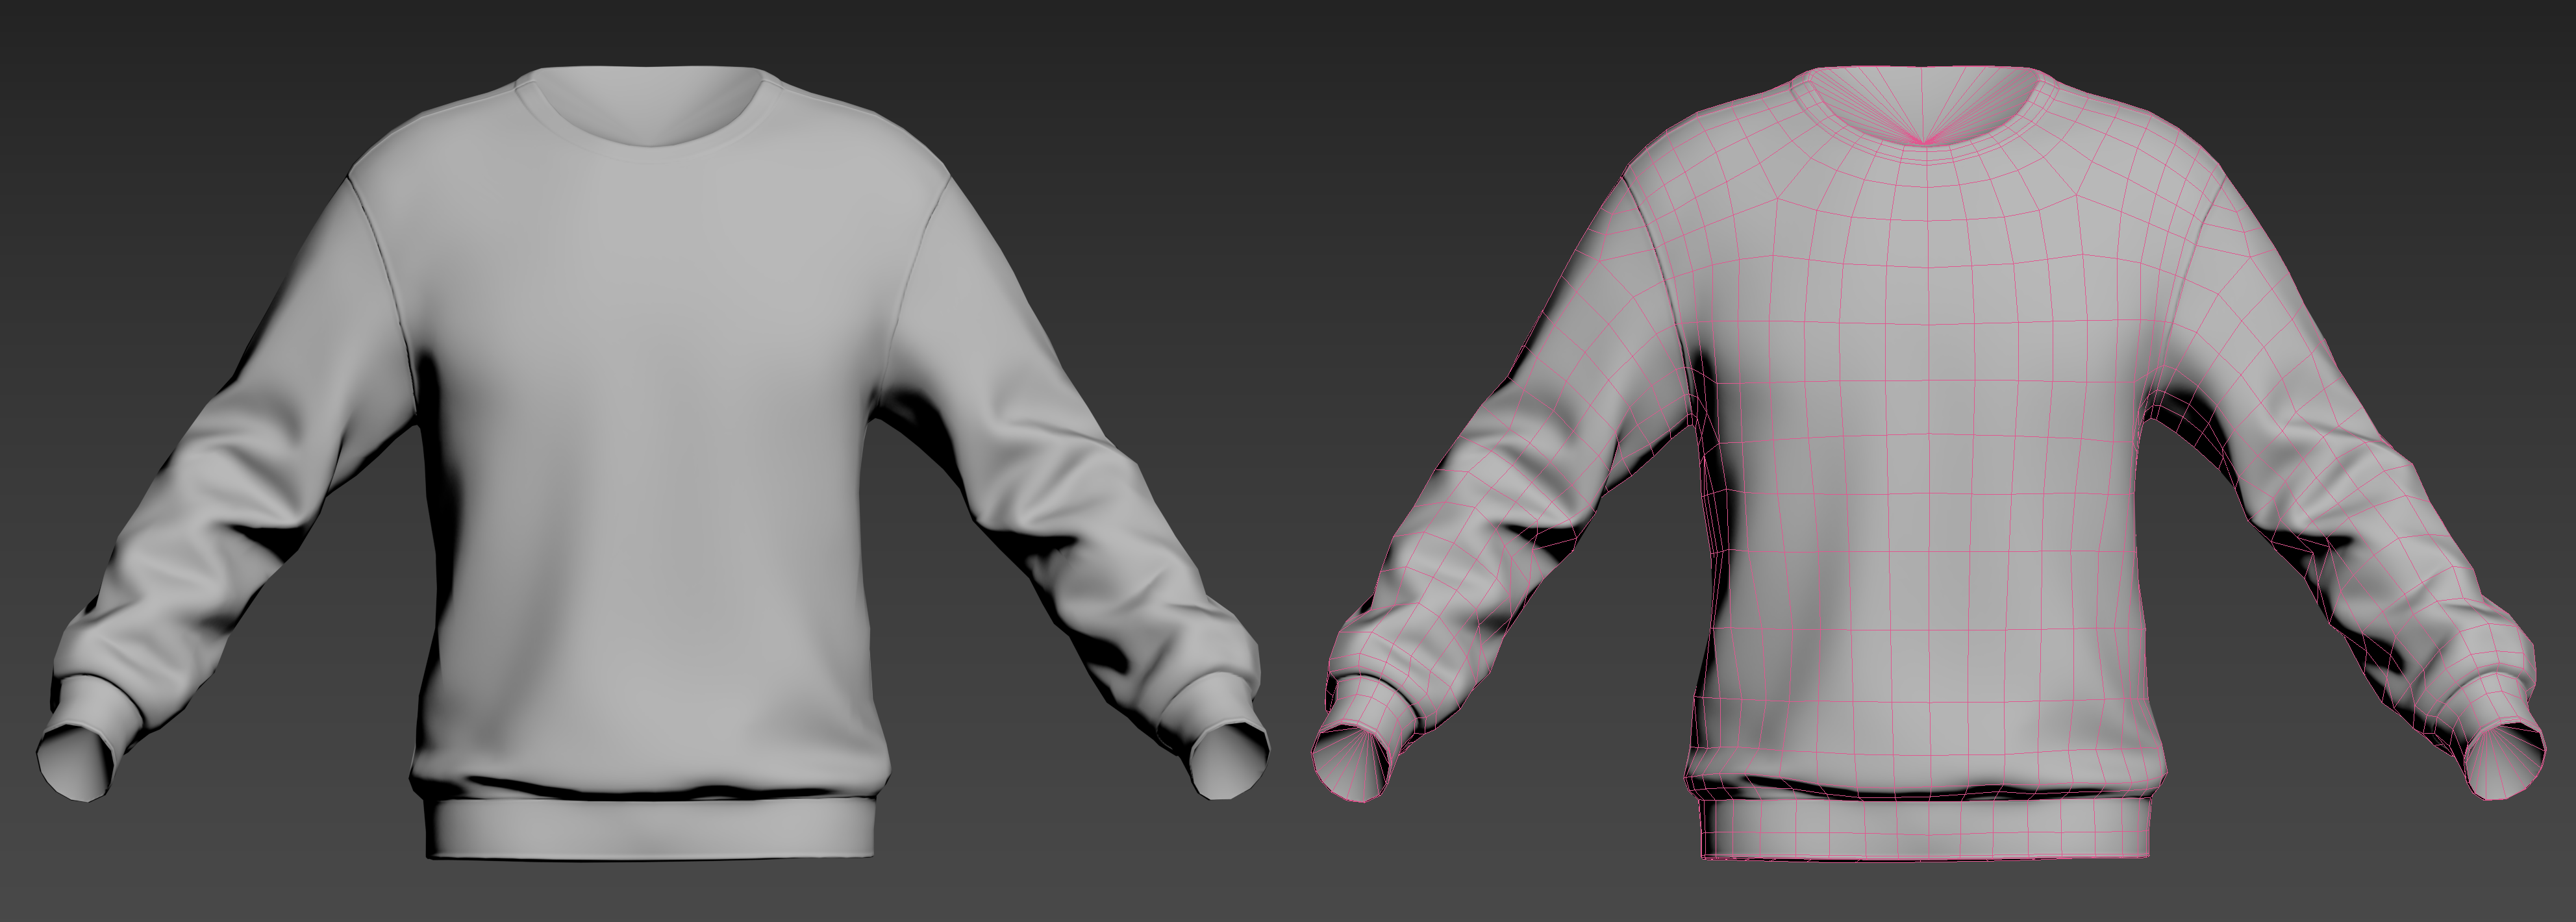
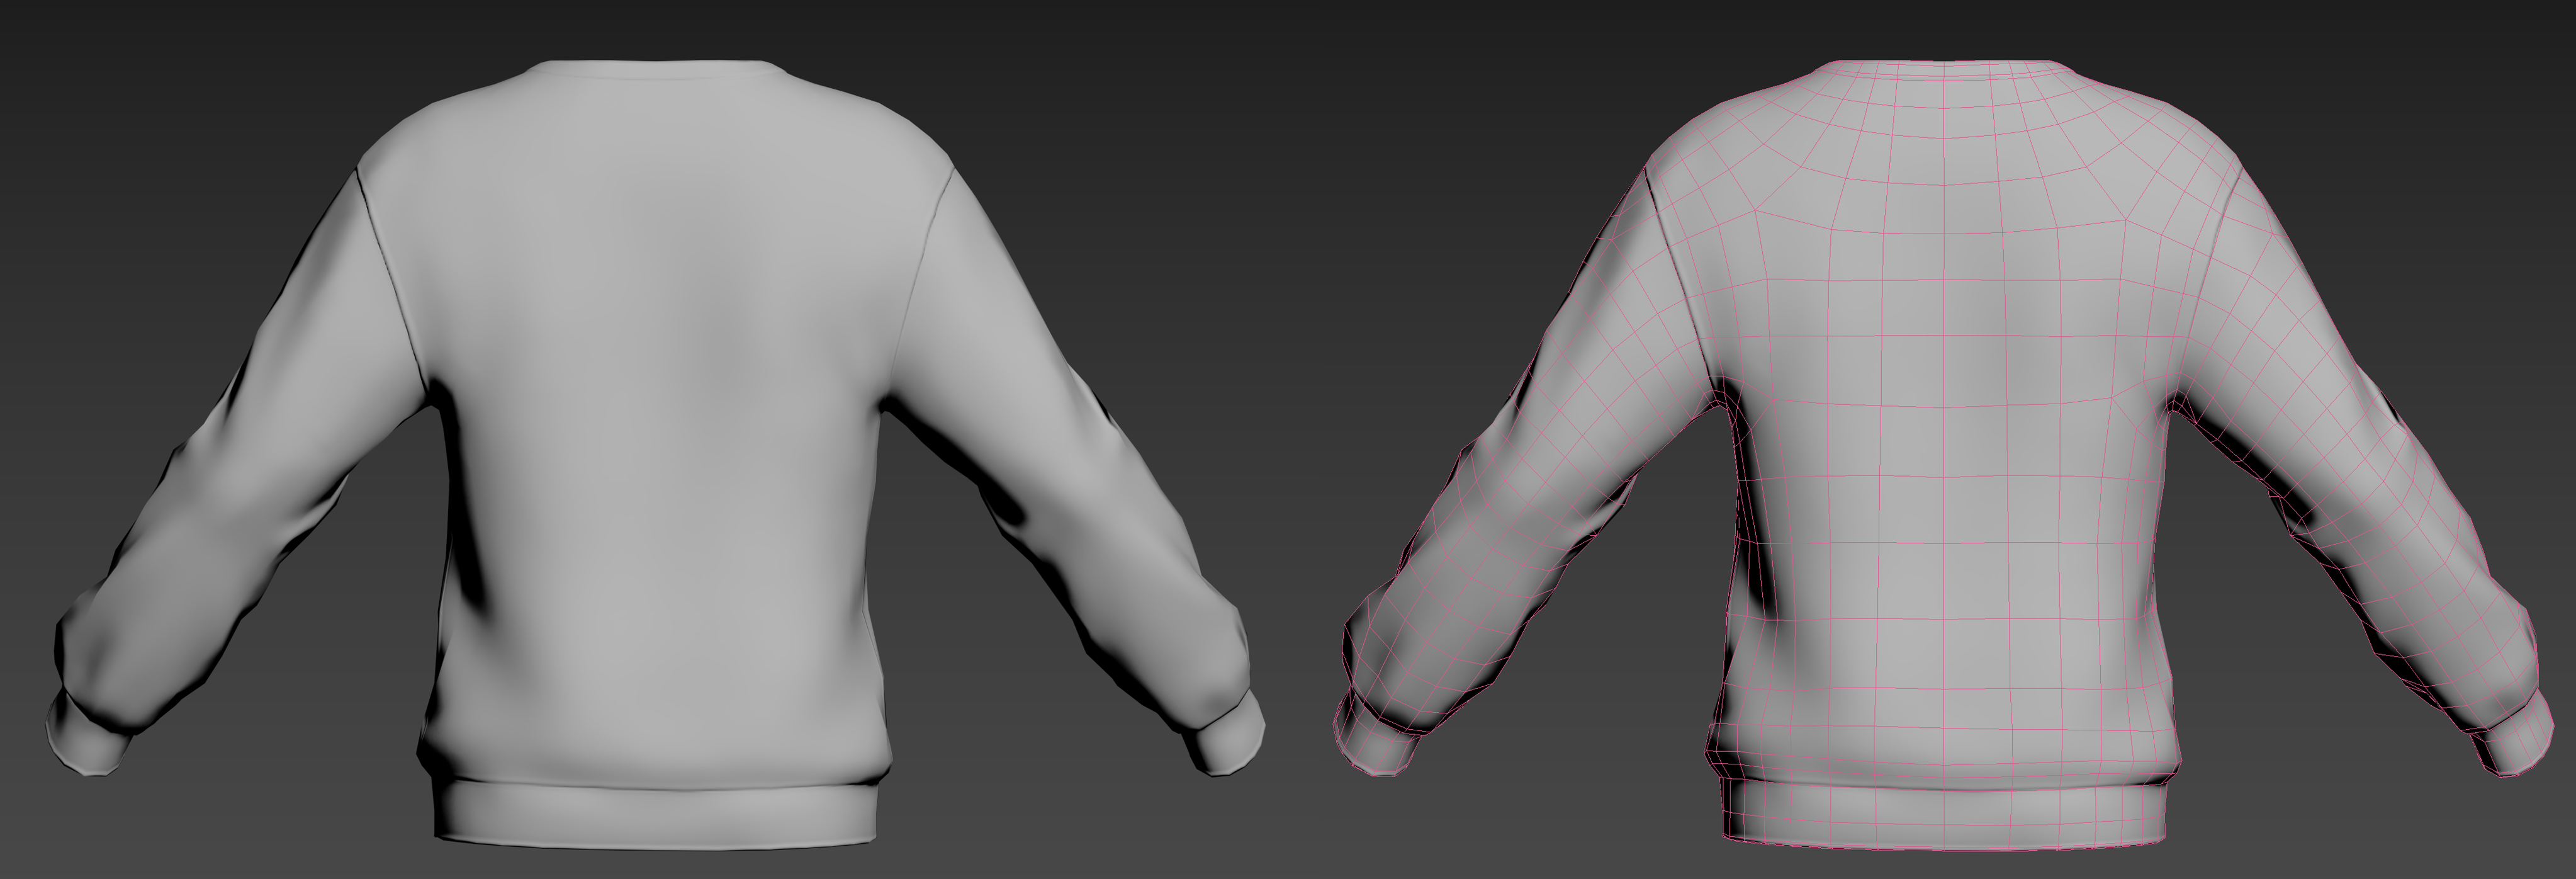
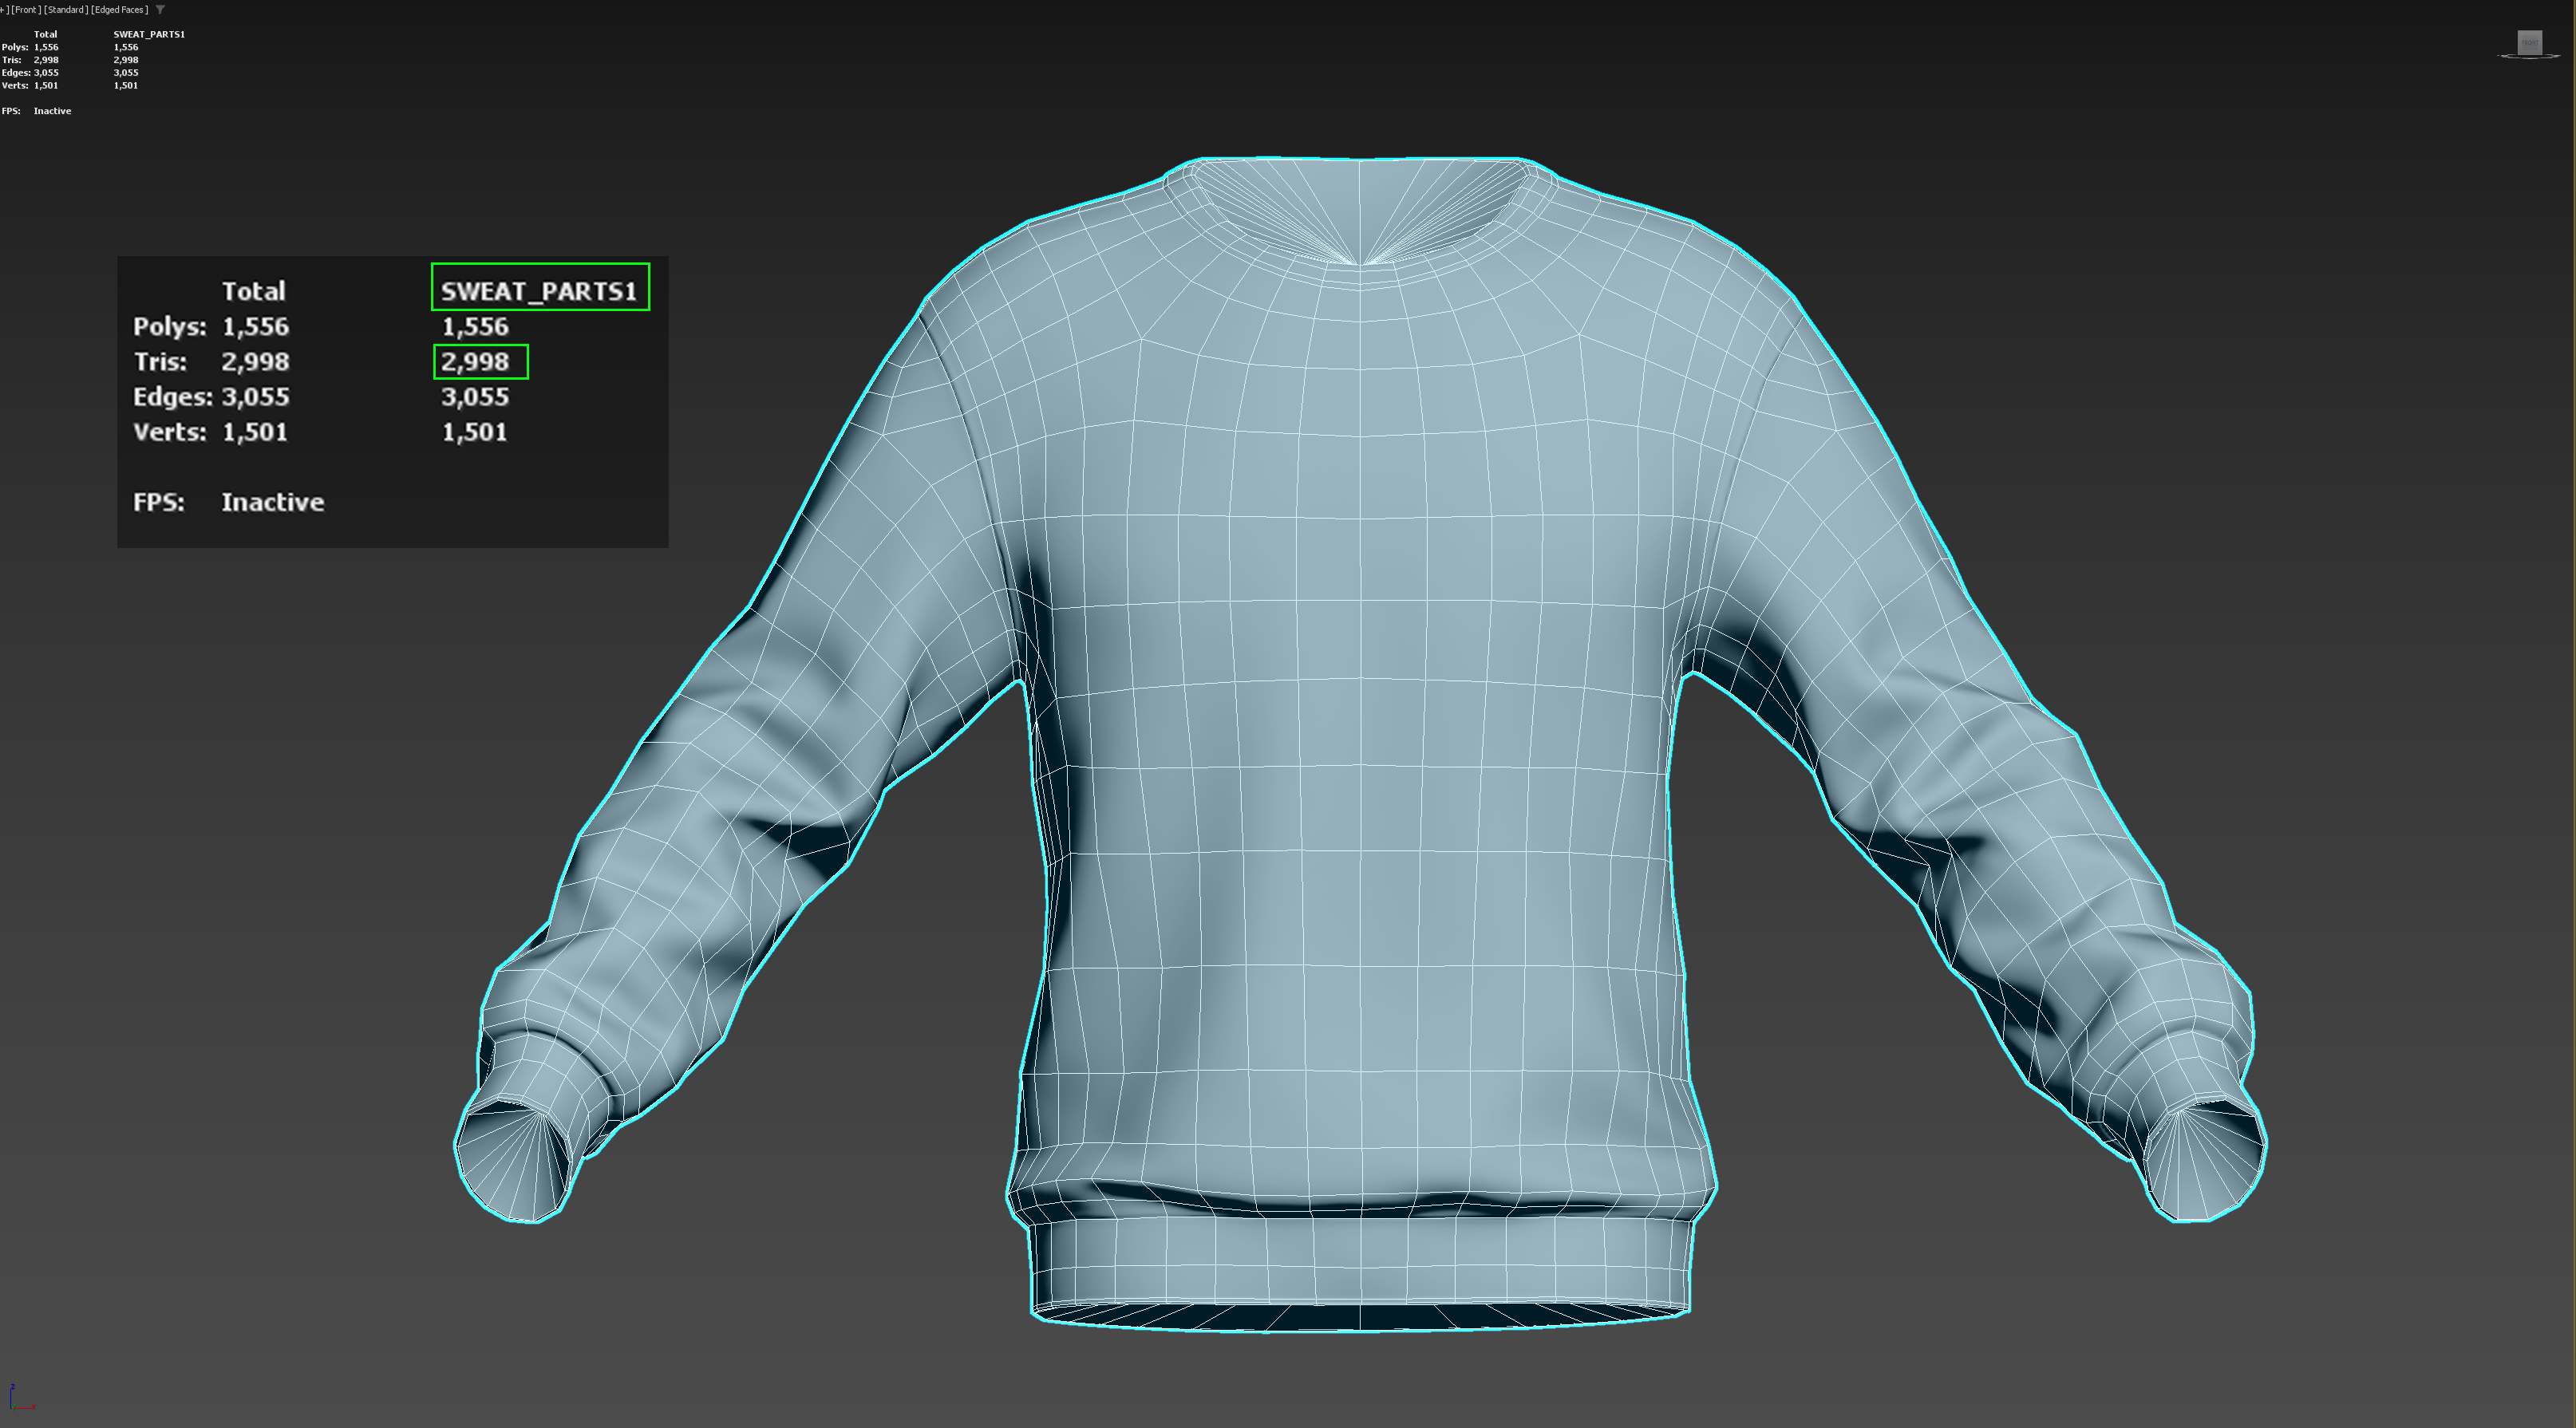
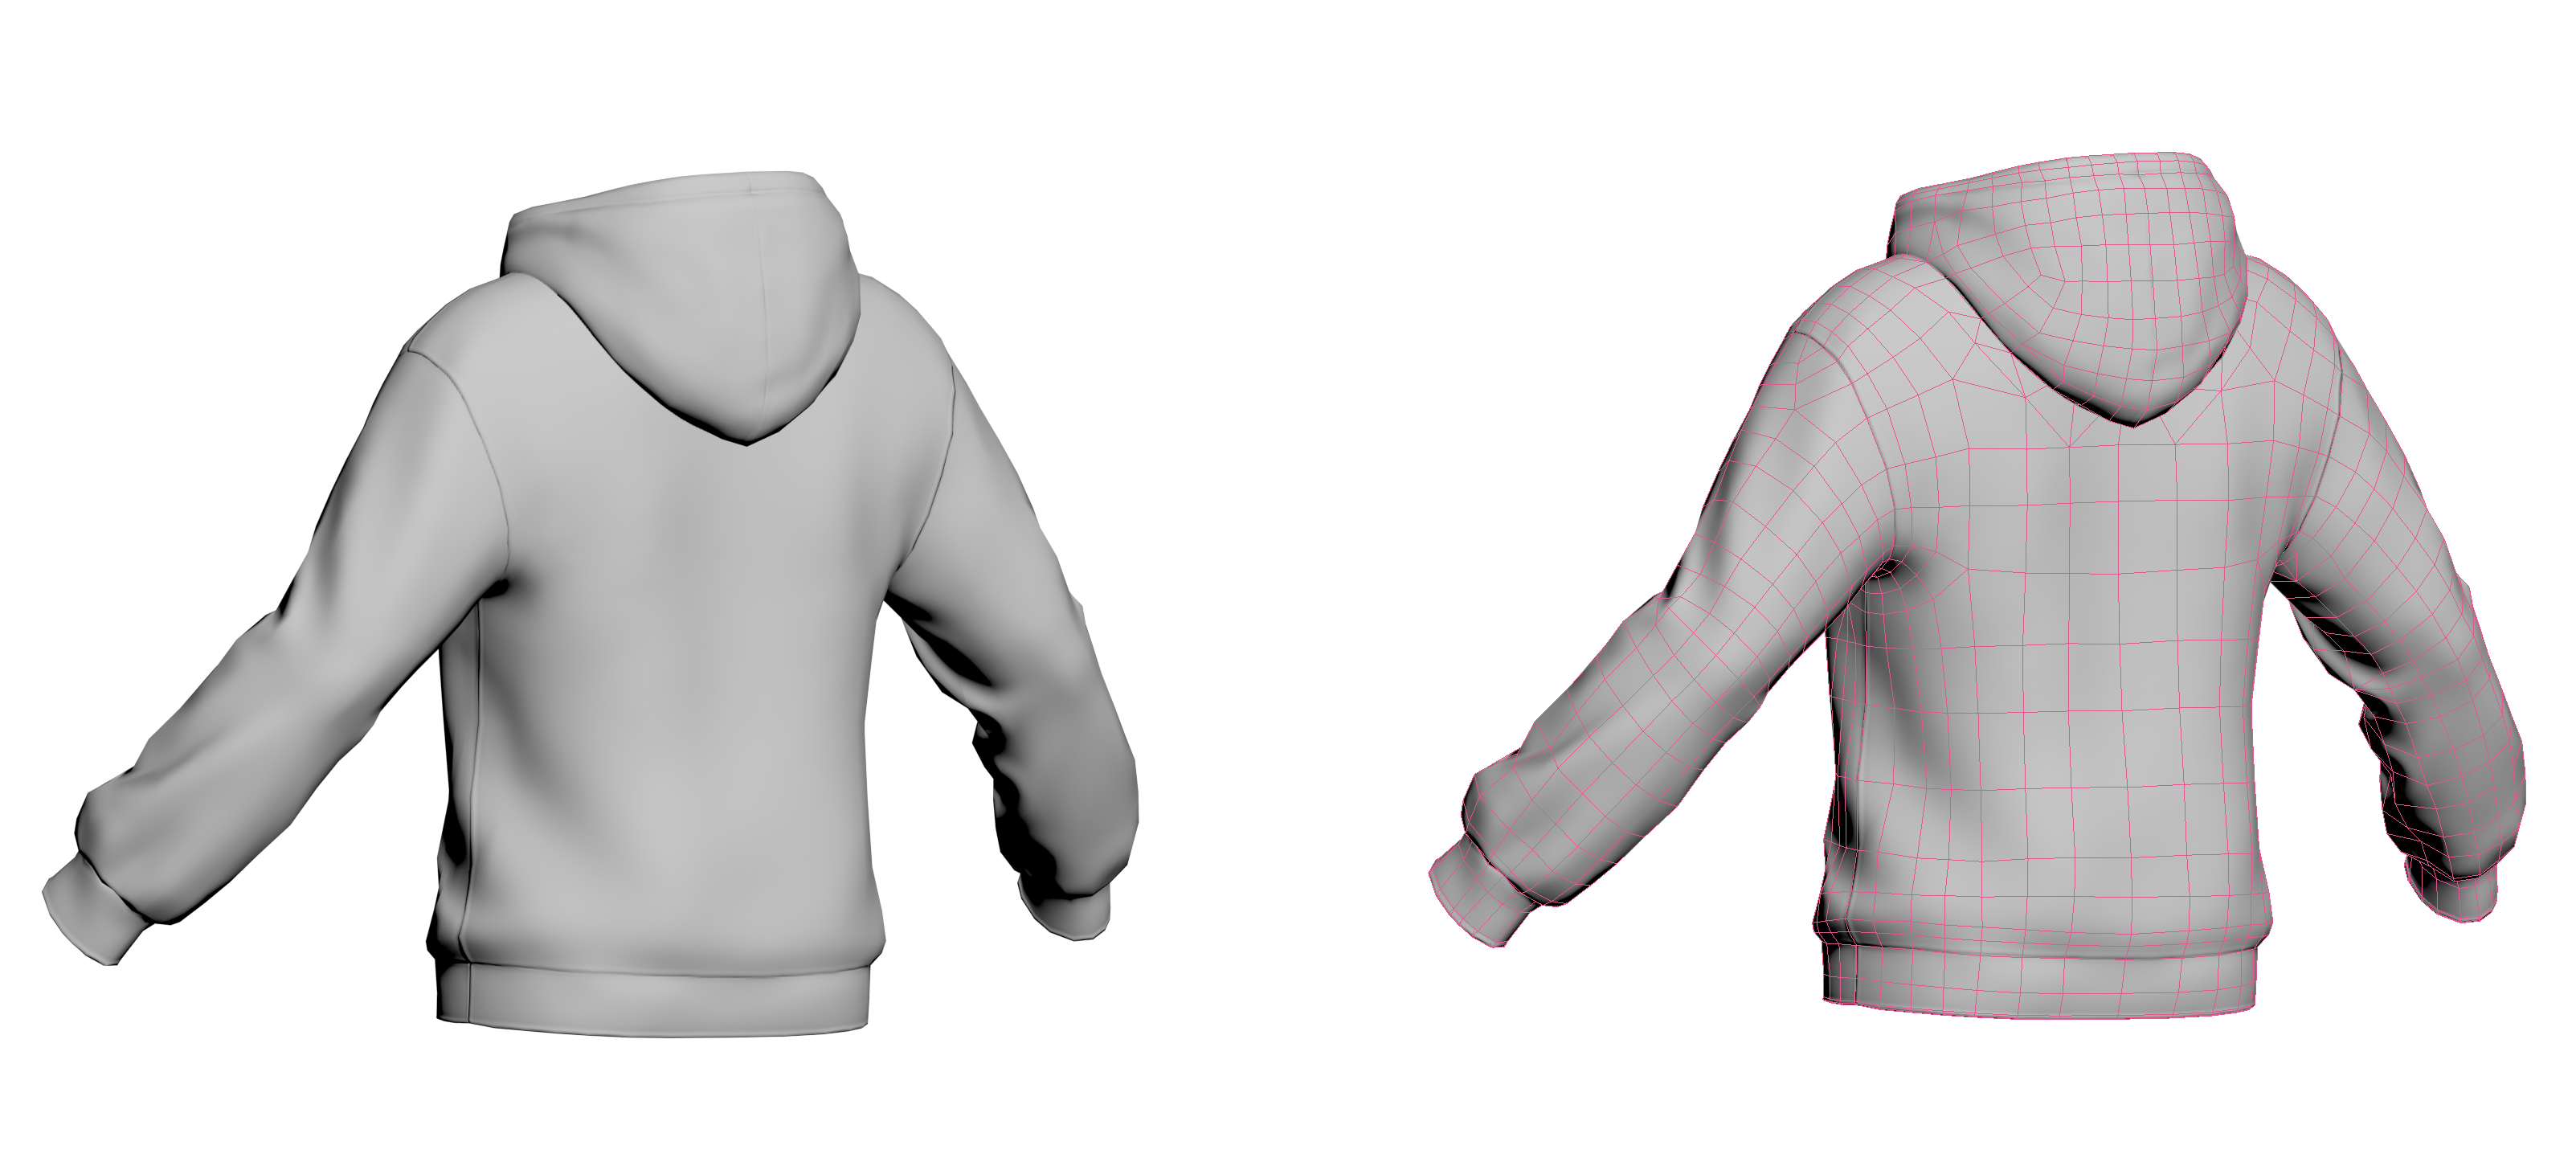
## Examples: the shape of the correctly worked wireframe.

<figure><img src="https://328555605-files.gitbook.io/~/files/v0/b/gitbook-x-prod.appspot.com/o/spaces%2Fqbl3tKh4Tqarpg8Dmgw2%2Fuploads%2FUAP5q45i5UmALj16Dcsv%2Fimage.png?alt=media&amp;token=4b2dae7d-4755-4637-b637-9ac6cf6cf9ce" alt=""><figcaption><p>Front</p></figcaption></figure>

<figure><img src="https://328555605-files.gitbook.io/~/files/v0/b/gitbook-x-prod.appspot.com/o/spaces%2Fqbl3tKh4Tqarpg8Dmgw2%2Fuploads%2FjvMfdBZMtE6nPhyh1LD9%2Fimage.png?alt=media&amp;token=779119b7-0204-4ef4-8d43-b579984b51f1" alt=""><figcaption><p>Back</p></figcaption></figure>

<figure><img src="https://328555605-files.gitbook.io/~/files/v0/b/gitbook-x-prod.appspot.com/o/spaces%2Fqbl3tKh4Tqarpg8Dmgw2%2Fuploads%2F5uZJVptc9JBg1512tKQM%2Fimage.png?alt=media&amp;token=bc55e7c1-abad-4cc2-8f5f-f577710511fc" alt=""><figcaption></figcaption></figure>

{% hint style="info" %}
For Altava, the priority is to preserve the shape of the optimized 3D model during conversion, limiting it to 20,000 Triangles per attire asset.

For Roblox, the limit is 4,000 Triangles, and any excess polygons will be automatically optimized. This can result in some deformation of the wireframe and may make it difficult to preserve certain shapes. \
\
Therefore, for conversion, it's recommended to keep the polygon count below 4,000.&#x20;
{% endhint %}

{% hint style="danger" %}
For buttons, belts, and accessories, exceeding 4,000 polygons may result in mesh loss due to automatic optimization. It's advised to create a single low-poly mesh. It is recommended to create a single low-poly mesh.
{% endhint %}

<figure><img src="https://328555605-files.gitbook.io/~/files/v0/b/gitbook-x-prod.appspot.com/o/spaces%2Fqbl3tKh4Tqarpg8Dmgw2%2Fuploads%2FSkuXtJnSS2YjhjXmTSA6%2Fimage.png?alt=media&amp;token=fac90a57-fa09-4b55-8e26-6f5e105d88a6" alt=""><figcaption></figcaption></figure>

<figure><img src="https://328555605-files.gitbook.io/~/files/v0/b/gitbook-x-prod.appspot.com/o/spaces%2Fqbl3tKh4Tqarpg8Dmgw2%2Fuploads%2FTRUt87RuhwPyK61lD9Fk%2Fimage.png?alt=media&amp;token=08f9eaf6-2bbb-4856-b10f-5039ecbb13c5" alt=""><figcaption></figcaption></figure>

{% hint style="success" %}
Work while referencing the indicated important joint areas and the overall flow of the base model.
{% endhint %}

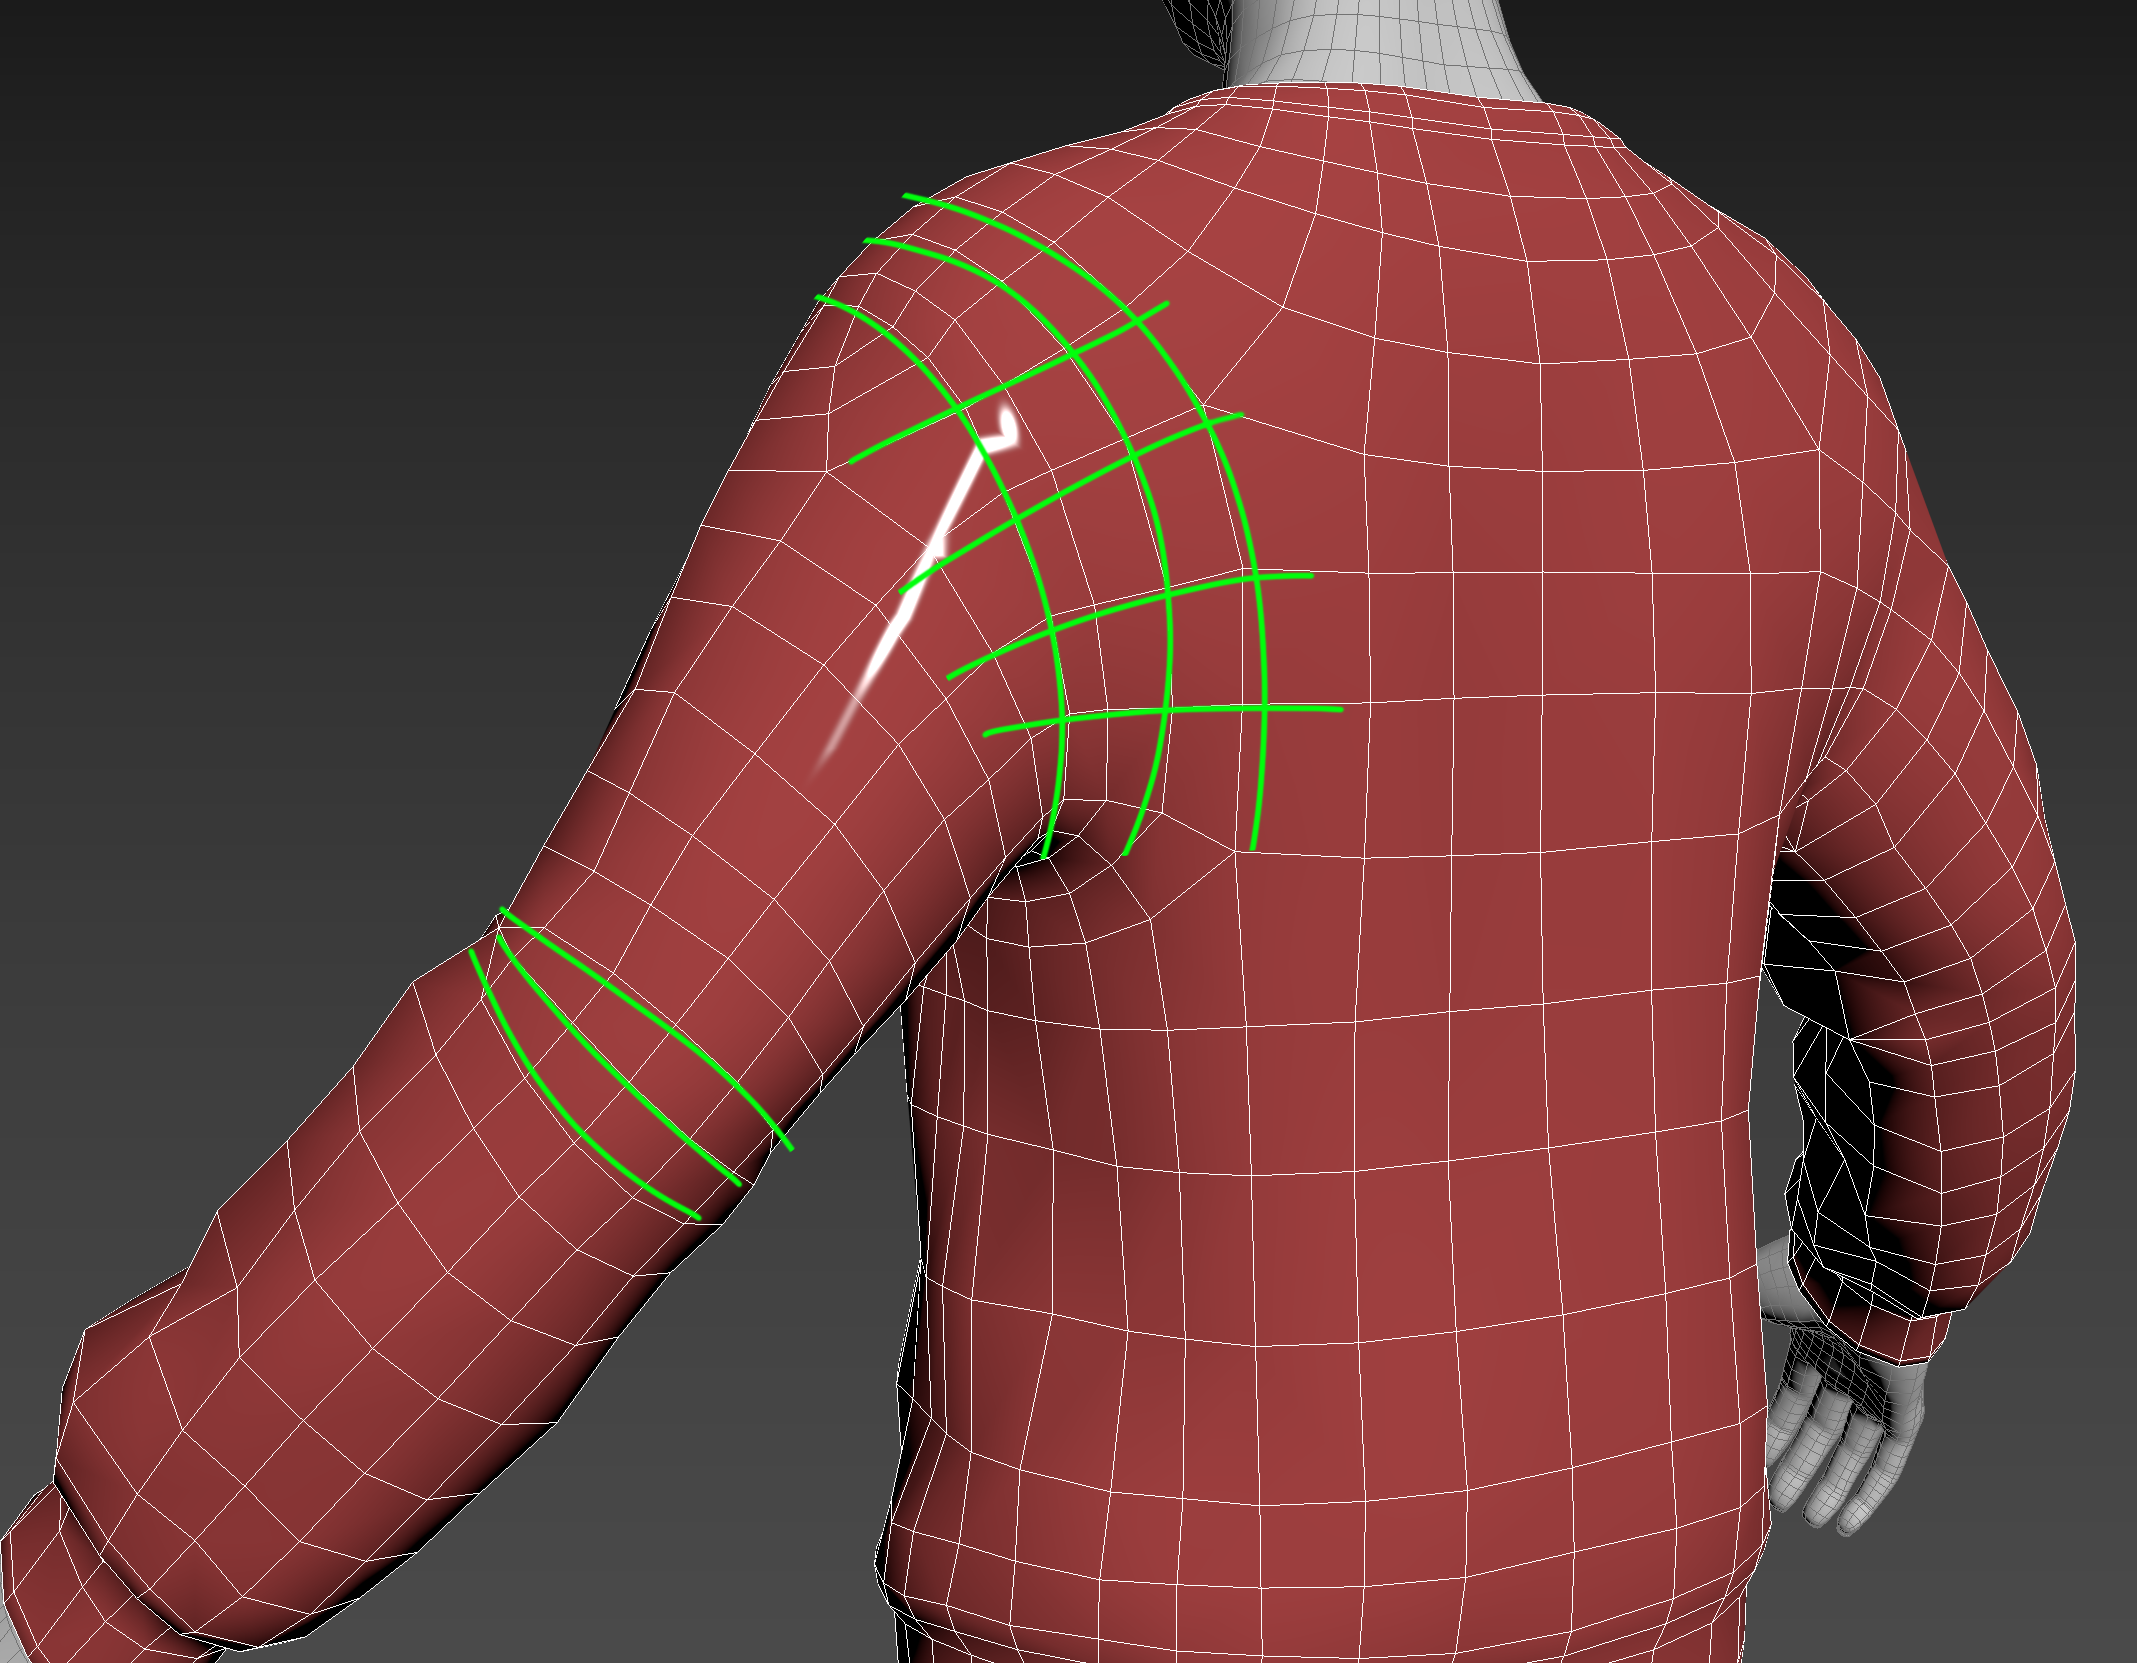
In areas expected to move a lot, such as shoulders, elbows, knees, and pelvis, more geometric details are needed so that the mesh can bend naturally.&#x20;

Typically, produces the three edge loops around the bone, providing both bendability and excellent performance for in-app items.

<figure><img src="https://lh7-us.googleusercontent.com/IYSc483v0sB0l-F5hJjM0Z9ALM8oA3ZggFNpu6hmc6AvKkuKc7psiQzHGzs-j04Om7l_5T-cElEJg7QKSWlO9Kdi0oWmLNwc5rwBGQrxiFnWt10rWL--etvSQPWE0Paaozbg3BzHZBS6x-Sulo2Hm7w" alt=""><figcaption></figcaption></figure>

When creating attire that fits an avatar, the parts corresponding to the avatar's joints should be constructed with similar seams.


# Optimizing High Polygons

{% hint style="info" %}
This guide is written based on Zbrush.
{% endhint %}

<figure><img src="https://328555605-files.gitbook.io/~/files/v0/b/gitbook-x-prod.appspot.com/o/spaces%2Fqbl3tKh4Tqarpg8Dmgw2%2Fuploads%2FIFUH7XSehy9HaOID95Qk%2Fimage.png?alt=media&amp;token=e854b32d-355e-4db1-8bf2-90d9f6230b34" alt=""><figcaption></figcaption></figure>

### Optimizing topology mesh

Before exporting the completed high-polygon mesh, if there are too many polygons, the file can be heavy to work with topology (varies depending on computer specifications).&#x20;

In such cases, it's good to reduce the **Decimation** or **Dividing** before exporting.

<figure><img src="https://328555605-files.gitbook.io/~/files/v0/b/gitbook-x-prod.appspot.com/o/spaces%2Fqbl3tKh4Tqarpg8Dmgw2%2Fuploads%2FmzzxCA5U5Zot6Fsl0lUl%2Fimage.png?alt=media&amp;token=582001a5-7df8-42b2-9abe-0bd39735dac7" alt=""><figcaption></figcaption></figure>

<figure><img src="https://328555605-files.gitbook.io/~/files/v0/b/gitbook-x-prod.appspot.com/o/spaces%2Fqbl3tKh4Tqarpg8Dmgw2%2Fuploads%2FnJiNawPeVJGsRSaUQgQn%2Fimage.png?alt=media&amp;token=8c38df3d-5abd-479b-a8c1-004b54726662" alt=""><figcaption></figcaption></figure>

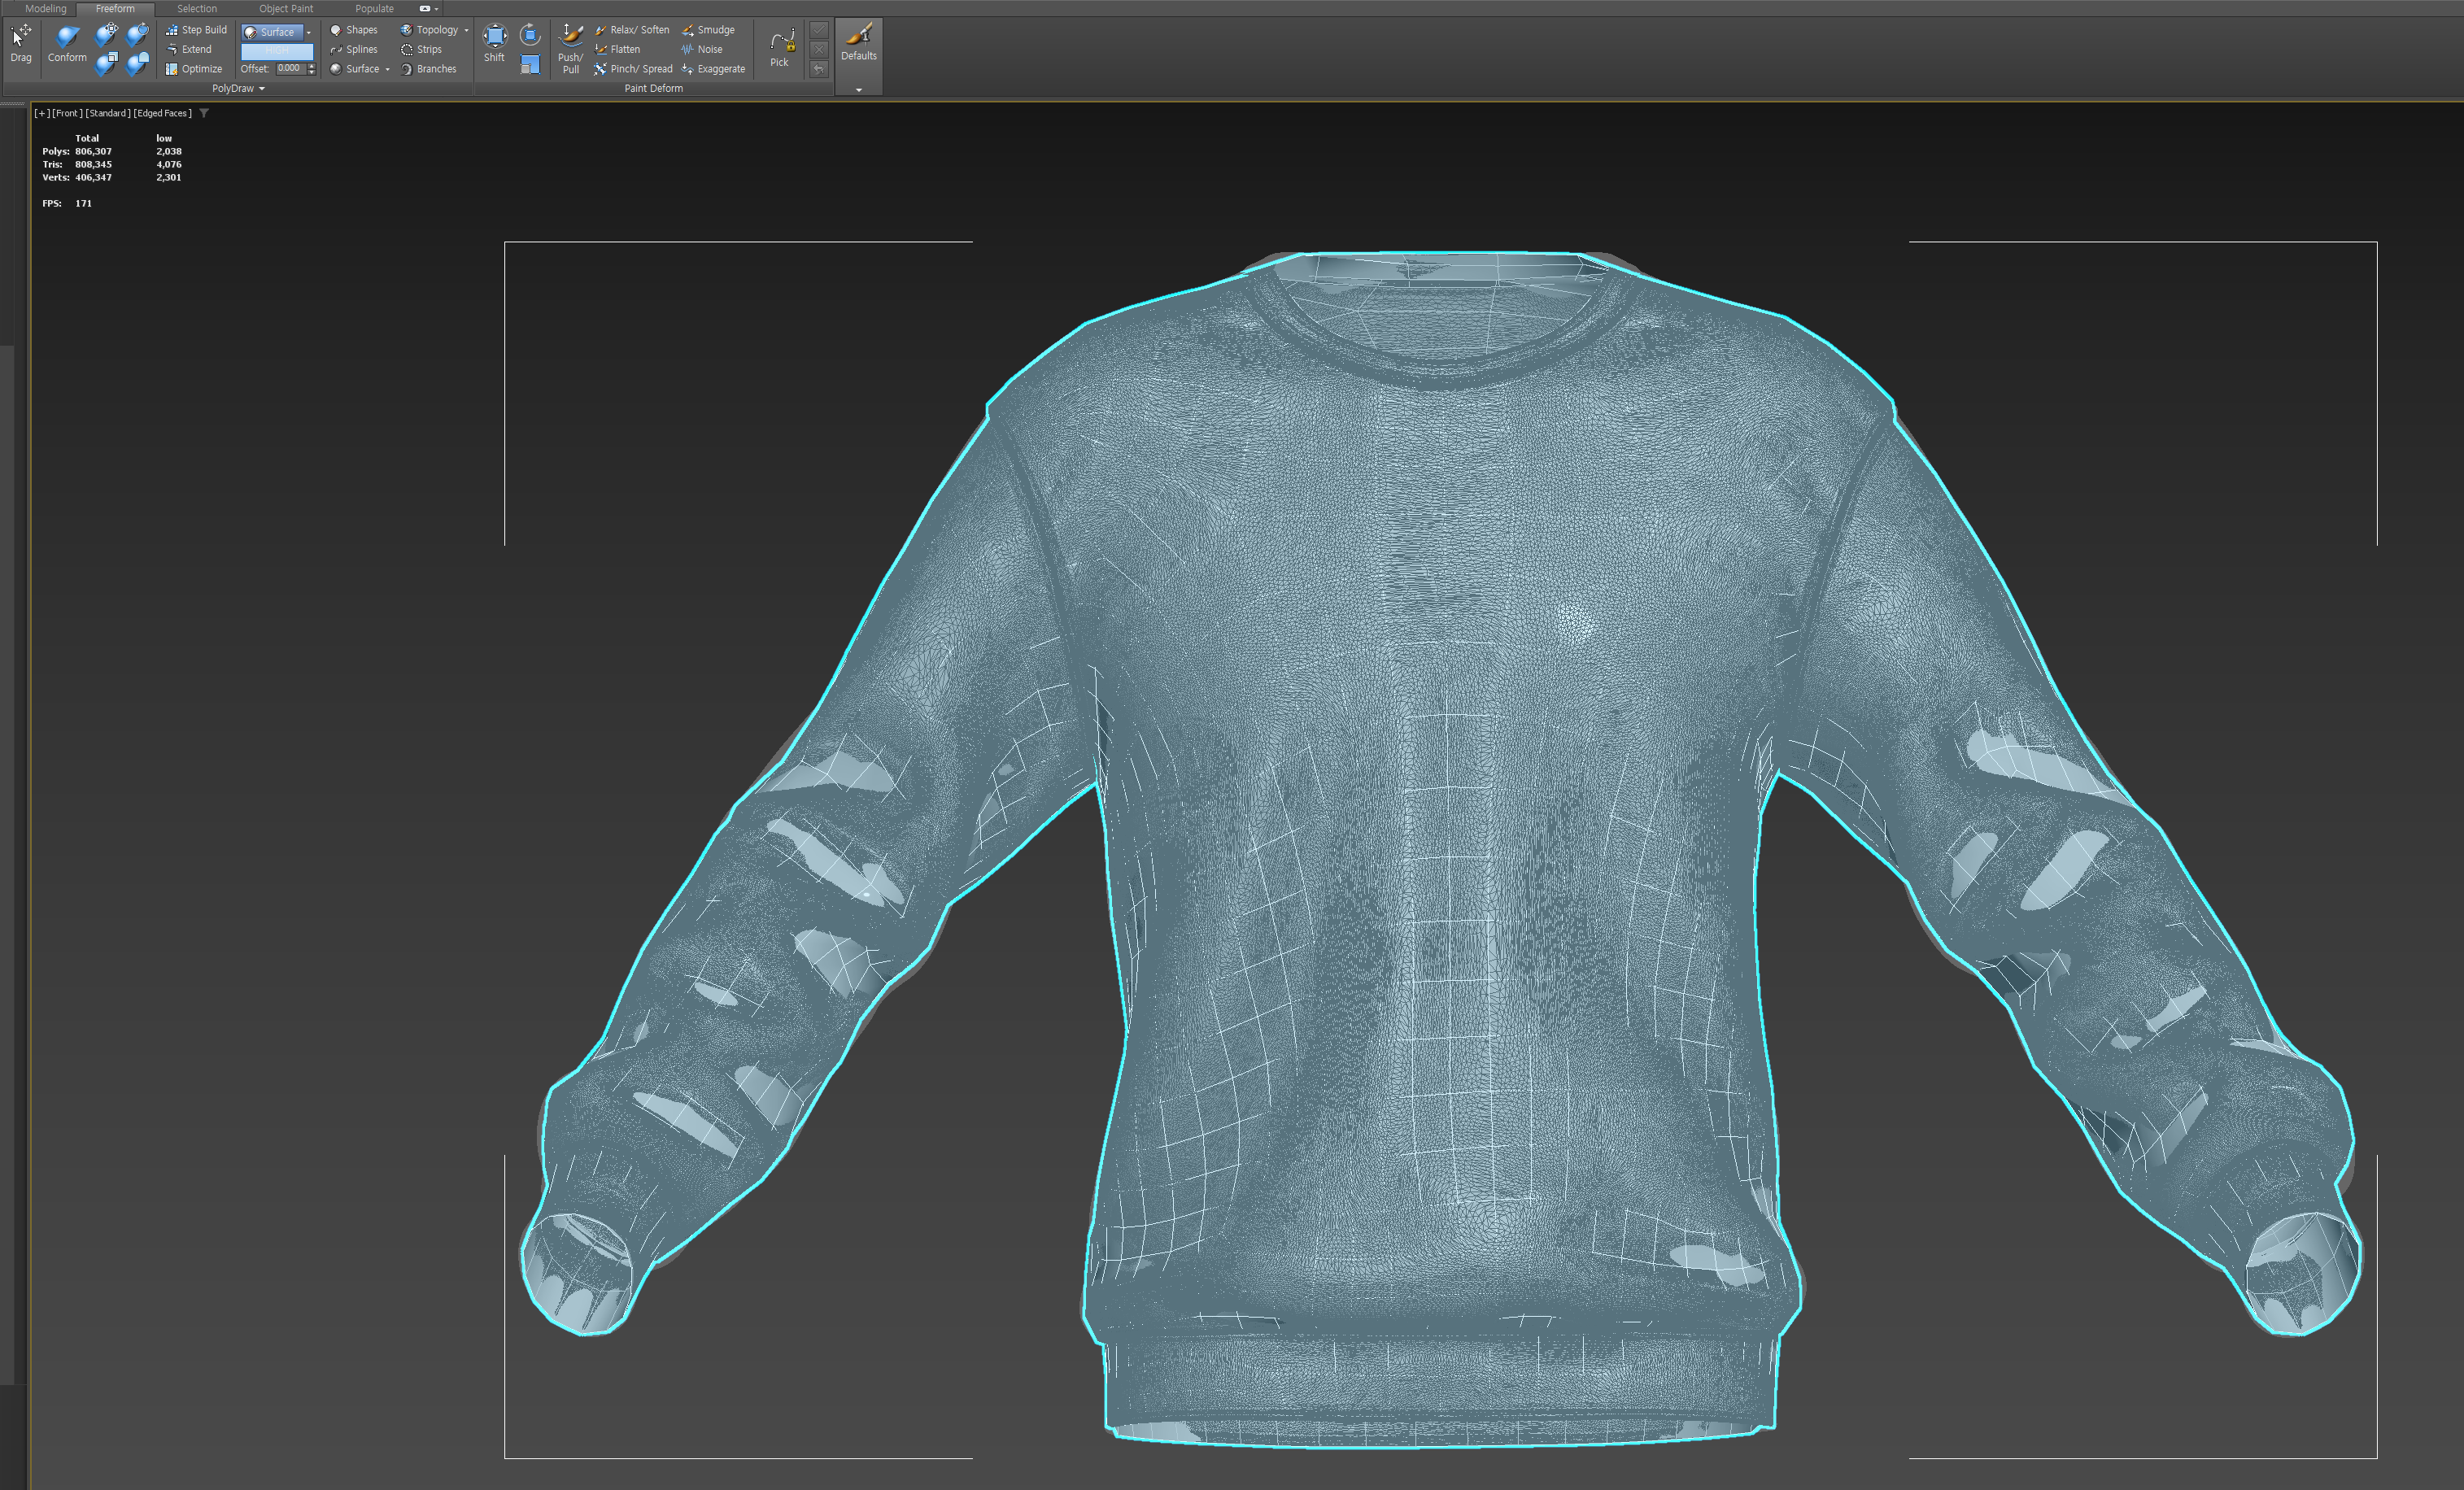
For this clothing, it can be seen that there are about 2 million polygons (approximately 4 million based on Tri).&#x20;

If the subdivide level is still active, you can lower the level and export, or if it's not, you can optimize with Decimation before exporting.

{% hint style="warning" %}
Polygon count is defined by Tri. \
For example, Poly: 2000 = Tri: 4000.
{% endhint %}

## Export by lowering Subdivision Level

<figure><img src="https://328555605-files.gitbook.io/~/files/v0/b/gitbook-x-prod.appspot.com/o/spaces%2Fqbl3tKh4Tqarpg8Dmgw2%2Fuploads%2F92S0kOrr6HroPvQGSpJO%2Fimage.png?alt=media&amp;token=31985e25-c6b6-44ff-9b48-bd0bcbdbce24" alt=""><figcaption></figcaption></figure>

<figure><img src="https://328555605-files.gitbook.io/~/files/v0/b/gitbook-x-prod.appspot.com/o/spaces%2Fqbl3tKh4Tqarpg8Dmgw2%2Fuploads%2F3bWQenZPCKMwkP529S8S%2Fimage.png?alt=media&amp;token=b6d6447e-1783-411f-8938-452e43ea874f" alt=""><figcaption></figcaption></figure>

<figure><img src="https://328555605-files.gitbook.io/~/files/v0/b/gitbook-x-prod.appspot.com/o/spaces%2Fqbl3tKh4Tqarpg8Dmgw2%2Fuploads%2FjKN8k7GCEgiFGDJsW3OM%2Fimage.png?alt=media&amp;token=5042c45d-8016-439c-bfea-8c5d0ba447be" alt=""><figcaption></figcaption></figure>

For this clothing, the subdivide level goes up to 3, and you lower it to 1 and export after deleting the higher levels.

{% hint style="info" %}
If the subdivision levels are well divided, it's convenient to use as a low-polygon mesh.
{% endhint %}

## Export with Decimation

1. Z plugin
2. Select Preprocessing
3. Choose the optimization ratio in Decimate.

<figure><img src="https://328555605-files.gitbook.io/~/files/v0/b/gitbook-x-prod.appspot.com/o/spaces%2Fqbl3tKh4Tqarpg8Dmgw2%2Fuploads%2FYsLG9UEfPiYjxiDI4Vqz%2Fimage.png?alt=media&amp;token=56e29316-aa64-4d12-b0a9-0fc227295dd6" alt=""><figcaption></figcaption></figure>

1. Results of proceeding with the Decimation value set to 20% (default setting).

You can maintain the silhouette while getting an optimized high-polygon.

<figure><img src="https://328555605-files.gitbook.io/~/files/v0/b/gitbook-x-prod.appspot.com/o/spaces%2Fqbl3tKh4Tqarpg8Dmgw2%2Fuploads%2FcQzT48aFMP0LpVJtxTBR%2Fimage.png?alt=media&amp;token=8e99a84e-d136-445e-944a-2f9f1440d1e9" alt=""><figcaption></figcaption></figure>

<figure><img src="https://328555605-files.gitbook.io/~/files/v0/b/gitbook-x-prod.appspot.com/o/spaces%2Fqbl3tKh4Tqarpg8Dmgw2%2Fuploads%2FcEIBG8kHiJDC8Thd5Oz9%2Fimage.png?alt=media&amp;token=a5eb32ca-57a5-447a-ae72-0c5afec8f158" alt=""><figcaption></figcaption></figure>

<figure><img src="https://328555605-files.gitbook.io/~/files/v0/b/gitbook-x-prod.appspot.com/o/spaces%2Fqbl3tKh4Tqarpg8Dmgw2%2Fuploads%2Ftq2Hytu9SpNKZJi96fzm%2Fimage.png?alt=media&amp;token=20551f04-671f-4cac-91eb-1aa4f17f47e4" alt=""><figcaption></figcaption></figure>


# Topology

Once the high-polygon optimization is completed, topology needs to be done. Topology is a mandatory step in the process, so please ensure to complete it.&#x20;

There are various software programs available for performing topology. However, this guideline covers how to do topology using the two programs listed below.

* [3ds Max](/creator-guide/3d-modeling/low-polygons/topology/3ds-max)
* [Blender](/creator-guide/3d-modeling/low-polygons/topology/blender)

Click the link for more details.


# 3ds Max

{% hint style="info" %}
Import data extracted as OBJ or FBX. or use Zbrush's GoZ feature. (A tool that directly transfers to 3ds Max)\
\
For detailed information on GoZ, please refer to [this link.](https://help.maxon.net/zbr/en-us/)
{% endhint %}

{% hint style="warning" %}
For a single clothing upload standard, please work with low-polygon as Tri less than 20,000.
{% endhint %}

1. Import the clothing as OBJ.

<figure><img src="https://328555605-files.gitbook.io/~/files/v0/b/gitbook-x-prod.appspot.com/o/spaces%2Fqbl3tKh4Tqarpg8Dmgw2%2Fuploads%2FmHRkzh5W7XRqM9N9TJ6V%2Fimage.png?alt=media&amp;token=3aacc8ac-216d-4fc1-977e-94cbf3355cce" alt=""><figcaption></figcaption></figure>

2. Convert Editable Mesh to Editable Poly. And name the mesh HIGH for easier visibility.

<figure><img src="https://328555605-files.gitbook.io/~/files/v0/b/gitbook-x-prod.appspot.com/o/spaces%2Fqbl3tKh4Tqarpg8Dmgw2%2Fuploads%2F1ZkOdp1ctJLwam87Jznz%2Fimage.png?alt=media&amp;token=13743d23-5ebc-4c76-843e-ff4e87d6d36a" alt=""><figcaption></figcaption></figure>

3. Select the high-polygon, press Ctrl+V, and create a mesh to be made into LOW polygon. Then select Retopology from the Modifier List.

<figure><img src="https://328555605-files.gitbook.io/~/files/v0/b/gitbook-x-prod.appspot.com/o/spaces%2Fqbl3tKh4Tqarpg8Dmgw2%2Fuploads%2F2fkRU19VhSLvnf3Ek6MT%2Fimage.png?alt=media&amp;token=6f855b75-d121-469d-a17b-6fc5c6f954a1" alt=""><figcaption></figcaption></figure>

4. Set Face Count to 2000 and **\[Compute]**.

{% hint style="info" %}
Clothes made in CLO or Marvelous can have separate pattern parts. \
\
If you have made separate sleeves or parts in Zbrush as well, it's normal for them to disconnect. In such cases, you must connect the vertices during the topology process.
{% endhint %}

<figure><img src="https://328555605-files.gitbook.io/~/files/v0/b/gitbook-x-prod.appspot.com/o/spaces%2Fqbl3tKh4Tqarpg8Dmgw2%2Fuploads%2FR6Baf96qEU4ue9SLJ2V1%2Fimage.png?alt=media&amp;token=72358438-7e7d-496a-98e8-f0342fb137b0" alt=""><figcaption><p>Mesh retopolized to selected approximation</p></figcaption></figure>

5. After retopology is complete, select the mesh named LOW, change to Surface - \[Draw On: Surface], then Pick and select the high-polygon to retopologiz&#x65;**.**

<figure><img src="https://328555605-files.gitbook.io/~/files/v0/b/gitbook-x-prod.appspot.com/o/spaces%2Fqbl3tKh4Tqarpg8Dmgw2%2Fuploads%2FYwzHAkJEpWesOMuZjUBA%2Fimage.png?alt=media&amp;token=a887d62a-814d-444d-be72-46d0c0d4789f" alt=""><figcaption></figcaption></figure>

<figure><img src="https://328555605-files.gitbook.io/~/files/v0/b/gitbook-x-prod.appspot.com/o/spaces%2Fqbl3tKh4Tqarpg8Dmgw2%2Fuploads%2F7oZCSKDi5IASrDfqJEac%2Fimage.png?alt=media&amp;token=92ebe12a-605a-4e4f-abb2-07e0aa2ae4dd" alt=""><figcaption></figcaption></figure>

6. Set the Offset to about 0.2 and use the Conform brush to sculpt the LOW mesh.

<figure><img src="https://328555605-files.gitbook.io/~/files/v0/b/gitbook-x-prod.appspot.com/o/spaces%2Fqbl3tKh4Tqarpg8Dmgw2%2Fuploads%2FP0ffbA1XB2XxPVqjrUcZ%2Fimage.png?alt=media&amp;token=72683cff-1108-43fc-b2e0-554174bfc0c2" alt=""><figcaption></figcaption></figure>

{% hint style="info" %}
For detailed tool explanations on retopology, please refer to [Autodesk's official YouTube](https://www.youtube.com/watch?v=GUeLVxQairM) channel, or various YouTube tutorials.
{% endhint %}

7. Work as much as possible along the wire flow of the base model.

Properly modeling the mesh to bend is also important. When the avatar moves, the mesh points move in alignment with the unseen internal skeleton. Therefore, the number of vertices used determines how intricately an item can bend. If a part of the avatar bends a lot, arrange the joint seams closely to smooth out the curves.

<figure><img src="https://328555605-files.gitbook.io/~/files/v0/b/gitbook-x-prod.appspot.com/o/spaces%2Fqbl3tKh4Tqarpg8Dmgw2%2Fuploads%2Foj5qOiOPhP4J8LMEae0o%2Fimage.png?alt=media&amp;token=498ac598-264a-43c1-841b-bfdcfdc0c178" alt=""><figcaption></figcaption></figure>

{% hint style="info" %}
It's important to evenly distribute the overall spacing of the wire. Be aware of working the edges of the parts with movement range such as armpits, elbows, pelvis, knees, etc.
{% endhint %}

{% hint style="info" %}
For the waist, please organize the wire neatly in a straight line as much as possible.\
\
For joint areas, work with a radial method for the wire.
{% endhint %}

<figure><img src="https://328555605-files.gitbook.io/~/files/v0/b/gitbook-x-prod.appspot.com/o/spaces%2Fqbl3tKh4Tqarpg8Dmgw2%2Fuploads%2FUnAzNP7SInbfHKvAQ2Ka%2Fimage.png?alt=media&amp;token=3e9d9981-827c-422c-9d61-0e321379dd8d" alt=""><figcaption></figcaption></figure>

8. Maintain the thickness at the end of the mesh.

<figure><img src="https://328555605-files.gitbook.io/~/files/v0/b/gitbook-x-prod.appspot.com/o/spaces%2Fqbl3tKh4Tqarpg8Dmgw2%2Fuploads%2FSuwRrgtU5hU15v96baul%2Fimage.png?alt=media&amp;token=ec616869-bb9b-4a0c-9a14-08e65d72fdfe" alt=""><figcaption></figcaption></figure>

<figure><img src="https://328555605-files.gitbook.io/~/files/v0/b/gitbook-x-prod.appspot.com/o/spaces%2Fqbl3tKh4Tqarpg8Dmgw2%2Fuploads%2FAFNSnJ8z6SVVN9q99Odn%2Fimage.png?alt=media&amp;token=12bd8c61-d400-41b0-9205-21c342de476e" alt=""><figcaption></figcaption></figure>

{% hint style="info" %}
To get good results when baking normal maps, the low-polygon mesh must sufficiently wrap the high-polygon mesh, and it is good to make it at about 45 degrees at the end.
{% endhint %}

9. Close all open meshes.

Even if you haven't made a high-poly, please close the inside mesh so it's not visible.&#x20;

Use shortcut 3 to select the open edges, then right-click and choose the Cap option to close the mesh,

<figure><img src="https://328555605-files.gitbook.io/~/files/v0/b/gitbook-x-prod.appspot.com/o/spaces%2Fqbl3tKh4Tqarpg8Dmgw2%2Fuploads%2FCldUkvGqwTXOrrMWhvvX%2Fimage.png?alt=media&amp;token=46b2db04-88cc-4b1f-b38f-25de73e8028a" alt=""><figcaption></figcaption></figure>

use the Insert tool to pull the edges to the end and collapse them.

<figure><img src="https://328555605-files.gitbook.io/~/files/v0/b/gitbook-x-prod.appspot.com/o/spaces%2Fqbl3tKh4Tqarpg8Dmgw2%2Fuploads%2FFC3HlATX0GV5rRYL311f%2Fimage.png?alt=media&amp;token=b4d89862-5474-4a79-85b1-84f59b482fe8" alt=""><figcaption></figcaption></figure>

Then, select the center vertex and pull it inward without interfering with the overall shape of the mesh.

<figure><img src="https://328555605-files.gitbook.io/~/files/v0/b/gitbook-x-prod.appspot.com/o/spaces%2Fqbl3tKh4Tqarpg8Dmgw2%2Fuploads%2FiN44Q6mx3ZZ7SqUA9G8R%2Fimage.png?alt=media&amp;token=957bfabb-a3b9-4941-b088-59546c6b5639" alt=""><figcaption></figcaption></figure>

Please do the same for sleeve ends or waist areas.

<figure><img src="https://328555605-files.gitbook.io/~/files/v0/b/gitbook-x-prod.appspot.com/o/spaces%2Fqbl3tKh4Tqarpg8Dmgw2%2Fuploads%2Fmq1pI6e6VKJ4DW2upIuz%2Fimage.png?alt=media&amp;token=78d261df-caf4-44a2-908e-70254352ec0d" alt=""><figcaption></figcaption></figure>

<figure><img src="https://328555605-files.gitbook.io/~/files/v0/b/gitbook-x-prod.appspot.com/o/spaces%2Fqbl3tKh4Tqarpg8Dmgw2%2Fuploads%2FcWoxOer0UPda1eSWUpjO%2Fimage.png?alt=media&amp;token=4041cd6d-6323-4805-ac01-c2a8e6b073ef" alt=""><figcaption></figcaption></figure>

{% hint style="success" %}
The mesh should be neatly organized when fitted over the base model.
{% endhint %}


# Blender

## Importing with Blender

{% hint style="danger" %}
For a single clothing upload standard, please work with low-polygon as Tri less than 20,000.
{% endhint %}

{% hint style="info" %}
Import data extracted as OBJ or FBX.
{% endhint %}

{% hint style="info" %}
If the size of the base model and the imported model do not match, adjust the Scale value as shown in the image below.
{% endhint %}

<figure><img src="https://328555605-files.gitbook.io/~/files/v0/b/gitbook-x-prod.appspot.com/o/spaces%2Fqbl3tKh4Tqarpg8Dmgw2%2Fuploads%2F5m5LdWCVyMcTKjKlG0yy%2Fblender_import_high.png?alt=media&amp;token=1be9c8ce-92b5-4143-b3cc-12141a7321b4" alt=""><figcaption><p>Ex)  Left: OBJ (Sclae:0.010) / Right: FBX (Scale:1.00)</p></figcaption></figure>

## Retopology in Blender

{% hint style="info" %}
Blender offers various Addons (helper scripts) to make retopology easier.\
\
You can easily apply Retopology or Remesh by searching on various websites like [Blender Market](https://blendermarket.com/categories/addons), [Blender addons](https://blender-addons.org/), etc. \
\
How to apply Addon can be found in the [Blender official manual](https://docs.blender.org/manual/ko/dev/editors/preferences/addons.html), and for how to use it, please refer to the download page of the Addon or various YouTube tutorials. \
\
The current guidelines explain how to do retopology without using Addons.
{% endhint %}

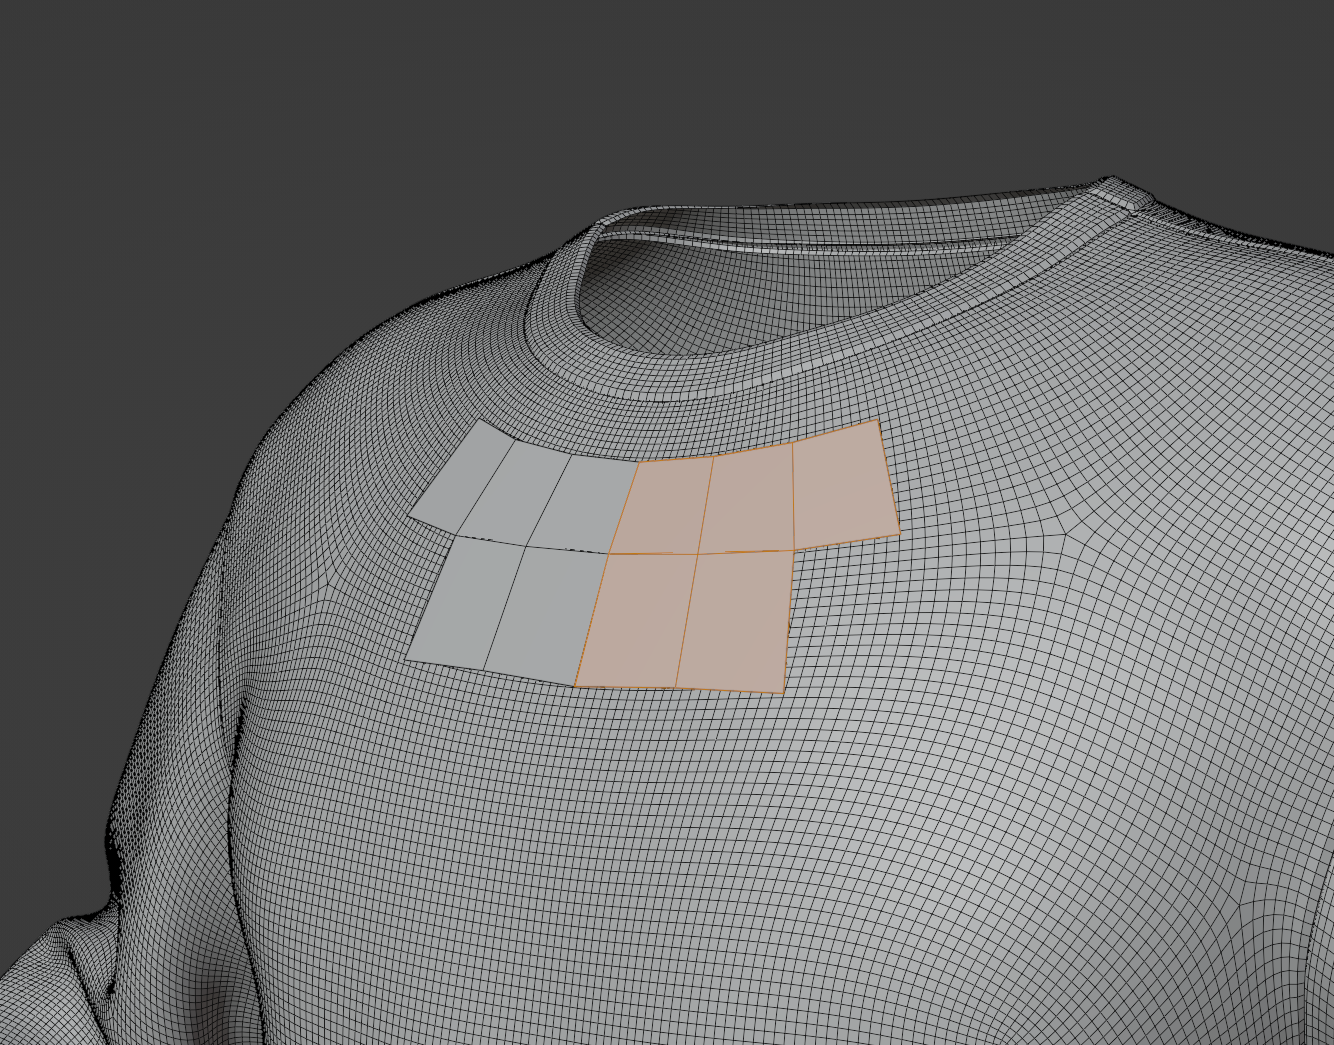
1. Select \[Shift + A] - \[Plane] to create a new mesh.

<figure><img src="https://328555605-files.gitbook.io/~/files/v0/b/gitbook-x-prod.appspot.com/o/spaces%2Fqbl3tKh4Tqarpg8Dmgw2%2Fuploads%2FUIuxVnYvvz08km9v1xmQ%2Fblender_add_plane.png?alt=media&amp;token=a02c7e54-54f7-4d4f-bbd2-4c23c7e90b76" alt=""><figcaption></figcaption></figure>

2. With the created Plane selected, press the Tab key to enter \[Edit mode], then press \[A] to select all vertices.\
   Select \[M] - \[At Center] to merge into a single vertex.

<figure><img src="https://328555605-files.gitbook.io/~/files/v0/b/gitbook-x-prod.appspot.com/o/spaces%2Fqbl3tKh4Tqarpg8Dmgw2%2Fuploads%2F5uk29syHvQw8KADViQi1%2Fblender_select_vertex.png?alt=media&amp;token=2bd0ef88-d00a-4fb9-b36c-3d450db28a5a" alt=""><figcaption><p>Select all vertexes</p></figcaption></figure>

<figure><img src="https://328555605-files.gitbook.io/~/files/v0/b/gitbook-x-prod.appspot.com/o/spaces%2Fqbl3tKh4Tqarpg8Dmgw2%2Fuploads%2FhY03IjKQlaT0oIK0znbT%2Fblender_merge_vertex.png?alt=media&amp;token=483c35a7-43fb-436d-b624-9d552ca58351" alt=""><figcaption></figcaption></figure>

3. Click \[Snap] - \[Face Project] to activate.

<figure><img src="https://328555605-files.gitbook.io/~/files/v0/b/gitbook-x-prod.appspot.com/o/spaces%2Fqbl3tKh4Tqarpg8Dmgw2%2Fuploads%2F35GNnGFCL9Z9g6Q7o2oU%2Fblender_snap.png?alt=media&amp;token=f202b56e-45c5-4671-a931-cd45cbc3c1d9" alt=""><figcaption></figcaption></figure>

4. Add **\[Modifier] - \[hrinkWrap], then select \[Target]** - Highpoly mesh.

<figure><img src="https://328555605-files.gitbook.io/~/files/v0/b/gitbook-x-prod.appspot.com/o/spaces%2Fqbl3tKh4Tqarpg8Dmgw2%2Fuploads%2FvXhrrb8xsCEP6kaM4ctE%2Fblender_shrinkwrap.png?alt=media&amp;token=47424134-393c-4db6-bbfb-efeda95c31dc" alt=""><figcaption></figcaption></figure>

<figure><img src="https://328555605-files.gitbook.io/~/files/v0/b/gitbook-x-prod.appspot.com/o/spaces%2Fqbl3tKh4Tqarpg8Dmgw2%2Fuploads%2FOQojYneDfnjyX0CMYvTx%2Fblender_shrinkwrap_2.png?alt=media&amp;token=e379184b-7041-46ff-babe-4b360f0560bb" alt=""><figcaption><p>Before checking highpoly</p></figcaption></figure>

<figure><img src="https://328555605-files.gitbook.io/~/files/v0/b/gitbook-x-prod.appspot.com/o/spaces%2Fqbl3tKh4Tqarpg8Dmgw2%2Fuploads%2FNPb9CdIquW8oXMJedTRi%2Fblender_shrinkwrap_3.png?alt=media&amp;token=cf008b3c-7937-44bc-9c2d-e0861a2a6958" alt=""><figcaption><p>After checking highpoly</p></figcaption></figure>

5. Add Mirror in the Modifier as needed, merge (Apply), and create faces.

<figure><img src="https://328555605-files.gitbook.io/~/files/v0/b/gitbook-x-prod.appspot.com/o/spaces%2Fqbl3tKh4Tqarpg8Dmgw2%2Fuploads%2FrMaAsKhOHRrmRl0bM1NB%2Fblender_retopology.png?alt=media&amp;token=4042c98e-0ed7-4e14-8e3f-bd73fcbe5021" alt=""><figcaption></figcaption></figure>

{% hint style="warning" %}
When using Mirror, activate Clipping to ensure that the vertices on both sides do not move away from the center when they touch.
{% endhint %}

<figure><img src="https://328555605-files.gitbook.io/~/files/v0/b/gitbook-x-prod.appspot.com/o/spaces%2Fqbl3tKh4Tqarpg8Dmgw2%2Fuploads%2FAZn55ehjjbNj0RfQX6zE%2Fblender_mirror.png?alt=media&amp;token=492bba68-471e-4830-a36f-7e8000b3acba" alt=""><figcaption><p>Add Mirror</p></figcaption></figure>

<figure><img src="https://328555605-files.gitbook.io/~/files/v0/b/gitbook-x-prod.appspot.com/o/spaces%2Fqbl3tKh4Tqarpg8Dmgw2%2Fuploads%2FIqNaTpnirBrIz1OzhhbF%2Fblender_mirror_clipping.png?alt=media&amp;token=a1b2d500-2a35-4e01-8a67-5c45fd6d6c91" alt=""><figcaption><p>Activate Clipping</p></figcaption></figure>

<figure><img src="https://328555605-files.gitbook.io/~/files/v0/b/gitbook-x-prod.appspot.com/o/spaces%2Fqbl3tKh4Tqarpg8Dmgw2%2Fuploads%2FltBmcSdgRzvpO9UDc0C2%2Fblender_mirror_apply.png?alt=media&amp;token=7568ad56-cc68-407e-8d8c-ba615bdf6f2a" alt=""><figcaption><p>Apply Mirror</p></figcaption></figure>

{% hint style="info" %}
Activate **\[Object] - \[Viewport Displa]y - \[In Front]** to see the created faces more clearly.
{% endhint %}

<figure><img src="https://328555605-files.gitbook.io/~/files/v0/b/gitbook-x-prod.appspot.com/o/spaces%2Fqbl3tKh4Tqarpg8Dmgw2%2Fuploads%2FrdPcZamuWilF9Co8uWuE%2Fblender_infront.png?alt=media&amp;token=50a38fcb-8d92-4d73-ba5e-4f4fa4cc46b1" alt=""><figcaption></figcaption></figure>

6. Work as much as possible along the wire flow of the base model.

Properly modeling the mesh to bend is also important. When the avatar moves, the mesh points move in alignment with the unseen internal skeleton. Therefore, the number of vertices used determines how intricately an item can bend. If a part of the avatar bends a lot, arrange the joint seams closely to smooth out the curves.

<figure><img src="https://328555605-files.gitbook.io/~/files/v0/b/gitbook-x-prod.appspot.com/o/spaces%2Fqbl3tKh4Tqarpg8Dmgw2%2Fuploads%2F7GtnUh2eVstUgePS5iku%2Fblender_wire.png?alt=media&amp;token=c19014e5-ed8e-4930-b2df-502dc4526c98" alt=""><figcaption></figcaption></figure>

{% hint style="info" %}
It's important to evenly distribute the overall spacing of the wire. Be aware of working the edges of the parts with movement range such as armpits, elbows, pelvis, knees, etc.
{% endhint %}

{% hint style="info" %}
For the waist, please organize the wire neatly in a straight line as much as possible.\
\
For joint areas, work with a radial method for the wire.
{% endhint %}

<figure><img src="https://328555605-files.gitbook.io/~/files/v0/b/gitbook-x-prod.appspot.com/o/spaces%2Fqbl3tKh4Tqarpg8Dmgw2%2Fuploads%2FXXqiKwAqMnMFyQ1mPcS2%2Fblender_wire_2.png?alt=media&amp;token=73fc0273-b752-421b-9fb4-cdf1c8484094" alt=""><figcaption></figcaption></figure>

7. Maintain the thickness at the end of the mesh.

<figure><img src="https://328555605-files.gitbook.io/~/files/v0/b/gitbook-x-prod.appspot.com/o/spaces%2Fqbl3tKh4Tqarpg8Dmgw2%2Fuploads%2Fbg4CNKGbWqByfVu9syKV%2Fblender_edge.png?alt=media&amp;token=0383f1cd-26a1-4ee5-b12e-e88544d6c031" alt=""><figcaption></figcaption></figure>

<figure><img src="https://328555605-files.gitbook.io/~/files/v0/b/gitbook-x-prod.appspot.com/o/spaces%2Fqbl3tKh4Tqarpg8Dmgw2%2Fuploads%2FTy2yTXDPEeCcqvYIu07Z%2Fblender_edge_2.png?alt=media&amp;token=bb3fdb83-1b02-4cd5-b178-e529209f82a1" alt=""><figcaption></figcaption></figure>

{% hint style="info" %}
To get good results when baking normal maps, the low-polygon mesh must sufficiently wrap the high-polygon mesh, and it is good to make it at about 45 degrees at the end.
{% endhint %}

8. Check for any errors such as dropped vertices, overlapping faces, etc., then select \[Ctrl+A] -\[ All Transforms] to reset all Transform values and finish the work.

<figure><img src="https://328555605-files.gitbook.io/~/files/v0/b/gitbook-x-prod.appspot.com/o/spaces%2Fqbl3tKh4Tqarpg8Dmgw2%2Fuploads%2FBEXdQrM6DHDL7jCwGySv%2Fblender_apply.png?alt=media&amp;token=bafa5baf-220e-41e4-8d60-496e3e99d459" alt=""><figcaption></figcaption></figure>

<figure><img src="https://328555605-files.gitbook.io/~/files/v0/b/gitbook-x-prod.appspot.com/o/spaces%2Fqbl3tKh4Tqarpg8Dmgw2%2Fuploads%2Fs7PQy4PV8tpS2skVRwGC%2Fblender_apply_2.png?alt=media&amp;token=60a771f2-9401-4cfa-8261-e71dfd1b2b96" alt=""><figcaption><p>Complete</p></figcaption></figure>


# Bake

## Baking in 3ds Max

{% hint style="info" %}
Before baking, you need UV information for the completed low-polygons. Please proceed after creating the UV map.
{% endhint %}

{% hint style="info" %}

### **Please check the smoothing groups before rendering**

Please organize the smoothing groups. If a face with an angle of more than 45 degrees is composed of a single smoothing group, the baked normal map will appear as if it is directly affected on the surface.
{% endhint %}

For the inner mesh, different smoothing groups should be specified.

Detach the UV of the separated mesh.

<figure><img src="https://328555605-files.gitbook.io/~/files/v0/b/gitbook-x-prod.appspot.com/o/spaces%2Fqbl3tKh4Tqarpg8Dmgw2%2Fuploads%2F0s6bfN3JSuZnwwP7nvSW%2Fimage.png?alt=media&amp;token=fc2abd4b-7e36-4f2f-9110-2a255f4d996d" alt=""><figcaption></figcaption></figure>

<figure><img src="https://328555605-files.gitbook.io/~/files/v0/b/gitbook-x-prod.appspot.com/o/spaces%2Fqbl3tKh4Tqarpg8Dmgw2%2Fuploads%2FuC76t3Hux8FKG3zaUdG7%2Fimage.png?alt=media&amp;token=670fa5d8-ddd1-4c00-9464-003d5b3e2a6b" alt=""><figcaption></figcaption></figure>

1. **Place the created high-poly and low-poly on top of each other.**

The low-poly should adequately cover the high-poly to appear similar in volume.

It's also smooth to handle the Cage in Projection.

<figure><img src="https://328555605-files.gitbook.io/~/files/v0/b/gitbook-x-prod.appspot.com/o/spaces%2Fqbl3tKh4Tqarpg8Dmgw2%2Fuploads%2Fgn1giM2v4hsnXLMCxzj9%2Fimage.png?alt=media&amp;token=2c2b7b04-4f6c-4be4-8519-218958ff54d8" alt=""><figcaption></figcaption></figure>

Select **\[Projection]** in the Modifier List.

<figure><img src="https://328555605-files.gitbook.io/~/files/v0/b/gitbook-x-prod.appspot.com/o/spaces%2Fqbl3tKh4Tqarpg8Dmgw2%2Fuploads%2FD98R6bET6yWqSyWL8UQy%2Fimage.png?alt=media&amp;token=6de614f9-9b62-4250-bab1-02a973050ef6" alt=""><figcaption></figcaption></figure>

<figure><img src="https://328555605-files.gitbook.io/~/files/v0/b/gitbook-x-prod.appspot.com/o/spaces%2Fqbl3tKh4Tqarpg8Dmgw2%2Fuploads%2FpekaKw8Vk7iGORhWEVRK%2Fimage.png?alt=media&amp;token=cbf18253-4152-47b2-8314-d022b7e3c937" alt=""><figcaption></figcaption></figure>

In the Pick List, select the **\[HIGH]** as the baking target.

<figure><img src="https://328555605-files.gitbook.io/~/files/v0/b/gitbook-x-prod.appspot.com/o/spaces%2Fqbl3tKh4Tqarpg8Dmgw2%2Fuploads%2FTUgNDgpacCrxSFJf98WD%2Fimage.png?alt=media&amp;token=8764aa33-8a0c-4be5-b04a-c35e8f6d2bd9" alt=""><figcaption></figcaption></figure>

Activate Shaded and adjust the Amount value to completely wrap the high-poly.

{% hint style="danger" %}
If the distance between the high-poly and Cage is too far, the quality of the baked normal map decreases.
{% endhint %}

<figure><img src="https://328555605-files.gitbook.io/~/files/v0/b/gitbook-x-prod.appspot.com/o/spaces%2Fqbl3tKh4Tqarpg8Dmgw2%2Fuploads%2Fh88LWR0a3vbfknSesjuE%2Fimage.png?alt=media&amp;token=8bdb7370-23a1-4206-aef6-abb449650b84" alt=""><figcaption></figcaption></figure>

Press shortcut 0 and execute \[Render to Texture].

<figure><img src="https://328555605-files.gitbook.io/~/files/v0/b/gitbook-x-prod.appspot.com/o/spaces%2Fqbl3tKh4Tqarpg8Dmgw2%2Fuploads%2F5gUXl6wanA9OzckMzBDc%2Fimage.png?alt=media&amp;token=f272ce9b-6111-4c0b-9b1a-8f6ba84e0858" alt=""><figcaption></figcaption></figure>

2. **Set the options as follows:**

Activate \[Projection Mapping] - \[Confirm Setup] - \[Render Filter] - Check \[Global Super Sampling] Option

\[ADD] - Normal map 1024x1024 Size - Rendering

{% hint style="info" %}
&#x20; Set the baking size high and then reduce it as needed
{% endhint %}

<figure><img src="https://328555605-files.gitbook.io/~/files/v0/b/gitbook-x-prod.appspot.com/o/spaces%2Fqbl3tKh4Tqarpg8Dmgw2%2Fuploads%2FXNaJ62qCEjd4hTJnkoJg%2Fimage.png?alt=media&amp;token=a11bfdb1-b179-4c77-ac80-36f0f5cb60ca" alt=""><figcaption></figcaption></figure>

Here is the completed normal map after rendering.

The red area below is caused by the lack of high-polygon information.

You need to clean up the basic normal map base color.

<figure><img src="https://328555605-files.gitbook.io/~/files/v0/b/gitbook-x-prod.appspot.com/o/spaces%2Fqbl3tKh4Tqarpg8Dmgw2%2Fuploads%2FDWHSTPk7UXzRTV9epMT9%2Fimage.png?alt=media&amp;token=503b9cb6-3428-481b-88c8-b9dfbd531d20" alt=""><figcaption></figcaption></figure>

3. **Complete to clean**

<figure><img src="https://328555605-files.gitbook.io/~/files/v0/b/gitbook-x-prod.appspot.com/o/spaces%2Fqbl3tKh4Tqarpg8Dmgw2%2Fuploads%2FS5o2VUw5oSmcN9hhgdsQ%2Fimage.png?alt=media&amp;token=45c5fcfa-ebe6-41f2-b104-32e4e5c7068a" alt=""><figcaption></figcaption></figure>

<figure><img src="https://328555605-files.gitbook.io/~/files/v0/b/gitbook-x-prod.appspot.com/o/spaces%2Fqbl3tKh4Tqarpg8Dmgw2%2Fuploads%2FUzdOv8TiFM5quvsF3bGV%2Fimage.png?alt=media&amp;token=0c977c7b-367c-4946-a2d9-eeb46a7285d5" alt=""><figcaption></figcaption></figure>

## Baking in Blender

{% hint style="info" %}
Before baking, UV information for the completed low-polygon is required. Please create a UV map.
{% endhint %}

### Setting the Scene for Bake

1. Go to \[Edit] - \[Preferences]- \[System] tab and set \[Cycles Render Device].

{% hint style="info" %}
If the CPU performance is similar to or better than the graphics card, enable it; otherwise, disable it\
\
For GTX graphics card: Choose CUDA / For RTX graphics card: Choose OptiX.
{% endhint %}

<figure><img src="https://328555605-files.gitbook.io/~/files/v0/b/gitbook-x-prod.appspot.com/o/spaces%2Fqbl3tKh4Tqarpg8Dmgw2%2Fuploads%2F5I0FfPUTC83jn2MM2MVh%2Fblender_prefernece_system.png?alt=media&amp;token=29f5207e-4dcb-478e-9efc-a7802671e752" alt=""><figcaption></figcaption></figure>

2. Switch the Render Engine to **\[Cycles]** in the Render tab.

<figure><img src="https://328555605-files.gitbook.io/~/files/v0/b/gitbook-x-prod.appspot.com/o/spaces%2Fqbl3tKh4Tqarpg8Dmgw2%2Fuploads%2FA2x8qotPaCytwPBH41SK%2Fblender_scene_engine.png?alt=media&amp;token=3c49ab1e-5c9e-48be-8263-7abe0294a269" alt=""><figcaption></figcaption></figure>

{% hint style="info" %}
Depending on the PC environment, changing the Device option to GPU Compute can improve the baking speed.
{% endhint %}

3. Set up the \[Render] - \[Bake] settings as follows:

<figure><img src="https://328555605-files.gitbook.io/~/files/v0/b/gitbook-x-prod.appspot.com/o/spaces%2Fqbl3tKh4Tqarpg8Dmgw2%2Fuploads%2F6fKD7BuH70JtIYFVsVgI%2Fblender_bake_setting.png?alt=media&amp;token=99ea809a-24a2-48b9-a9b9-ec9b3ab4c01c" alt=""><figcaption></figcaption></figure>

### Bake Normal map

1. Select the low-polygon and deactivate Auto Smooth under Data - Normals.

<figure><img src="https://328555605-files.gitbook.io/~/files/v0/b/gitbook-x-prod.appspot.com/o/spaces%2Fqbl3tKh4Tqarpg8Dmgw2%2Fuploads%2FTrvTkAxCk4AXJCn3y1UC%2Fblender_auto_smooth.png?alt=media&amp;token=b59fdeba-f7f3-4b82-9952-46deb07510af" alt=""><figcaption></figcaption></figure>

2. Press the Tab key to switch to Edit Mode, select the outer and inner faces, then right-click - Shade Smooth.

<figure><img src="https://328555605-files.gitbook.io/~/files/v0/b/gitbook-x-prod.appspot.com/o/spaces%2Fqbl3tKh4Tqarpg8Dmgw2%2Fuploads%2FC7vCsNiFWJwwDxefy1lz%2Fblender_poly_select.png?alt=media&amp;token=1660cde5-8a8b-4f8a-b44f-b7144aac0fd5" alt=""><figcaption><p>Left: Select the outer face / Right: Select the inner face</p></figcaption></figure>

<figure><img src="https://328555605-files.gitbook.io/~/files/v0/b/gitbook-x-prod.appspot.com/o/spaces%2Fqbl3tKh4Tqarpg8Dmgw2%2Fuploads%2FhtFa6Re1JnseaufW43qi%2Fblender_shade_smooth.png?alt=media&amp;token=dbbb70dd-48c4-4543-bde4-24c8ddf90cd6" alt=""><figcaption></figcaption></figure>

3. Align the low-polygon and high-polygon so that they completely overlap.

{% hint style="warning" %}
Check if both the low-polygon and high-polygon are visible.
{% endhint %}

<figure><img src="https://328555605-files.gitbook.io/~/files/v0/b/gitbook-x-prod.appspot.com/o/spaces%2Fqbl3tKh4Tqarpg8Dmgw2%2Fuploads%2FdWDaZ7MbZUaqsbf8Abxb%2Fblender_low_high.png?alt=media&amp;token=661baa9f-031b-4d57-a774-70978453a2ff" alt=""><figcaption></figcaption></figure>

<figure><img src="https://328555605-files.gitbook.io/~/files/v0/b/gitbook-x-prod.appspot.com/o/spaces%2Fqbl3tKh4Tqarpg8Dmgw2%2Fuploads%2FwLyGRc5gh0xiabombDFv%2Fblender_low_high_2.png?alt=media&amp;token=747206b3-97ad-4c98-8778-4d026791525e" alt=""><figcaption></figcaption></figure>

4. Click the \[Shading] button at the top to switch to the Shading Editor.

<figure><img src="https://328555605-files.gitbook.io/~/files/v0/b/gitbook-x-prod.appspot.com/o/spaces%2Fqbl3tKh4Tqarpg8Dmgw2%2Fuploads%2FwpuAQYr0Z8K517iz4RBe%2Fblender_shading.png?alt=media&amp;token=48496b41-4cc7-447a-8ce6-f438f645a963" alt=""><figcaption></figcaption></figure>

5. Select the low-polygon and, if there is no applied material, click the \[New] button to add a new material.

<figure><img src="https://328555605-files.gitbook.io/~/files/v0/b/gitbook-x-prod.appspot.com/o/spaces%2Fqbl3tKh4Tqarpg8Dmgw2%2Fuploads%2FF6igcARIsYn1NLxGdinA%2Fblender_new_material.png?alt=media&amp;token=d2509259-041b-4072-9aa9-8da4668cb903" alt=""><figcaption></figcaption></figure>

6. Set up the material nodes as shown in the image below.

<figure><img src="https://328555605-files.gitbook.io/~/files/v0/b/gitbook-x-prod.appspot.com/o/spaces%2Fqbl3tKh4Tqarpg8Dmgw2%2Fuploads%2FejULie5FJMjzNOwnAndU%2Fblender_material_node_normal.png?alt=media&amp;token=84505394-9957-40f7-a281-81a0c2f6be3f" alt=""><figcaption></figcaption></figure>

7. Click the **\[New]** button of the Image Texture to create a new texture.

<figure><img src="https://328555605-files.gitbook.io/~/files/v0/b/gitbook-x-prod.appspot.com/o/spaces%2Fqbl3tKh4Tqarpg8Dmgw2%2Fuploads%2Fndn2CPZoqf4IwlvDEKkW%2Fblender_image_texture.png?alt=media&amp;token=08100d69-6fcf-48c0-b247-f1fba6de2361" alt=""><figcaption></figcaption></figure>

8. If there is an applied material for the high-polygon, click the X button to remove it.

<figure><img src="https://328555605-files.gitbook.io/~/files/v0/b/gitbook-x-prod.appspot.com/o/spaces%2Fqbl3tKh4Tqarpg8Dmgw2%2Fuploads%2FW9rBM1glhQzRTAYpzQfi%2Fblender_material_delete.png?alt=media&amp;token=ebbe1938-d772-4c87-962b-f614d3a12b36" alt=""><figcaption></figcaption></figure>

9. With the high-polygon selected, hold down the Shift key and select the low-polygon.

{% hint style="info" %}
If selecting from the Outliner instead of the Viewport, hold down the Ctrl key while selecting the low-polygon after selecting the high-polygon.
{% endhint %}

<figure><img src="https://328555605-files.gitbook.io/~/files/v0/b/gitbook-x-prod.appspot.com/o/spaces%2Fqbl3tKh4Tqarpg8Dmgw2%2Fuploads%2FmVeyvV2ftcMS2EJ35hdT%2Fblender_low_high_3.png?alt=media&amp;token=95fd4a74-4acc-4760-8190-68dbd8bb6a2c" alt=""><figcaption></figcaption></figure>

{% hint style="danger" %}
Please check the color of the model name shown in the outliner. The low-polygon should be yellow (active).
{% endhint %}

10. Press the **\[Bake]** button in **\[Render] - \[Bake]** to render the normal map.

{% hint style="info" %}
In **\[Render] - \[Bake] - \[Selected to Active]**, adjust the Extrusion value and Max Ray Distance value gradually to render a clean and sharp normal map.
{% endhint %}

<figure><img src="https://328555605-files.gitbook.io/~/files/v0/b/gitbook-x-prod.appspot.com/o/spaces%2Fqbl3tKh4Tqarpg8Dmgw2%2Fuploads%2FEnzYvVEUlBZom5pGd3vE%2Fblender_bake.png?alt=media&amp;token=e86320d4-d44d-4725-b6d1-81c3aa29e7a7" alt=""><figcaption></figcaption></figure>

<figure><img src="https://328555605-files.gitbook.io/~/files/v0/b/gitbook-x-prod.appspot.com/o/spaces%2Fqbl3tKh4Tqarpg8Dmgw2%2Fuploads%2FSgnqYEzenaTUs0AtDCbL%2Fblender_bake_normal.png?alt=media&amp;token=8e34d866-a2f4-43d5-a4ad-2abc06d89b7d" alt=""><figcaption><p>Left: Before / RIght: After</p></figcaption></figure>

11. Click the Texture Paint button at the top to switch to Paint mode.

<figure><img src="https://328555605-files.gitbook.io/~/files/v0/b/gitbook-x-prod.appspot.com/o/spaces%2Fqbl3tKh4Tqarpg8Dmgw2%2Fuploads%2FvfoXFvrZdgIsjT3CgkEP%2Fblender_texture_paint.png?alt=media&amp;token=bbfdbfb0-1c3a-4a9d-ac15-c3f13d8d5521" alt=""><figcaption></figcaption></figure>

12. Cleanly modify the inner face using tools like Draw and Fill.

<figure><img src="https://328555605-files.gitbook.io/~/files/v0/b/gitbook-x-prod.appspot.com/o/spaces%2Fqbl3tKh4Tqarpg8Dmgw2%2Fuploads%2FqUqkMKqz19P7DdAKcX4o%2Fblender_normal_before.png?alt=media&amp;token=ff9507de-772f-4658-9d7e-86863ebe35db" alt=""><figcaption><p>Before</p></figcaption></figure>

<figure><img src="https://328555605-files.gitbook.io/~/files/v0/b/gitbook-x-prod.appspot.com/o/spaces%2Fqbl3tKh4Tqarpg8Dmgw2%2Fuploads%2FPEUkfG2IVNfBjmlEMn64%2Fblender_normal_after.png?alt=media&amp;token=c2350288-445d-4077-8cbc-d2c2a89e956f" alt=""><figcaption><p>After</p></figcaption></figure>

13. Click the Image - Save button to save the completed normal map.

<figure><img src="https://328555605-files.gitbook.io/~/files/v0/b/gitbook-x-prod.appspot.com/o/spaces%2Fqbl3tKh4Tqarpg8Dmgw2%2Fuploads%2Fk85JuIbhmOEcxm4zZDnh%2Fblender_normal_save.png?alt=media&amp;token=bb48ef76-ae86-442b-9784-7f0347630078" alt=""><figcaption></figcaption></figure>

{% hint style="danger" %}
When saving, make sure to change the Color Space to \[**Non-Color]**.
{% endhint %}

<figure><img src="https://328555605-files.gitbook.io/~/files/v0/b/gitbook-x-prod.appspot.com/o/spaces%2Fqbl3tKh4Tqarpg8Dmgw2%2Fuploads%2FF4VSR4tH3FU50B29pe1J%2Fblender_normal_save_option.png?alt=media&amp;token=cba4cdc4-5c29-4f0c-b990-139a5c998e84" alt=""><figcaption></figcaption></figure>

<figure><img src="https://328555605-files.gitbook.io/~/files/v0/b/gitbook-x-prod.appspot.com/o/spaces%2Fqbl3tKh4Tqarpg8Dmgw2%2Fuploads%2FDQTnZwnCASZMDxhjnDIW%2Fblender_normal_complete.png?alt=media&amp;token=9a0667b5-1f24-4225-bc4e-c75a05e22a4e" alt="" width="563"><figcaption><p>Complete to apply normal map</p></figcaption></figure>


# Texturing

This process is for applying colors, images, three-dimensionality, and textures to the created the clothing mesh.

## PBR Texture

{% hint style="info" %}
We recommend creating texture based on the [Physically Based Render (PBR)](https://namu.wiki/w/%EB%AC%BC%EB%A6%AC%20%EA%B8%B0%EB%B0%98%20%EB%A0%8C%EB%8D%94%EB%A7%81) method.&#x20;

This guide is based on Adobe Substance 3D Painter.
{% endhint %}

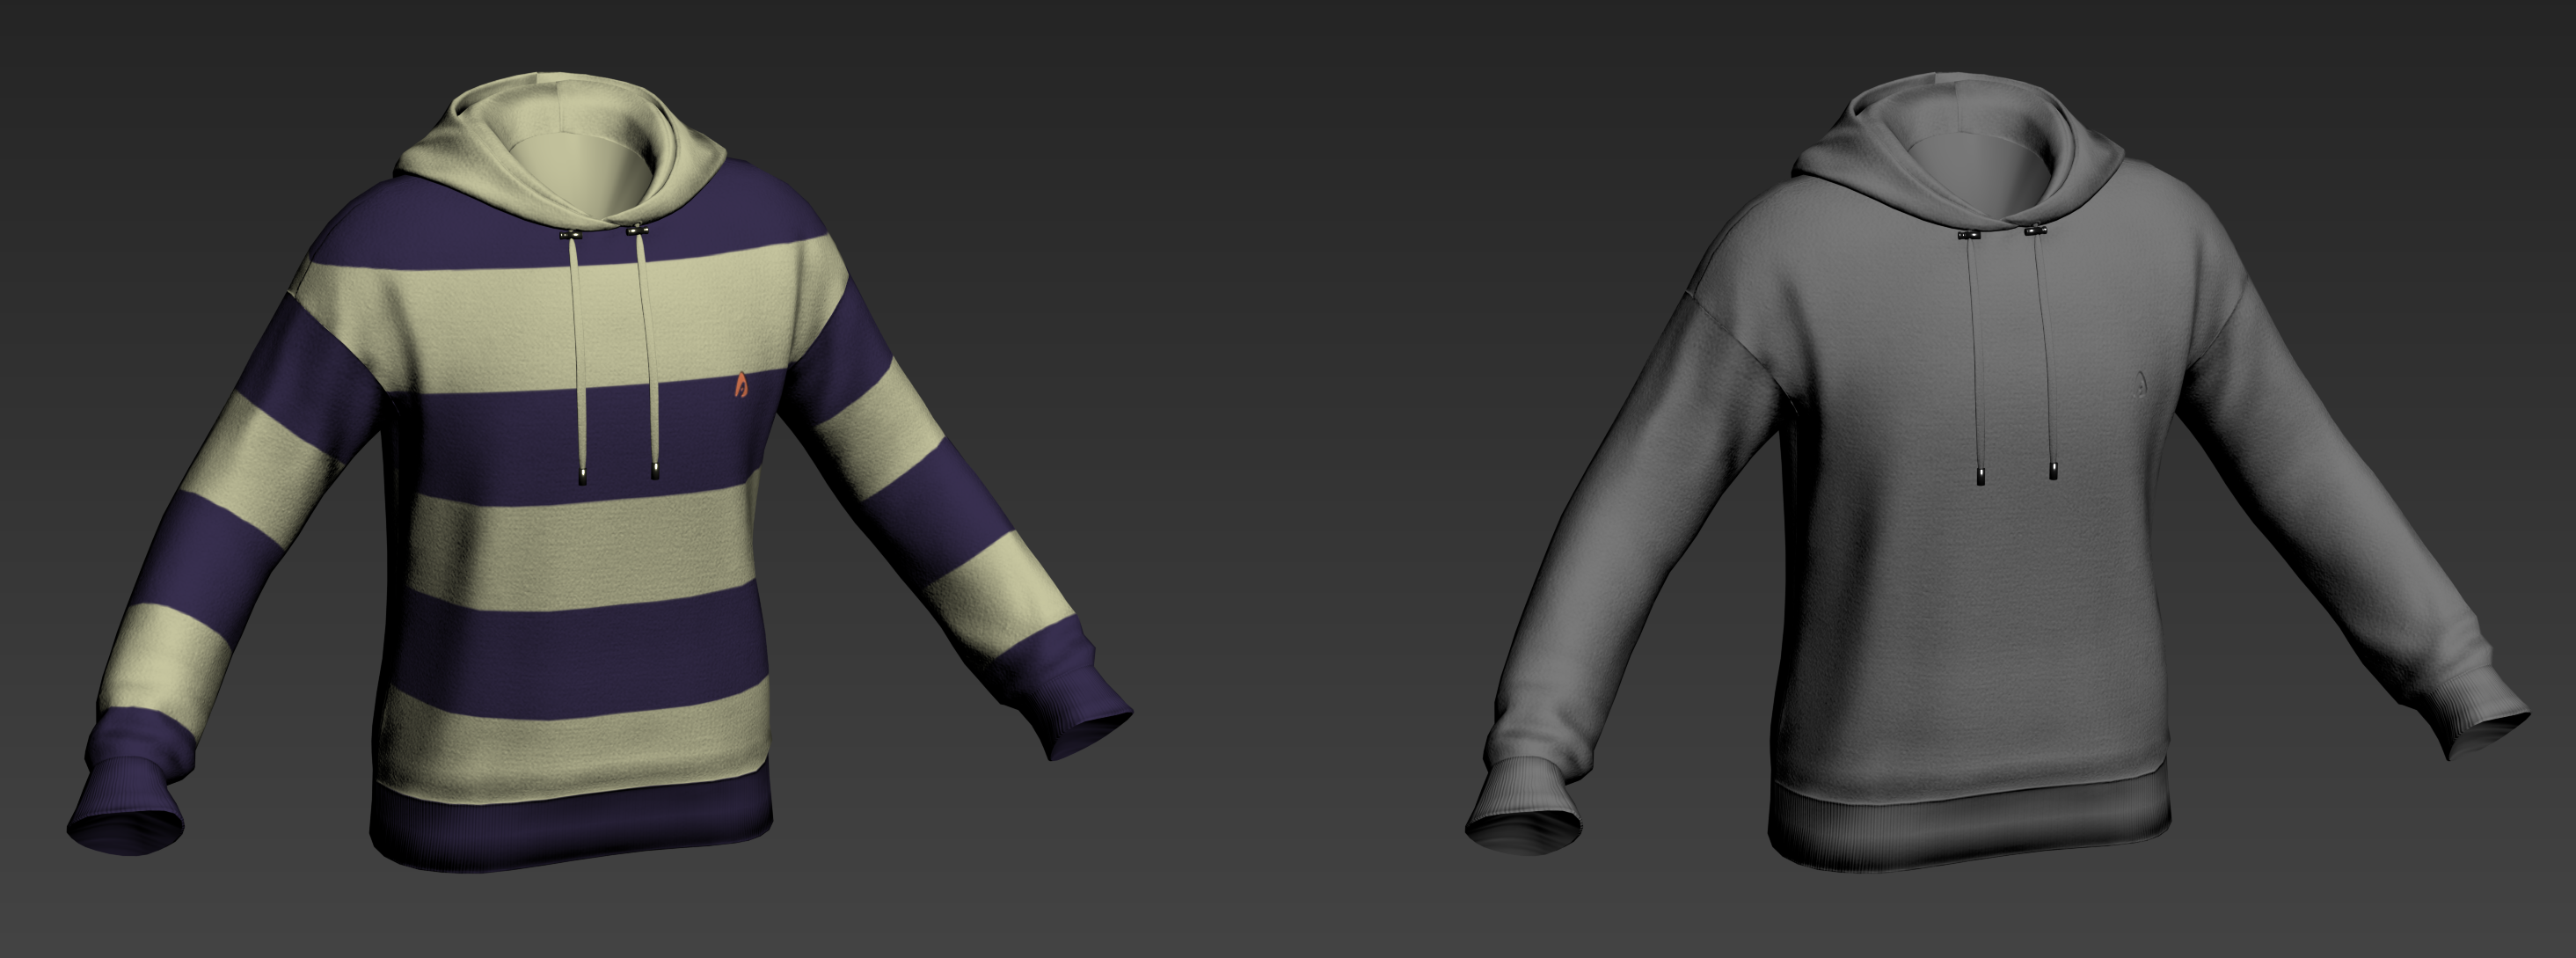
## Examples of the clothing created using the PBR method in ALTAVA.

<figure><img src="https://328555605-files.gitbook.io/~/files/v0/b/gitbook-x-prod.appspot.com/o/spaces%2Fqbl3tKh4Tqarpg8Dmgw2%2Fuploads%2FwK4yNhMd5IQK10eMx1J4%2Fimage.png?alt=media&amp;token=986d242e-eea1-428b-b45b-77a67270f5a0" alt=""><figcaption></figcaption></figure>

<figure><img src="https://328555605-files.gitbook.io/~/files/v0/b/gitbook-x-prod.appspot.com/o/spaces%2Fqbl3tKh4Tqarpg8Dmgw2%2Fuploads%2FmQ53Tp13lUl1w8EDYyvY%2Fimage.png?alt=media&amp;token=47ab1178-8692-45cd-8bf3-2507da94ed4f" alt=""><figcaption></figcaption></figure>

<figure><img src="https://328555605-files.gitbook.io/~/files/v0/b/gitbook-x-prod.appspot.com/o/spaces%2Fqbl3tKh4Tqarpg8Dmgw2%2Fuploads%2F4mFhAgCzh61h7FuU81Fm%2Fimage.png?alt=media&amp;token=68b6e7c6-a867-4ce1-a86d-aa55da4c4c68" alt=""><figcaption></figcaption></figure>

<figure><img src="https://328555605-files.gitbook.io/~/files/v0/b/gitbook-x-prod.appspot.com/o/spaces%2Fqbl3tKh4Tqarpg8Dmgw2%2Fuploads%2FP40f8LJNkw9o4h5ttjjH%2Fimage.png?alt=media&amp;token=4741035c-69ac-467d-9fa5-06c5998994d0" alt=""><figcaption></figcaption></figure>


# UV Mapping

## 1. Unwrap UV

{% hint style="info" %}
Please keep the UV island count under 200.
{% endhint %}

UV mapping is the process of taking the vertices of a 3D mesh and mapping them onto a 2D plane. Then, this layout is used to map the texture file (image) onto the 3D mesh.

<figure><img src="https://328555605-files.gitbook.io/~/files/v0/b/gitbook-x-prod.appspot.com/o/spaces%2Fqbl3tKh4Tqarpg8Dmgw2%2Fuploads%2FkHICNFXc7cF57WVIJFrd%2Fimage.png?alt=media&amp;token=92140179-a84c-40f5-8b4d-fd050f11c9cf" alt=""><figcaption></figcaption></figure>

{% hint style="success" %}
It's good to divide UV islands based on the pattern of the outfit, which is the seams.
{% endhint %}

To prevent pixel loss, it's best to work as tightly as possible both horizontally and vertically.

<figure><img src="https://328555605-files.gitbook.io/~/files/v0/b/gitbook-x-prod.appspot.com/o/spaces%2Fqbl3tKh4Tqarpg8Dmgw2%2Fuploads%2FZA2ZBpzl1ZKK9dywUdHy%2Fimage.png?alt=media&amp;token=a8d9c2b3-7a70-43a5-bb04-e92f6419f209" alt=""><figcaption></figcaption></figure>

## **2. UV Mapping at 3Ds Max**

* Seams are perfect guides that indicate where to insert UV seams into the model. If you've modeled using references, use the outfit's seams as guides to approximately locate the UV seams.
* The UV editing system in 3Ds Max may not be sufficient for handling complex UV layouts. Utilizing additional UV workflow features can streamline your work effectively.
* A well-organized UV layout can simplify texturing. Aligning UV islands based on their direction can be extremely helpful, although this process is largely manual.

## **3. Exporting UV Maps**

If you plan to texture with Substance Painter, you can skip this step. This process is useful when you only want to decorate the outfit with colors and simple drawings in Photoshop.

<figure><img src="https://328555605-files.gitbook.io/~/files/v0/b/gitbook-x-prod.appspot.com/o/spaces%2Fqbl3tKh4Tqarpg8Dmgw2%2Fuploads%2FYJ4CgR3rZcedQFL5MoPy%2Fimage.png?alt=media&amp;token=3e6120ac-bcad-43e4-8046-94b9e2cd3fd7" alt=""><figcaption></figcaption></figure>

To create and edit textures in a separate image editing program, you need to export the UV map as an image file.

In 3Ds Max, you can export the UV map by using the "Render UVW Template" option under the Tools menu of the UV Layout panel. When you select this option, the file menu will appear.

We recommend to reduce the resolution of the UV layout to 1024 x 1024 pixels.

Align the parts marked in green to match the image and then click "Render UV Template.

<figure><img src="https://328555605-files.gitbook.io/~/files/v0/b/gitbook-x-prod.appspot.com/o/spaces%2Fqbl3tKh4Tqarpg8Dmgw2%2Fuploads%2Fpg6P7KBoz7MHh6dQUH1u%2Fimage.png?alt=media&amp;token=097f6553-a19f-4397-a3f3-504ad7e224a4" alt=""><figcaption></figcaption></figure>

Click the save button.

<figure><img src="https://328555605-files.gitbook.io/~/files/v0/b/gitbook-x-prod.appspot.com/o/spaces%2Fqbl3tKh4Tqarpg8Dmgw2%2Fuploads%2FLm4JE2b9ZdNE0EjAjYJY%2Fimage.png?alt=media&amp;token=69663e45-427b-4f7c-a749-8728c676d6df" alt=""><figcaption></figcaption></figure>

After specifying the location and filename, set the **\[save as type]** to Targa image File and save.


# Creating Texture Maps - Substance 3D Painter

{% hint style="success" %}
For the high quality of Substance 3D Painter, the best quality of Normal texture is essential.
{% endhint %}

1. Import the exported outfit file (fbx) into Substance Painter.

<figure><img src="https://328555605-files.gitbook.io/~/files/v0/b/gitbook-x-prod.appspot.com/o/spaces%2Fqbl3tKh4Tqarpg8Dmgw2%2Fuploads%2Fcn2oIuCTA05J4J5jNLks%2Fimage.png?alt=media&amp;token=867d8626-6d6f-4352-a09f-c7d83394c23b" alt=""><figcaption></figcaption></figure>

2\. Select a texture size of 1024 and work with OpenGL.&#x20;

Add the baked textures into the "bake mesh map" section. You can see that one Normal map has been added.&#x20;

To increase the quality, it's good to utilize many baked textures.

<figure><img src="https://328555605-files.gitbook.io/~/files/v0/b/gitbook-x-prod.appspot.com/o/spaces%2Fqbl3tKh4Tqarpg8Dmgw2%2Fuploads%2FfWXHhm76RrQBVcebz0dR%2Fimage.png?alt=media&amp;token=f86a4046-1ec3-4541-8f9d-001d0a537d4c" alt=""><figcaption></figcaption></figure>

3. In the \[MESH MAPS] menu on the right, insert the imported Normal map and click \[Bake Mesh Maps].

<figure><img src="https://328555605-files.gitbook.io/~/files/v0/b/gitbook-x-prod.appspot.com/o/spaces%2Fqbl3tKh4Tqarpg8Dmgw2%2Fuploads%2Ffqfurbzq5726R1vlSXPb%2Fimage.png?alt=media&amp;token=5a1fa992-48c0-48a3-bcac-6da0d168d8ac" alt=""><figcaption></figcaption></figure>

<figure><img src="https://328555605-files.gitbook.io/~/files/v0/b/gitbook-x-prod.appspot.com/o/spaces%2Fqbl3tKh4Tqarpg8Dmgw2%2Fuploads%2FfjMjlYPT27I4cOxaxlM0%2Fimage.png?alt=media&amp;token=30ad2298-93dd-44aa-8d34-2e90b4852105" alt=""><figcaption></figcaption></figure>

4. When a baking options window will appear, check the imported Normal map and other necessary maps, then execute \[Bake selected textures]. Textures will be automatically generated based on the imported Normal map information

<figure><img src="https://328555605-files.gitbook.io/~/files/v0/b/gitbook-x-prod.appspot.com/o/spaces%2Fqbl3tKh4Tqarpg8Dmgw2%2Fuploads%2FW0gnGInxyTVrKwo2nogO%2Fimage.png?alt=media&amp;token=012ca27c-2a06-4f5a-bc5a-dec68331fbc6" alt=""><figcaption></figcaption></figure>

Depending on the mesh shape and baked textures, you can adjust the option values to modify the texture results.

5. Once completed, click \[Return to painting mode] to return to the previous editing screen.

Drag and drop the material you want onto the outfit to apply it.

Adjust the material particle scale and use layer masking for texturing.

<figure><img src="https://328555605-files.gitbook.io/~/files/v0/b/gitbook-x-prod.appspot.com/o/spaces%2Fqbl3tKh4Tqarpg8Dmgw2%2Fuploads%2FeZrleWWQqyn1C98VBvl3%2Fimage.png?alt=media&amp;token=682eb82a-96ba-49a1-8de5-d46b8b19957c" alt=""><figcaption></figcaption></figure>

Now, let's add the Altava logo.

<figure><img src="https://328555605-files.gitbook.io/~/files/v0/b/gitbook-x-prod.appspot.com/o/spaces%2Fqbl3tKh4Tqarpg8Dmgw2%2Fuploads%2FjsnpncpxOrBOTuoFiLVj%2Fimage.png?alt=media&amp;token=0650f5ce-a8a5-4a66-917b-0ebddcc09262" alt=""><figcaption></figcaption></figure>

Press Alt + the mask window to view only the mask area.

<figure><img src="https://328555605-files.gitbook.io/~/files/v0/b/gitbook-x-prod.appspot.com/o/spaces%2Fqbl3tKh4Tqarpg8Dmgw2%2Fuploads%2FwJYFzNe2l4ap89OHKcsm%2Fimage.png?alt=media&amp;token=921cb2ed-b37c-4e90-8f3b-0c890aff177f" alt=""><figcaption></figcaption></figure>

Return to the material viewer screen by pressing the shortcut M.

<figure><img src="https://328555605-files.gitbook.io/~/files/v0/b/gitbook-x-prod.appspot.com/o/spaces%2Fqbl3tKh4Tqarpg8Dmgw2%2Fuploads%2FBxLPM1RugbMxttabNWK3%2Fimage.png?alt=media&amp;token=41442b07-4869-4eea-b6c9-7d346e194d7b" alt=""><figcaption></figcaption></figure>

6. Choose the color of the logo and adjust the metal and roughness values to give it a shiny appearance.

<figure><img src="https://328555605-files.gitbook.io/~/files/v0/b/gitbook-x-prod.appspot.com/o/spaces%2Fqbl3tKh4Tqarpg8Dmgw2%2Fuploads%2FnPOifbF914e6MGxlwGo0%2Fimage.png?alt=media&amp;token=b26f9679-b3c0-430f-8f13-bc1506629d86" alt=""><figcaption></figcaption></figure>

7. Once the texture work is completed, click \[Export Textures] to extract the textures.

<figure><img src="https://328555605-files.gitbook.io/~/files/v0/b/gitbook-x-prod.appspot.com/o/spaces%2Fqbl3tKh4Tqarpg8Dmgw2%2Fuploads%2FcRLSpGhWHCrHpkFJ8tNj%2Fimage.png?alt=media&amp;token=154dee5c-1bf6-45eb-8220-f6ffdabc31b0" alt=""><figcaption></figcaption></figure>

* &#x20;Set the location to save.
* Select \[PBR Metallic Roughness].
* Select the file type as PNG.
* Save at a size of 1024 (feel free to save a separate high-quality original if you want).

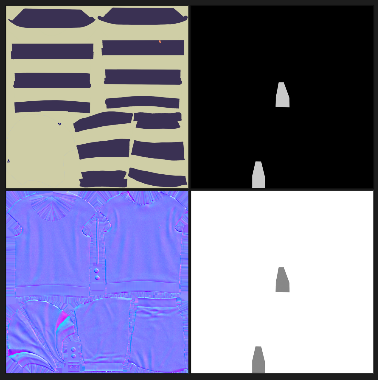
8. You can check the extracted **Diffuse (BaseColor), Metallic, Normal, and Roughness textures.**

<figure><img src="https://328555605-files.gitbook.io/~/files/v0/b/gitbook-x-prod.appspot.com/o/spaces%2Fqbl3tKh4Tqarpg8Dmgw2%2Fuploads%2FJgZhV70A4QZ973SQbtYf%2Fimage.png?alt=media&amp;token=a9cddbde-534d-42a0-832d-a3dabad26882" alt=""><figcaption></figcaption></figure>


# Exporting

Once you have created the 3D model, please export it as an FBX file. Before uploading, ensure that clothing textures are included in the FBX file. \
\
Also, when exporting, please check the following checklists:

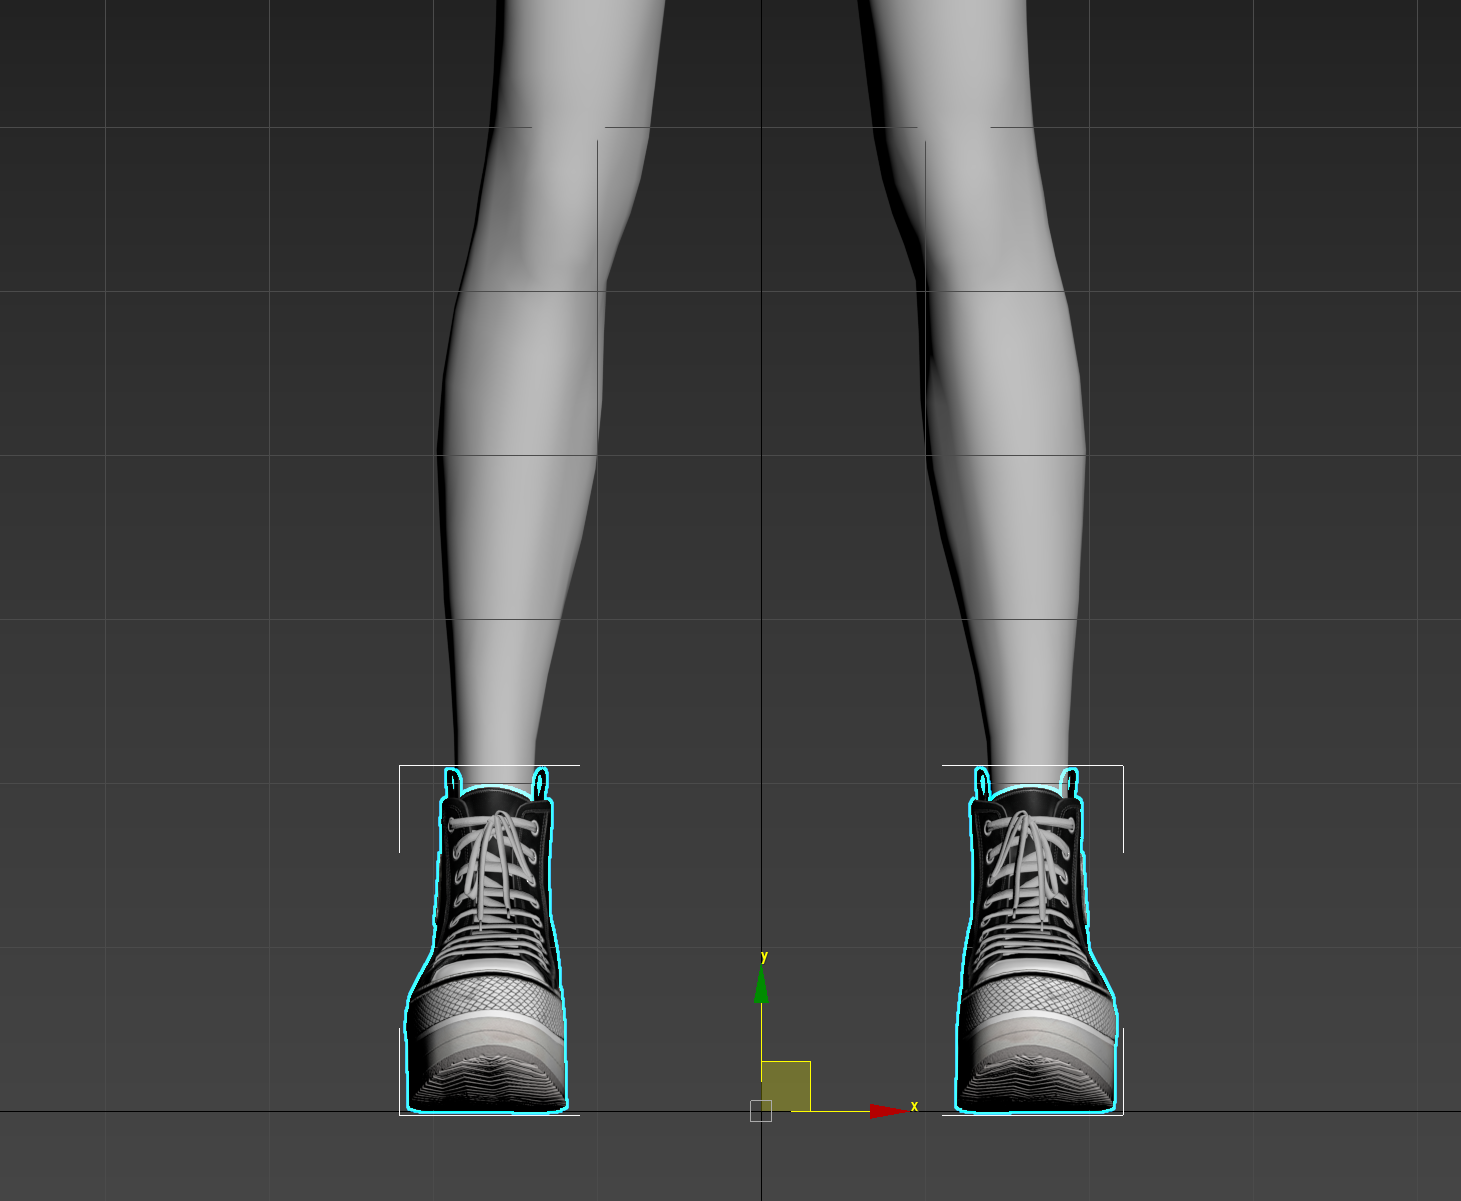
* Is the clothing fitted properly on the base model?
* Are textures correctly applied to the material?
* Is the left and right symmetry correct (for shoes only)?

For information on exporting from 3Ds Max, click [here](/creator-guide/3d-modeling/exporting/3ds-max). For information on exporting from Blender, click[ here.](/creator-guide/3d-modeling/exporting/blender)


# 3ds Max

{% hint style="danger" %}
Before uploading, make sure to include the clothing texture in the FBX.
{% endhint %}

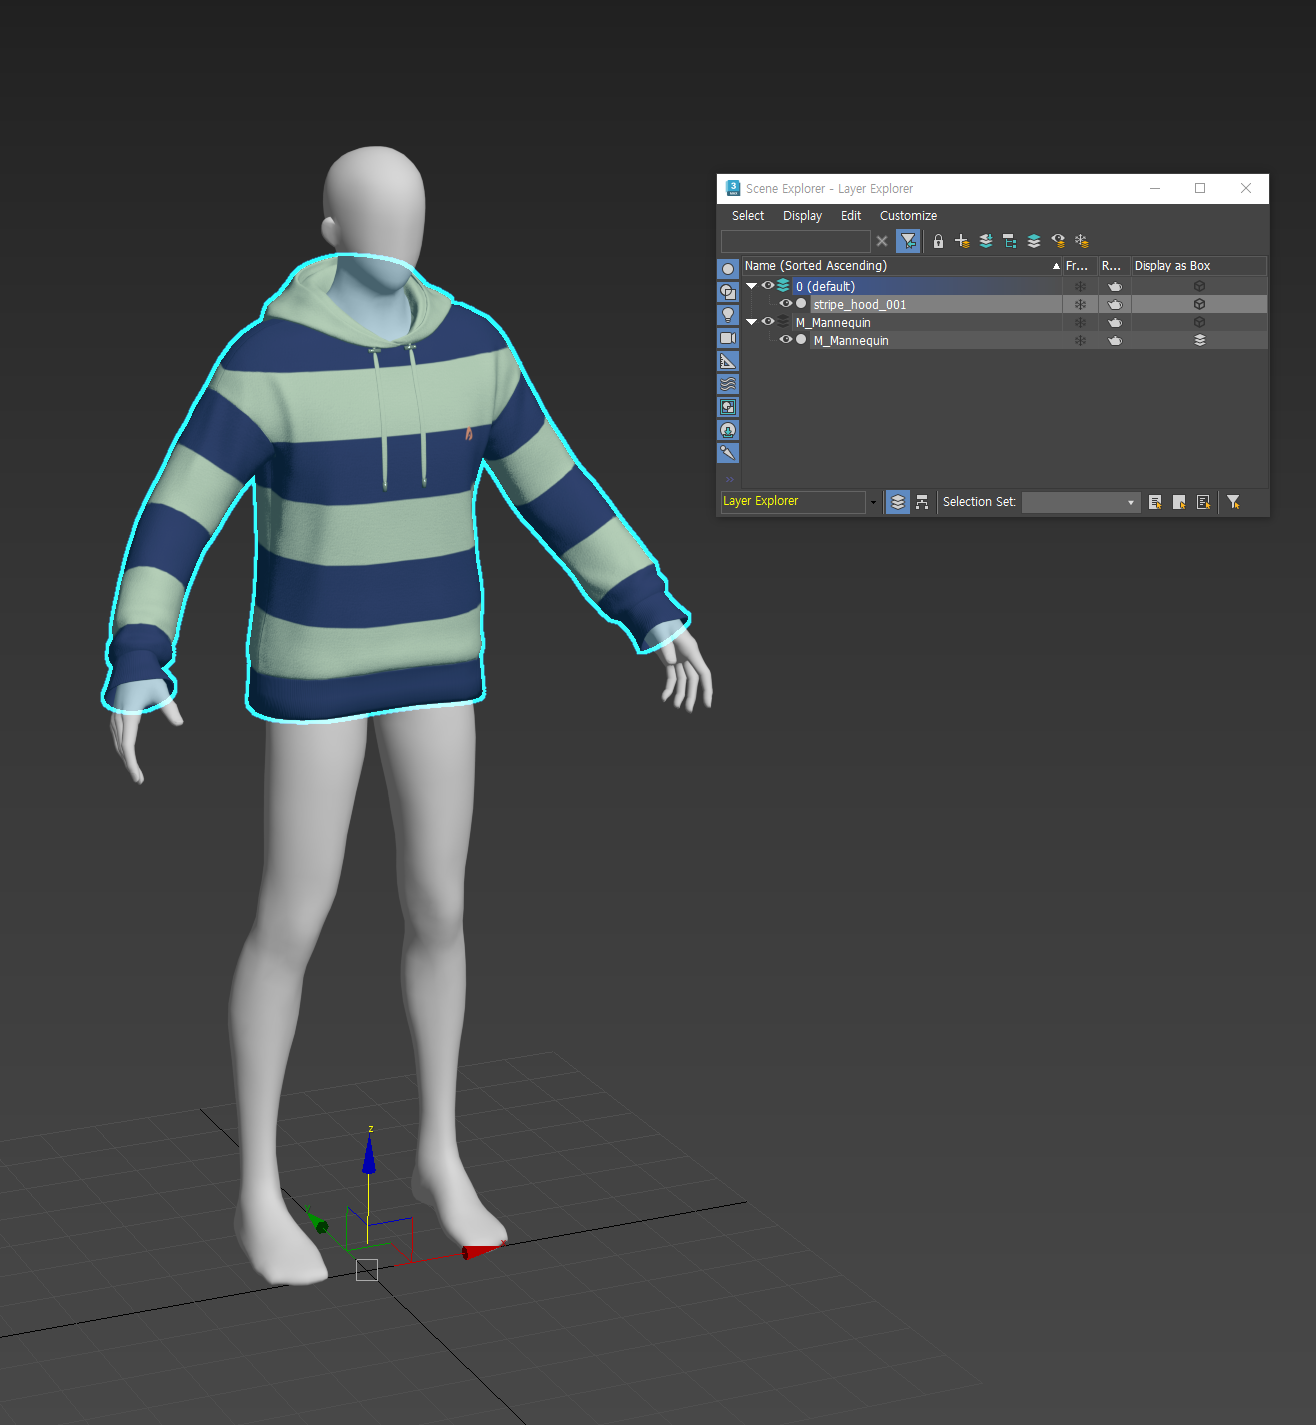
### **1.**  Check the clothing object created on the base model

* In the Base Model Setup, check that the created clothing is properly worn.&#x20;

{% hint style="info" %}
If the unit setup or pivot is incorrect, the position may not align correctly.
{% endhint %}

<figure><img src="https://328555605-files.gitbook.io/~/files/v0/b/gitbook-x-prod.appspot.com/o/spaces%2Fqbl3tKh4Tqarpg8Dmgw2%2Fuploads%2F0k89jjLAQv1v0FOtyogN%2F%EC%9D%B5%EC%8A%A4%ED%8F%AC%ED%8A%B80.png?alt=media&amp;token=3b4125c9-1730-4c14-8dff-d5bebac31080" alt=""><figcaption><p><mark style="color:blue;"><strong>O: The clothing is applied correctly.</strong></mark></p></figcaption></figure>

<figure><img src="https://328555605-files.gitbook.io/~/files/v0/b/gitbook-x-prod.appspot.com/o/spaces%2Fqbl3tKh4Tqarpg8Dmgw2%2Fuploads%2FiUM3v27fEpGPzzrPoztd%2F%EC%9D%B5%EC%8A%A4%ED%8F%AC%ED%8A%B80_1.png?alt=media&amp;token=30b63f6c-b2c7-4060-a8c4-e01205fea6cb" alt=""><figcaption><p><mark style="color:red;"><strong>X: In the case, you must check Units Setup , Scale , Pivo</strong>t.</mark></p></figcaption></figure>

### 2. Applying textures to materials

1. Click on the **\[Material Editor]** in the top menu or press the shortcut key (M).

<figure><img src="https://328555605-files.gitbook.io/~/files/v0/b/gitbook-x-prod.appspot.com/o/spaces%2Fqbl3tKh4Tqarpg8Dmgw2%2Fuploads%2FfK8wvJAuiblx4nRgvJ5x%2F%EC%9D%B5%EC%8A%A4%ED%8F%AC%ED%8A%B8_1.png?alt=media&amp;token=9f3285ba-cd7c-4c41-ac3d-1b3c07ec4f7f" alt=""><figcaption></figcaption></figure>

2. Connect the textures created using **Physical Material** to the nodes below.

<figure><img src="https://328555605-files.gitbook.io/~/files/v0/b/gitbook-x-prod.appspot.com/o/spaces%2Fqbl3tKh4Tqarpg8Dmgw2%2Fuploads%2F5VpZCxJa3mfXy1HNyD99%2F%EC%9D%B5%EC%8A%A4%ED%8F%AC%ED%8A%B82.png?alt=media&amp;token=96175eb5-854b-4b14-bd72-f91b93254b39" alt=""><figcaption></figcaption></figure>

<figure><img src="https://328555605-files.gitbook.io/~/files/v0/b/gitbook-x-prod.appspot.com/o/spaces%2Fqbl3tKh4Tqarpg8Dmgw2%2Fuploads%2Fna3edQe7DN0p7GDs2pgV%2F%EC%9D%B5%EC%8A%A4%ED%8F%AC%ED%8A%B83.png?alt=media&amp;token=b68ffe8a-b3ac-4f09-bab0-529315a97428" alt=""><figcaption></figcaption></figure>

{% hint style="info" %}
**Diffuse 1024x1024**&#x20;

**Normal 1024x1024&#x20;**<mark style="color:red;">**(Using OpenGL method)**</mark>

**Metallic 1024x1024**

**Roughness 1024x1024**&#x20;
{% endhint %}

<figure><img src="https://328555605-files.gitbook.io/~/files/v0/b/gitbook-x-prod.appspot.com/o/spaces%2Fqbl3tKh4Tqarpg8Dmgw2%2Fuploads%2FeA6KwLlLq9L5TCgQSE8s%2F%EC%9D%B5%EC%8A%A4%ED%8F%AC%ED%8A%B84.png?alt=media&amp;token=1a96acb8-e1dd-4486-abeb-babf1a71807b" alt=""><figcaption></figcaption></figure>

{% hint style="warning" %}
Use the OpenGL method for the normal map. 3Ds Max uses DirectX, so you need to check the **Y-axis** to make it appear correctly.
{% endhint %}

<figure><img src="https://328555605-files.gitbook.io/~/files/v0/b/gitbook-x-prod.appspot.com/o/spaces%2Fqbl3tKh4Tqarpg8Dmgw2%2Fuploads%2FxuYQUs3wAmnmSdJzEC87%2Fimage.png?alt=media&amp;token=99ce17d4-7af3-48d3-9846-918674057e65" alt=""><figcaption><p>Apply material</p></figcaption></figure>

<figure><img src="https://328555605-files.gitbook.io/~/files/v0/b/gitbook-x-prod.appspot.com/o/spaces%2Fqbl3tKh4Tqarpg8Dmgw2%2Fuploads%2FMWH4jkpRcNU4BGCJVTJp%2Fimage.png?alt=media&amp;token=b40b6d70-eee1-4266-ae88-b4e179e3dff5" alt=""><figcaption><p>You need to change to <mark style="color:red;"><strong>Realistic Material</strong></mark> view to see it properly.</p></figcaption></figure>

### 3. Apply material

<figure><img src="https://328555605-files.gitbook.io/~/files/v0/b/gitbook-x-prod.appspot.com/o/spaces%2Fqbl3tKh4Tqarpg8Dmgw2%2Fuploads%2FgmqIjNRFLW1OoKL83zwC%2Fimage.png?alt=media&amp;token=1294874a-eef6-4bb3-b31c-5302fa63e9b8" alt=""><figcaption><p><mark style="color:blue;"><strong>O: The material has been applied correctly.</strong></mark></p></figcaption></figure>

{% hint style="info" %}
Please check that there are no holes showing the inner mesh and that it is well sealed.
{% endhint %}

<figure><img src="https://328555605-files.gitbook.io/~/files/v0/b/gitbook-x-prod.appspot.com/o/spaces%2Fqbl3tKh4Tqarpg8Dmgw2%2Fuploads%2F4k7atjWNmmADkRcW7ypT%2Fimage.png?alt=media&amp;token=5a237b11-b769-42fa-a632-5eba93de1e91" alt=""><figcaption><p><mark style="color:blue;"><strong>O: The normal map has been applied correctly.</strong></mark></p></figcaption></figure>

{% hint style="info" %}
Ensure that the normal is not flipped and that the applied texture is inserted correctly.
{% endhint %}

<figure><img src="https://328555605-files.gitbook.io/~/files/v0/b/gitbook-x-prod.appspot.com/o/spaces%2Fqbl3tKh4Tqarpg8Dmgw2%2Fuploads%2FYN2Lug4bPHyvOvYixQL3%2Fimage.png?alt=media&amp;token=c723c04b-fe2d-4e27-ae31-ff5f1b40ca1f" alt=""><figcaption><p><mark style="color:red;"><strong>X</strong></mark></p></figcaption></figure>

<figure><img src="https://328555605-files.gitbook.io/~/files/v0/b/gitbook-x-prod.appspot.com/o/spaces%2Fqbl3tKh4Tqarpg8Dmgw2%2Fuploads%2FKP0F0uULDhdcqAztF9Rq%2Fimage.png?alt=media&amp;token=601eb972-a7c9-4c7a-947b-00537a497790" alt=""><figcaption></figcaption></figure>

{% hint style="warning" %}
If a normal map has been created with OpenGL, it must be checked Y for it to appear normal.
{% endhint %}

### 4. Export the clothing as FBX

1. Select the clothing to upload individually.

{% hint style="info" %}
The clothing mesh to be extracted should be composed as a single form.
{% endhint %}

<figure><img src="https://328555605-files.gitbook.io/~/files/v0/b/gitbook-x-prod.appspot.com/o/spaces%2Fqbl3tKh4Tqarpg8Dmgw2%2Fuploads%2FawJTDpE8YioKsHa1q2Cw%2Fimage.png?alt=media&amp;token=4d7b11e0-bb1f-4ea1-b3d2-275579e9a7f3" alt=""><figcaption></figcaption></figure>

2. \[File] - \[Export] - \[Export Selected] (Export the selected mesh) Select and export as FBX.

<figure><img src="https://328555605-files.gitbook.io/~/files/v0/b/gitbook-x-prod.appspot.com/o/spaces%2Fqbl3tKh4Tqarpg8Dmgw2%2Fuploads%2FinVoSk1bTfxGzu7Dl0T0%2Fimage.png?alt=media&amp;token=11141c97-db32-4539-8e3d-6dfd764eb214" alt=""><figcaption></figcaption></figure>

3. Check the following FBX Export options.

<figure><img src="https://328555605-files.gitbook.io/~/files/v0/b/gitbook-x-prod.appspot.com/o/spaces%2Fqbl3tKh4Tqarpg8Dmgw2%2Fuploads%2FZWWYjF5VZ6RIbZnMJufu%2Fimage.png?alt=media&amp;token=1455828c-021f-4571-a829-fb3f859f5f82" alt=""><figcaption></figcaption></figure>

{% hint style="success" %}
Check Embed Media to ensure the FBX is extracted with the texture included.
{% endhint %}

{% hint style="danger" %}
Please make sure to **uncheck Animation**. There may be errors during conversion if it's checked.
{% endhint %}

### 5. Export the shoes as FBX

Shoes must be uploaded as a symmetrical pair, both left and right.

<figure><img src="https://328555605-files.gitbook.io/~/files/v0/b/gitbook-x-prod.appspot.com/o/spaces%2Fqbl3tKh4Tqarpg8Dmgw2%2Fuploads%2F7aG9TtyJTZ62prVQkWX2%2Fimage.png?alt=media&amp;token=481cbeb9-4761-4cec-a480-b6e3d98cfb2f" alt=""><figcaption></figcaption></figure>

{% hint style="info" %}
Only the left shoes will be visible when editing in the design tool.
{% endhint %}

<figure><img src="https://328555605-files.gitbook.io/~/files/v0/b/gitbook-x-prod.appspot.com/o/spaces%2Fqbl3tKh4Tqarpg8Dmgw2%2Fuploads%2Fwnj28ZSEn8E1FGdBcK4Z%2Fimage.png?alt=media&amp;token=aa326354-636a-4793-8135-a50eb99517f8" alt=""><figcaption></figcaption></figure>


# Blender

{% hint style="danger" %}
Before uploading, make sure to include the clothing texture in the FBX.
{% endhint %}

### 1. Check the clothing created on the base model

1. In the Base Model Setup, check that the created clothing is properly worn. Find out more [\[Setting up Base model - Blender\]](/creator-guide/3d-modeling/setting-up-base-model/blender)

{% hint style="info" %}
If the unit setup or pivot is incorrect, the position may not align correctly.
{% endhint %}

<figure><img src="https://328555605-files.gitbook.io/~/files/v0/b/gitbook-x-prod.appspot.com/o/spaces%2Fqbl3tKh4Tqarpg8Dmgw2%2Fuploads%2FwlJ3JbC9e3iPjtGlRs9t%2Fblender_clothes_correct.png?alt=media&amp;token=2fc59cee-53de-44fb-8f56-9a142eda90c1" alt=""><figcaption><p><mark style="color:blue;"><strong>O: The clothing is applied correctly.</strong></mark></p></figcaption></figure>

<figure><img src="https://328555605-files.gitbook.io/~/files/v0/b/gitbook-x-prod.appspot.com/o/spaces%2Fqbl3tKh4Tqarpg8Dmgw2%2Fuploads%2FLydSRmlqgddYFyHy1V0H%2Fblender_clothes_incorrect.png?alt=media&amp;token=2d276914-3980-427c-9b0e-88178f160c60" alt=""><figcaption><p><mark style="color:red;"><strong>X: In the case, you must check Units Setup , Scale , Pivo</strong>t.</mark></p></figcaption></figure>

## 2. Applying textures to materials

1. Click on the Shading button in the top menu to navigate to the Shading Editor.

<figure><img src="https://328555605-files.gitbook.io/~/files/v0/b/gitbook-x-prod.appspot.com/o/spaces%2Fqbl3tKh4Tqarpg8Dmgw2%2Fuploads%2FwpuAQYr0Z8K517iz4RBe%2Fblender_shading.png?alt=media&amp;token=48496b41-4cc7-447a-8ce6-f438f645a963" alt=""><figcaption></figcaption></figure>

2. After selecting the clothing modeling, if no material is applied, click the **\[New]** button to add a new material.

<figure><img src="https://328555605-files.gitbook.io/~/files/v0/b/gitbook-x-prod.appspot.com/o/spaces%2Fqbl3tKh4Tqarpg8Dmgw2%2Fuploads%2FF6igcARIsYn1NLxGdinA%2Fblender_new_material.png?alt=media&amp;token=d2509259-041b-4072-9aa9-8da4668cb903" alt=""><figcaption></figcaption></figure>

3. Use Principled BSDF to connect nodes as shown in the image below.

<figure><img src="https://328555605-files.gitbook.io/~/files/v0/b/gitbook-x-prod.appspot.com/o/spaces%2Fqbl3tKh4Tqarpg8Dmgw2%2Fuploads%2FrEI3ngXKgS4itCOK4KoZ%2Fblender_material_node.png?alt=media&amp;token=05609523-fa80-473f-807b-b141f721a429" alt=""><figcaption></figcaption></figure>

<figure><img src="https://328555605-files.gitbook.io/~/files/v0/b/gitbook-x-prod.appspot.com/o/spaces%2Fqbl3tKh4Tqarpg8Dmgw2%2Fuploads%2FXlmQF40VORCXLwtXIm6W%2Ftextures.png?alt=media&amp;token=6395eb8d-3b85-4799-a00d-c13b4a2ee72a" alt="" width="375"><figcaption></figcaption></figure>

{% hint style="info" %}
**Diffuse 1024x1024**&#x20;

**Normal 1024x1024&#x20;**<mark style="color:red;">**(Using OpenGL method)**</mark>

**Metallic 1024x1024**

**Roughness 1024x1024**&#x20;
{% endhint %}

<figure><img src="https://328555605-files.gitbook.io/~/files/v0/b/gitbook-x-prod.appspot.com/o/spaces%2Fqbl3tKh4Tqarpg8Dmgw2%2Fuploads%2F4y9pcf63yhDpgbzy5XNu%2Fblender_colorspace.png?alt=media&amp;token=6b00eec8-cbf9-47fd-824c-34e029e50c80" alt=""><figcaption></figcaption></figure>

{% hint style="danger" %}
The Color Space for the Normal, Metallic, and Roughness textures should be set to Non-Color.
{% endhint %}

## 3. Apply material

<figure><img src="https://328555605-files.gitbook.io/~/files/v0/b/gitbook-x-prod.appspot.com/o/spaces%2Fqbl3tKh4Tqarpg8Dmgw2%2Fuploads%2FX9a8RkFasfLgwJnHhf4l%2Fblender_apply_material.png?alt=media&amp;token=0fc86a59-6748-4001-9cee-726e778f575b" alt=""><figcaption><p><mark style="color:blue;"><strong>O: The material has been applied correctly.</strong></mark></p></figcaption></figure>

{% hint style="warning" %}
To accurately check the texture color, please set the Color Management as shown in the image below.
{% endhint %}

<figure><img src="https://328555605-files.gitbook.io/~/files/v0/b/gitbook-x-prod.appspot.com/o/spaces%2Fqbl3tKh4Tqarpg8Dmgw2%2Fuploads%2FpwXpKep2gCtvtzwWUVZk%2Fblender_color_management.png?alt=media&amp;token=6d7c1306-5e66-4669-89f6-0fc0a5e4e348" alt=""><figcaption></figcaption></figure>

{% hint style="warning" %}
Please check that there are no holes showing the inner mesh, ensure the normal is not flipped, and verify that the applied texture is inserted correctly.
{% endhint %}

<figure><img src="https://328555605-files.gitbook.io/~/files/v0/b/gitbook-x-prod.appspot.com/o/spaces%2Fqbl3tKh4Tqarpg8Dmgw2%2Fuploads%2FQJ8EbdkMwiUP0qXU2F1V%2Fblender_apply_material_2.png?alt=media&amp;token=4882f3f2-8cfd-4e6f-8e62-368a4bf1c749" alt=""><figcaption></figcaption></figure>

<figure><img src="https://328555605-files.gitbook.io/~/files/v0/b/gitbook-x-prod.appspot.com/o/spaces%2Fqbl3tKh4Tqarpg8Dmgw2%2Fuploads%2FgJfqVvKnI4VIyBBfMj9r%2Fblender_apply_material_3.png?alt=media&amp;token=25feb494-6429-44ab-8f58-300ad928b938" alt=""><figcaption></figcaption></figure>

## 4. Export the clothing as FBX

1. Select the clothing to upload individually.

{% hint style="info" %}
The clothing mesh to be extracted should be composed as a single form.
{% endhint %}

<figure><img src="https://328555605-files.gitbook.io/~/files/v0/b/gitbook-x-prod.appspot.com/o/spaces%2Fqbl3tKh4Tqarpg8Dmgw2%2Fuploads%2FAoxzAXglVa2Qhnize9UK%2Fblender_select_clothes.png?alt=media&amp;token=c8d30365-c60e-4a61-966d-d8ca228e0a3e" alt=""><figcaption></figcaption></figure>

2. Select **\[File] - \[Export] - \[FBX]**

<figure><img src="https://328555605-files.gitbook.io/~/files/v0/b/gitbook-x-prod.appspot.com/o/spaces%2Fqbl3tKh4Tqarpg8Dmgw2%2Fuploads%2F85sSutpIPchcic57Q0sm%2Fblender_export.png?alt=media&amp;token=67a7d84e-e6b2-4c9a-9dc4-38be71d6ac44" alt=""><figcaption></figcaption></figure>

3. Check the following FBX Export options.

<figure><img src="https://328555605-files.gitbook.io/~/files/v0/b/gitbook-x-prod.appspot.com/o/spaces%2Fqbl3tKh4Tqarpg8Dmgw2%2Fuploads%2Fe4YPjz2GfLix0fqB29gu%2Fblender_export_setting.png?alt=media&amp;token=79e53f91-a2b1-48ee-956d-61542f11315e" alt=""><figcaption></figcaption></figure>

{% hint style="success" %}
After setting Path Mode to Copy, you need to activate Embed Textures to ensure the textures are included with the FBX export.
{% endhint %}

{% hint style="danger" %}
Please disable Bake Animation as there may be errors during conversion.
{% endhint %}

### 5. Export the shoes as FBX

Shoes must be uploaded as a symmetrical pair, both left and right.

<figure><img src="https://328555605-files.gitbook.io/~/files/v0/b/gitbook-x-prod.appspot.com/o/spaces%2Fqbl3tKh4Tqarpg8Dmgw2%2Fuploads%2FVTj6UU939xgnsVN6FAzi%2Fimage.png?alt=media&amp;token=e11a0a50-57c3-4a01-b58e-4a3ca339ff3a" alt=""><figcaption></figcaption></figure>

{% hint style="info" %}
Only the left shoes will be visible when editing in the design tool.
{% endhint %}

<figure><img src="https://328555605-files.gitbook.io/~/files/v0/b/gitbook-x-prod.appspot.com/o/spaces%2Fqbl3tKh4Tqarpg8Dmgw2%2Fuploads%2FBLmh8HTqGSOhwelHZ1BR%2Fimage.png?alt=media&amp;token=1ca70dfe-f2b2-4104-9338-320a4b662577" alt=""><figcaption></figcaption></figure>


# Units Setup

{% hint style="info" %}
**Units Setup** is a feature that allows you to set the units of length, time, angle, etc., used in the workspace. This enables users to maintain a consistent unit system when working on modeling, animation, rendering, and other tasks.
{% endhint %}

## Setting up Units Setup in 3ds Max

<figure><img src="https://328555605-files.gitbook.io/~/files/v0/b/gitbook-x-prod.appspot.com/o/spaces%2Fqbl3tKh4Tqarpg8Dmgw2%2Fuploads%2FPx4CfqxHhGCBDQlwdI7m%2Fimage.png?alt=media&amp;token=3567bbf3-4a2d-417d-acf9-06a2d9ca3a95" alt=""><figcaption></figcaption></figure>

1. Go to **\[Customize]** at the top and select **\[Units Setup]**.

<figure><img src="https://328555605-files.gitbook.io/~/files/v0/b/gitbook-x-prod.appspot.com/o/spaces%2Fqbl3tKh4Tqarpg8Dmgw2%2Fuploads%2F0fkaolhplapULeBu686t%2Fimage.png?alt=media&amp;token=ad2005ec-8d19-4417-91ad-c524721928c4" alt=""><figcaption></figcaption></figure>

2. Check **\[Metric]** and select **\[Centimeters]**.

<figure><img src="https://328555605-files.gitbook.io/~/files/v0/b/gitbook-x-prod.appspot.com/o/spaces%2Fqbl3tKh4Tqarpg8Dmgw2%2Fuploads%2FlbnRO6aXDHgEra3ETqWc%2Fimage.png?alt=media&amp;token=d85de8d8-83e3-4f27-8054-c2966201af63" alt=""><figcaption></figcaption></figure>

3. Click **\[System Unit Setup]** and ensure that 1 Unit is set to Centimeters.


# Mesh Range

{% hint style="success" %}
Please download the clothing range mesh provided in the [\[Setting up Modeling\]](/creator-guide/making-3d-models/preparing-for-modeling/altava).
{% endhint %}

<figure><img src="https://328555605-files.gitbook.io/~/files/v0/b/gitbook-x-prod.appspot.com/o/spaces%2Fqbl3tKh4Tqarpg8Dmgw2%2Fuploads%2FGVRumyv4WIehsQTE7bXO%2Fimage.png?alt=media&amp;token=a0ed72de-6462-4b92-9a71-c07d851df785" alt=""><figcaption></figcaption></figure>

<figure><img src="https://328555605-files.gitbook.io/~/files/v0/b/gitbook-x-prod.appspot.com/o/spaces%2Fqbl3tKh4Tqarpg8Dmgw2%2Fuploads%2FPZibvV8oJR8agfF85t26%2Fimage.png?alt=media&amp;token=16348d71-e1d3-489e-952e-e47bea098d57" alt=""><figcaption><p>M_ClothCage</p></figcaption></figure>

<figure><img src="https://328555605-files.gitbook.io/~/files/v0/b/gitbook-x-prod.appspot.com/o/spaces%2Fqbl3tKh4Tqarpg8Dmgw2%2Fuploads%2FDQTKTi7ZdFR2OwzQJU6a%2Fimage.png?alt=media&amp;token=8757dc43-d96d-4327-9c2c-93ba76ba883f" alt=""><figcaption><p>F_ClothCage</p></figcaption></figure>

{% hint style="info" %}

* Avoid creating clothing that deviates significantly from the shape of typical clothing.&#x20;
* Please create by the provided base mesh.&#x20;
* Ensure that the clothing does not extend beyond the range mesh.
* &#x20;Do not include accessories such as wing decorations, swords, helmets, etc., in the clothing.
  {% endhint %}


# Texture

{% hint style="success" %}
We prioritize texture creation using **a Physically Based Renderer (PBR)** approach. \
We recommend using **Adobe Substance 3D Painter** for texture creation.
{% endhint %}

### Texture Basics

ALTAVA uses a total of four textures. Please create textures with a size of 1024 x 1024 or smaller (512x512).

<table><thead><tr><th width="137">Types</th><th width="117">Size</th><th width="91">Format</th><th>Name</th></tr></thead><tbody><tr><td>Diffuse<strong>*</strong></td><td>1024x1024 </td><td>.PNG</td><td>name_diffuse</td></tr><tr><td>Normal</td><td>1024x1024 </td><td>.PNG</td><td>name_normal</td></tr><tr><td>Metallic</td><td>1024x1024</td><td>.PNG</td><td>name_metallic</td></tr><tr><td>Roughness</td><td>1024x1024 </td><td>.PNG</td><td>name_roughness</td></tr></tbody></table>

{% hint style="info" %}

* At least one of the four textures (Diffuse) is required when uploading.
* Except for hand maps or cartoon-style texturing, we recommend creating all four textures.
* If there is an Opacity map, please include it in the Diffuse map. (It cannot be applied as a separate texture.)
  {% endhint %}

We recommend using all four textures as the highest quality is achieved when all textures are included.

* **Diffuse**: Represents the colors or patterns on the model's surface. It can also depict other effects such as reflection, light transmission, and shadows depending on skill level.
* **Normal**: Used to represent the detailed three-dimensionality of the model's surface. It is generally used to make flat parts of the surface appear three-dimensional or to add detailed details.
* **Metallic**: Used to define parts of the model's surface with metallic properties.
* **Roughness**: Used to define how rough or smooth the model's surface is.
* **Ambient Occlusion**: The Ambient Occlusion map is used to define the intensity of shadows considering the surrounding lighting of the surface. This can emphasize the depth and three-dimensionality of the texture.
* **Curvature map**: Used to visualize the curvature of each part of the model to enhance the model's three-dimensionality and detail.
* **Opacity map**: A method that represents the transparency of pixels in an image or graphic. The transparency of a pixel is typically expressed as a value between 0 (completely transparent) and 1 (completely opaque).

{% hint style="info" %}
**Ambient Occlusion map and Curvature map**&#x20;

It is recommended to composite them appropriately with the Diffuse map.
{% endhint %}

<figure><img src="https://328555605-files.gitbook.io/~/files/v0/b/gitbook-x-prod.appspot.com/o/spaces%2Fqbl3tKh4Tqarpg8Dmgw2%2Fuploads%2FiUwDyuhp9o5TZJlAfz1a%2Fimage.png?alt=media&amp;token=acafb362-6c15-4069-82cd-e5abf60d4596" alt=""><figcaption><p> Left: Diffuse map<br> Right: Normal map + Diffuse map</p></figcaption></figure>

{% hint style="danger" %}
Uploading is not possible if the same texture naming is duplicated.
{% endhint %}


# Polygon count

{% hint style="info" %}
For ALTAVA, we prioritize preserving the shape of the optimized clothing and limit it to 20,000 triangles per clothing asset during conversion.&#x20;

Roblox has a limit of 4,000 triangles, and automatic optimization occurs for polygons exceeding this limit. This can result in slight deformation in the wireframe flow during conversion and may make it difficult to preserve some forms.

Therefore, to prevent mesh loss during conversion, we recommend creating models with fewer than 4,000 triangles.
{% endhint %}

## How to Check Polygon Count in 3ds Max

<figure><img src="https://328555605-files.gitbook.io/~/files/v0/b/gitbook-x-prod.appspot.com/o/spaces%2Fqbl3tKh4Tqarpg8Dmgw2%2Fuploads%2FQExxHwMVc5okJvpHsoKm%2Fimage.png?alt=media&amp;token=282386a0-f17c-418b-afcf-50d14ded920f" alt=""><figcaption></figcaption></figure>

1. Press the 7 key shortcut to display the polygon count. Then, click on the \[+] symbol and go to Configure Viewports.

<figure><img src="https://328555605-files.gitbook.io/~/files/v0/b/gitbook-x-prod.appspot.com/o/spaces%2Fqbl3tKh4Tqarpg8Dmgw2%2Fuploads%2Fxtr97d93mx8ik5SDwCZK%2Fimage.png?alt=media&amp;token=cd1ef40a-b950-401b-accb-f2e45d2f14b9" alt="" width="563"><figcaption></figcaption></figure>

2. Check Triangle Count and Total + Selection in Statistics and click OK.

<figure><img src="https://328555605-files.gitbook.io/~/files/v0/b/gitbook-x-prod.appspot.com/o/spaces%2Fqbl3tKh4Tqarpg8Dmgw2%2Fuploads%2FiNizjsIXeKmNP6hNpu5N%2Fimage.png?alt=media&amp;token=b20932ce-b6cc-466d-8e74-32e28c21a8d6" alt=""><figcaption></figcaption></figure>

3. You can check the Tris count.

## How to Check Polygon Count in Blender

1. Expand the options in **\[Overlays]** located at the top right corner of the viewport and activate **\[Statistics].**

<figure><img src="https://328555605-files.gitbook.io/~/files/v0/b/gitbook-x-prod.appspot.com/o/spaces%2Fqbl3tKh4Tqarpg8Dmgw2%2Fuploads%2FIPYc3Z7zvS1ziiUhDN6W%2Fblender_overlays.png?alt=media&amp;token=2fce3c0e-4cc3-429e-8e0c-e7e4a2f2287e" alt=""><figcaption></figcaption></figure>

2. Check the Triangles value at the top left corner of the viewport.

<figure><img src="https://328555605-files.gitbook.io/~/files/v0/b/gitbook-x-prod.appspot.com/o/spaces%2Fqbl3tKh4Tqarpg8Dmgw2%2Fuploads%2Fo9vQrU9fOEsEWDPGBjaf%2Fblender_statistics.png?alt=media&amp;token=568f60d7-3965-45c0-b52a-cf7e3c785830" alt=""><figcaption></figcaption></figure>

{% hint style="info" %}
On the left side, it displays the information of the currently selected object, while the right side shows information for the entire scene.

(The triangle count of the currently selected object / Total triangle count of all objects in the scene)
{% endhint %}


# Mesh check

## How to Check for Polygons with More than 5 Sides in 3ds Max

{% hint style="info" %}
If the object is created with N-gons, the computer needs to interpret this back into triangle form, adding an extra cumbersome step.
{% endhint %}

<figure><img src="https://328555605-files.gitbook.io/~/files/v0/b/gitbook-x-prod.appspot.com/o/spaces%2Fqbl3tKh4Tqarpg8Dmgw2%2Fuploads%2FkDMhQxSkdxVrhSnPfhNT%2Fimage.png?alt=media&amp;token=62e989cf-b642-4f58-8f57-79caa2d9ac95" alt=""><figcaption></figcaption></figure>

1. Select the clothing mesh and enter polygon selection mode.

<figure><img src="https://328555605-files.gitbook.io/~/files/v0/b/gitbook-x-prod.appspot.com/o/spaces%2Fqbl3tKh4Tqarpg8Dmgw2%2Fuploads%2F8xUPo8gE6v2EM9XvL5XA%2Fimage.png?alt=media&amp;token=a226d8c3-0c54-4415-8100-4770a24d0e82" alt=""><figcaption></figcaption></figure>

2. Go to Selection and on the right side under By Numeric, set Sides:4 and choose \[Greater Than(>)].
3. Click on the mouse cursor icon.
4. You can check all faces with more than 5 sides selected.

## How to Check for Polygons with More than 5 Sides in Blender

1. Select the model and press the Tab key to switch to Edit Mode.
2. Choose **\[Select] - \[Select All by Trait] - \[Faces by Sides]**.

<figure><img src="https://328555605-files.gitbook.io/~/files/v0/b/gitbook-x-prod.appspot.com/o/spaces%2Fqbl3tKh4Tqarpg8Dmgw2%2Fuploads%2FsI10pRrCasEvVMiL0YB8%2Fblender_select_ngons.png?alt=media&amp;token=2980f72c-d4ce-43d6-97f9-a8c8bea733ec" alt="" width="563"><figcaption></figcaption></figure>

3. In the Select Faces by Sides option at the bottom left, set Type to Greater Than.

<figure><img src="https://328555605-files.gitbook.io/~/files/v0/b/gitbook-x-prod.appspot.com/o/spaces%2Fqbl3tKh4Tqarpg8Dmgw2%2Fuploads%2FcDiq720RwQGxR1P4hu0J%2Fblender_select_ngons_2.png?alt=media&amp;token=7460b6c2-0ed0-49e2-bfd3-f2020874c559" alt=""><figcaption></figcaption></figure>

4. Setting Number of Vertices to 4 will allow you to select all faces with more than 5 sides.

<figure><img src="https://328555605-files.gitbook.io/~/files/v0/b/gitbook-x-prod.appspot.com/o/spaces%2Fqbl3tKh4Tqarpg8Dmgw2%2Fuploads%2FVvuXFsoRhfRBu8TFiB4p%2Fblender_select_ngons_3.png?alt=media&amp;token=f7895ccc-79cf-451a-aeb3-cd337e461e75" alt=""><figcaption></figcaption></figure>

## Check Unnecessary Vertices, Polygons, and Edges

{% hint style="info" %}
Please clean up any unnecessary vertex traces or mesh fragments.
{% endhint %}

<figure><img src="https://328555605-files.gitbook.io/~/files/v0/b/gitbook-x-prod.appspot.com/o/spaces%2Fqbl3tKh4Tqarpg8Dmgw2%2Fuploads%2FN2T0CB1JylDNDl1Gd75h%2Fimage.png?alt=media&amp;token=9a3a400d-0130-478e-b504-9d875367b50d" alt=""><figcaption></figcaption></figure>

## Check Inverted Mesh

{% hint style="info" %}
If the faces are flipped when resetting the pivot, please correct them to their original state.
{% endhint %}

<figure><img src="https://328555605-files.gitbook.io/~/files/v0/b/gitbook-x-prod.appspot.com/o/spaces%2Fqbl3tKh4Tqarpg8Dmgw2%2Fuploads%2Fz5xZkNmcnpKjiVgZZNrV%2Fimage.png?alt=media&amp;token=f44f8faa-7c63-4a24-946f-14c091114686" alt=""><figcaption></figcaption></figure>

<figure><img src="https://328555605-files.gitbook.io/~/files/v0/b/gitbook-x-prod.appspot.com/o/spaces%2Fqbl3tKh4Tqarpg8Dmgw2%2Fuploads%2FPwKbQ4yk5oYs5NpZoDen%2Fimage.png?alt=media&amp;token=61299821-ac3a-4955-8869-fae49ba980fd" alt=""><figcaption></figcaption></figure>

## Do Not Use Groups

{% hint style="info" %}
If you are using group objects, ungroup them and merge the meshes into one.
{% endhint %}

<figure><img src="https://328555605-files.gitbook.io/~/files/v0/b/gitbook-x-prod.appspot.com/o/spaces%2Fqbl3tKh4Tqarpg8Dmgw2%2Fuploads%2FTtRxwSzKBgEouCyrt1bC%2FGroup%202%20(1).png?alt=media&amp;token=8b1b52fd-1d5f-48d0-9099-63a108c082b9" alt=""><figcaption></figcaption></figure>

<figure><img src="https://328555605-files.gitbook.io/~/files/v0/b/gitbook-x-prod.appspot.com/o/spaces%2Fqbl3tKh4Tqarpg8Dmgw2%2Fuploads%2FxRHh4TcPwFXezmoMzNDP%2Fimage.png?alt=media&amp;token=f4494ef4-1579-4f92-9a20-23571cc57127" alt=""><figcaption></figcaption></figure>


# Polygon two sides

{% hint style="info" %}
**Two sides** refer to the common practice in 3D modeling where only one side of the model's surface is rendered. This is typically the side visually displayed. However, when rendering both sides, the system needs to perform double the graphic work, which can affect performance.
{% endhint %}

Some platforms discourage the use of Two sides to maintain optimal performance. In addition, there are instances where using Two sides can be a reason for rejection during evaluation.

1. Only ensure that the backside of the polygon is not visible.

<figure><img src="https://328555605-files.gitbook.io/~/files/v0/b/gitbook-x-prod.appspot.com/o/spaces%2Fqbl3tKh4Tqarpg8Dmgw2%2Fuploads%2FmogHnU04ccOdZr701AZk%2Fimage.png?alt=media&amp;token=4fb594e5-49b5-4692-b860-bec70d02f991" alt=""><figcaption></figcaption></figure>

2. For simple cases, as shown in the picture, the most efficient way to save on polygon count is to block the holes.

<figure><img src="https://328555605-files.gitbook.io/~/files/v0/b/gitbook-x-prod.appspot.com/o/spaces%2Fqbl3tKh4Tqarpg8Dmgw2%2Fuploads%2FVNwatPsFuVx76IJfVstG%2Fimage.png?alt=media&amp;token=8e97d79a-914d-4837-b770-e1335e977142" alt=""><figcaption></figcaption></figure>

After the work, please organize the mesh's UVs and textures.

For further details, please refer to the \[topology guidelines].


# Clipping

{% hint style="danger" %}
Please check to ensure that there are not overlapping parts between the costume mesh and the body mesh.
{% endhint %}

<figure><img src="https://328555605-files.gitbook.io/~/files/v0/b/gitbook-x-prod.appspot.com/o/spaces%2Fqbl3tKh4Tqarpg8Dmgw2%2Fuploads%2FiPlkZeYpWBhXJNvmyzNV%2Fimage.png?alt=media&amp;token=0635ef1d-3d52-4435-ab68-39a268ad8f73" alt=""><figcaption></figcaption></figure>

<figure><img src="https://328555605-files.gitbook.io/~/files/v0/b/gitbook-x-prod.appspot.com/o/spaces%2Fqbl3tKh4Tqarpg8Dmgw2%2Fuploads%2Fo3NXqWPYJktfSXKBf98d%2Fimage.png?alt=media&amp;token=889f0d35-bc09-41a7-93dc-17e2a3f9cee3" alt=""><figcaption><p>Ensure that the clothing does not penetrate the base mesh.</p></figcaption></figure>

<figure><img src="https://328555605-files.gitbook.io/~/files/v0/b/gitbook-x-prod.appspot.com/o/spaces%2Fqbl3tKh4Tqarpg8Dmgw2%2Fuploads%2FaLto4mtoz3FCdTFggwOQ%2Fimage.png?alt=media&amp;token=609abc94-78de-4127-b0aa-21c75433ef43" alt=""><figcaption><p>Ensure that the clothing does not penetrate the base mesh.</p></figcaption></figure>

{% hint style="info" %}
Please make the clothing fit properly on the body if possible. **Maintain sufficient spacing above the base mesh.**
{% endhint %}

<figure><img src="https://328555605-files.gitbook.io/~/files/v0/b/gitbook-x-prod.appspot.com/o/spaces%2Fqbl3tKh4Tqarpg8Dmgw2%2Fuploads%2F8alnIFkSXDGMUyKltp7m%2Fimage.png?alt=media&amp;token=bcba5a22-6e3a-4a4d-9912-41a7e67e19c4" alt=""><figcaption></figcaption></figure>

{% hint style="success" %}
After checking the front, back, and side meshes, please proceed with the upload.
{% endhint %}


# Reset Pivot

{% hint style="info" %}
**Pivot** is that the pivot is a tool that neatly organizes and displays data. If the data or structure changes, the pivot must be refreshed accordingly, so please reset the pivot.
{% endhint %}

{% hint style="danger" %}
After resetting the pivot, please confirm the position is X: 0.0cm, Y: 0.0cm, Z: 0.0cm. Also, please make sure to check and correct **any mesh flips or errors caused by mirroring.**
{% endhint %}

## How to Reset Pivot in Blender

1. Check if the created clothing fits well on the mannequin.

<figure><img src="https://328555605-files.gitbook.io/~/files/v0/b/gitbook-x-prod.appspot.com/o/spaces%2Fqbl3tKh4Tqarpg8Dmgw2%2Fuploads%2FwlJ3JbC9e3iPjtGlRs9t%2Fblender_clothes_correct.png?alt=media&amp;token=2fc59cee-53de-44fb-8f56-9a142eda90c1" alt=""><figcaption></figcaption></figure>

2. Select the clothing model and check the position of the Origin (Pivot).

{% hint style="info" %}
The orange small dot represents the position of the Origin (Pivot).
{% endhint %}

<figure><img src="https://328555605-files.gitbook.io/~/files/v0/b/gitbook-x-prod.appspot.com/o/spaces%2Fqbl3tKh4Tqarpg8Dmgw2%2Fuploads%2F90sfIENwFMo2K02asBxj%2Fblender_origin.png?alt=media&amp;token=2db29f1a-1699-4e67-b39f-c77ba0903fd0" alt=""><figcaption></figcaption></figure>

{% hint style="info" %}
Correct Origin (Pivot): The position of the Origin (Pivot) is at the center of the X-axis grid and Y-axis grid, and both Location values are 0. You can finalize the work in this state.
{% endhint %}

<figure><img src="https://328555605-files.gitbook.io/~/files/v0/b/gitbook-x-prod.appspot.com/o/spaces%2Fqbl3tKh4Tqarpg8Dmgw2%2Fuploads%2Fz2L9uGeIuWvZlTOEGu3Z%2Fblender_origin_correct.png?alt=media&amp;token=ab33e700-a4fc-4cd7-a6b3-6796bd0d8eb0" alt=""><figcaption><p>Correct Origin(Pivot) position</p></figcaption></figure>

3. Click **\[Ctrl+A] - \[All Transforms]** while the 3D model selected.

<figure><img src="https://328555605-files.gitbook.io/~/files/v0/b/gitbook-x-prod.appspot.com/o/spaces%2Fqbl3tKh4Tqarpg8Dmgw2%2Fuploads%2FBEXdQrM6DHDL7jCwGySv%2Fblender_apply.png?alt=media&amp;token=bafa5baf-220e-41e4-8d60-496e3e99d459" alt=""><figcaption></figcaption></figure>

{% hint style="info" %}
If the Origin (Pivot) is set correctly, you can finalize the work. \
If the Origin (Pivot) is incorrect, follow the instructions below (4-6).
{% endhint %}

4. Press the N key, then set the position of the 3D Cursor to 0 in View - 3D Cursor.

<figure><img src="https://328555605-files.gitbook.io/~/files/v0/b/gitbook-x-prod.appspot.com/o/spaces%2Fqbl3tKh4Tqarpg8Dmgw2%2Fuploads%2FxSx3kg5y38QSNyzTXiZV%2Fblender_3dcursor.png?alt=media&amp;token=6c22922e-2537-4ed1-a9c3-8e6fa3d13802" alt=""><figcaption></figcaption></figure>

5. \[Right-click] - \[Set Origin] - \[Origin to 3D Cursor] while the clothing model selected.

<figure><img src="https://328555605-files.gitbook.io/~/files/v0/b/gitbook-x-prod.appspot.com/o/spaces%2Fqbl3tKh4Tqarpg8Dmgw2%2Fuploads%2FXMW5QTZSSUwSKPpTi40V%2Fblender_setorigin.png?alt=media&amp;token=2fe8c75d-fbe1-473f-9058-7f042d10aa2d" alt=""><figcaption></figcaption></figure>

6. Check if the position of the Origin (Pivot) is at the center of the X-axis grid and Y-axis grid and if the values in \[Item] - \[Transform] - \[Location] are all 0.

<figure><img src="https://328555605-files.gitbook.io/~/files/v0/b/gitbook-x-prod.appspot.com/o/spaces%2Fqbl3tKh4Tqarpg8Dmgw2%2Fuploads%2Fz2L9uGeIuWvZlTOEGu3Z%2Fblender_origin_correct.png?alt=media&amp;token=ab33e700-a4fc-4cd7-a6b3-6796bd0d8eb0" alt=""><figcaption><p>Correct Origin(Pivot) location</p></figcaption></figure>

## How to Reset Pivot in 3Ds Max

<figure><img src="https://328555605-files.gitbook.io/~/files/v0/b/gitbook-x-prod.appspot.com/o/spaces%2Fqbl3tKh4Tqarpg8Dmgw2%2Fuploads%2FDLavULSxdfQuC1yluYTq%2Fimage.png?alt=media&amp;token=7d7a75ec-1312-4ff0-bd04-b167efd52415" alt=""><figcaption></figcaption></figure>

1. With the Pivot selected in Hierarchy, click on Affect Pivot Only.

<figure><img src="https://328555605-files.gitbook.io/~/files/v0/b/gitbook-x-prod.appspot.com/o/spaces%2Fqbl3tKh4Tqarpg8Dmgw2%2Fuploads%2FOrucB2gIOERRb3KVbMVB%2Fimage.png?alt=media&amp;token=fbf99158-3bea-42a6-bc71-1c643debcfe8" alt=""><figcaption></figcaption></figure>

2. In Select and Move mode, set the values for x, y, z axes to 0 (cm).

<figure><img src="https://328555605-files.gitbook.io/~/files/v0/b/gitbook-x-prod.appspot.com/o/spaces%2Fqbl3tKh4Tqarpg8Dmgw2%2Fuploads%2FCVj5Vqox9SOmKtXPaJ4k%2Fimage.png?alt=media&amp;token=95266485-d542-494f-86f5-b74d55a29f4b" alt=""><figcaption><p>'Select and Move'</p></figcaption></figure>

3. In Select and Rotate mode, set the values for x, y, z axes to 0 (cm).

<figure><img src="https://328555605-files.gitbook.io/~/files/v0/b/gitbook-x-prod.appspot.com/o/spaces%2Fqbl3tKh4Tqarpg8Dmgw2%2Fuploads%2FauUVR1khJtTaZN2SRMkR%2Fimage.png?alt=media&amp;token=e62a5ec4-11fe-4d7a-b7ea-c27fcdc1c4eb" alt=""><figcaption><p>'Select and Rotate'</p></figcaption></figure>

4. Click Transform.

<figure><img src="https://328555605-files.gitbook.io/~/files/v0/b/gitbook-x-prod.appspot.com/o/spaces%2Fqbl3tKh4Tqarpg8Dmgw2%2Fuploads%2FAO0R5Lsp5NbtQgVBasMm%2Fimage.png?alt=media&amp;token=058b87f3-1131-40e1-a3c8-fa4202b4c8e5" alt=""><figcaption></figcaption></figure>

5. Click \[Reset XForm] in Utilities, then click \[Reset Selected].

<figure><img src="https://328555605-files.gitbook.io/~/files/v0/b/gitbook-x-prod.appspot.com/o/spaces%2Fqbl3tKh4Tqarpg8Dmgw2%2Fuploads%2FF4M6dhYNe55DfsQaooaK%2Fimage.png?alt=media&amp;token=f3d4d963-332c-4675-be24-65a557edf79b" alt=""><figcaption></figcaption></figure>

6. Go back to Modify and click Collapse All.

<figure><img src="https://328555605-files.gitbook.io/~/files/v0/b/gitbook-x-prod.appspot.com/o/spaces%2Fqbl3tKh4Tqarpg8Dmgw2%2Fuploads%2FfKpmEHSRnFrZANzAIeas%2Fimage.png?alt=media&amp;token=9ade1e37-3fbd-460a-b684-ba4e2554c3f3" alt=""><figcaption></figcaption></figure>


# My 3D Models

When you access the ALTAVA Creator page and click on the "My 3D models" tab, you can see the list of 3D models you have uploaded.

## Status

The registered models will be displayed in the following states depending on the review status:

<table><thead><tr><th width="163.33333333333331">Status</th><th>-</th><th data-hidden></th></tr></thead><tbody><tr><td>Submitted</td><td>The review has been started by the reviewer, and you are waiting for the review results.</td><td></td></tr><tr><td>Not approved</td><td>The submitted 3D model has been rejected during the review process.</td><td></td></tr><tr><td>Download</td><td>The submitted 3D model has passed the review process, and you can download the conversion file.</td><td></td></tr></tbody></table>

\
If you want to download the conversion file, click on the "Download" button. If you want to publish your 3D model, you can share your design by clicking the "Publish" button.

{% hint style="info" %}
What is **a conversion file?** It refers to a .zip file that has converted your 3D model into a file format suitable for other virtual worlds.
{% endhint %}

## Download

When you click the \[**Download]** button, you can download the .zip file converted into a file format suitable for other virtual worlds. Currently, we provide files for **Roblox and SnapChat**, and we are planning to expand to include various virtual world files in the future.

## Publish

The 3D model in the "Download (approved)" state is inactive. Only the creator can view the file.

When you click the "Publish" button, your 3D model will be tokenized as an NFT and displayed on the ALTAVA AI platform.&#x20;

This means that other users and creators can redesign and decorate your design through \[Redesign], and you can generate revenue based on the number of downloads.

{% hint style="warning" %}
Once a design is published, it cannot be changed to private.
{% endhint %}

{% hint style="warning" %}
Once a 3D model is published, its name cannot be changed. If you want to change the name, please rename it before publishing. (Only English, maximum 20 characters, numbers, and spaces are allowed.)
{% endhint %}


# NFT Minting

### Create a MetaMask Account

To protect the design rights of the original creator and create a transparent settlement system, ATLAVA team manages original works as NFTs. Please create a MetaMask account to generate revenue.

* Create a [MetaMask Account](https://metamask.io/download/)

After connecting your MetaMask, click Publish to initiate minting automatically. Once minting is successful, your model will be ready to generate revenue. You can check your minted 3D models in My Wallet.

<figure><img src="https://328555605-files.gitbook.io/~/files/v0/b/gitbook-x-prod.appspot.com/o/spaces%2Fqbl3tKh4Tqarpg8Dmgw2%2Fuploads%2FxRa2d7IiKogvKAGHfNk0%2Fimage.png?alt=media&amp;token=f82fc14f-0b8f-4a49-94c2-9b466c372eee" alt=""><figcaption></figcaption></figure>

You can check settlement-related details in My Wallet.&#x20;

Click [\[My Wallet\]](/creator-guide/managing-your-3d-models/my-wallet) for more details.


# My Wallet

My Wallet page is where you can check the 3D models you have minted.

The 3D models you currently possess are displayed, and you can see the price and the number of downloads for each 3D model.

### Settlement

Your My Wallet page is automatically updated to indicate the progress of your settlement. Detailed settlement standards and timeline will be announced separately.

<figure><img src="https://328555605-files.gitbook.io/~/files/v0/b/gitbook-x-prod.appspot.com/o/spaces%2Fqbl3tKh4Tqarpg8Dmgw2%2Fuploads%2FcaC8vuTGEd4P9rvrfLoe%2Fmy%20wallet%20(6).png?alt=media&amp;token=caf8449e-1111-44a3-92cb-e35b188ebfa0" alt=""><figcaption></figcaption></figure>


# Upload my 3D model to Roblox

1. Select the 3D model you want from the My 3D Models tab.
2. Download the Roblox file.

<figure><img src="https://328555605-files.gitbook.io/~/files/v0/b/gitbook-x-prod.appspot.com/o/spaces%2Fqbl3tKh4Tqarpg8Dmgw2%2Fuploads%2FIaL22oSTLFOkYhahQWeH%2Froblox%20download.png?alt=media&amp;token=60fba60c-97f2-4808-9185-20f271867d42" alt=""><figcaption></figcaption></figure>

3. Download the [Studio](https://create.roblox.com/) and upload files according to the guidelines.

<figure><img src="https://328555605-files.gitbook.io/~/files/v0/b/gitbook-x-prod.appspot.com/o/spaces%2Fqbl3tKh4Tqarpg8Dmgw2%2Fuploads%2Fa9Wg3u6i7BUvbZjCMQCc%2Fimage%20(74).png?alt=media&amp;token=89080f70-f9cd-47ea-9429-de5b3218746e" alt=""><figcaption></figcaption></figure>


# Upload my 3D model to Snapchat

1. Select the 3D model you want from the My 3D Models tab.
2. Download the Snapchat file.

<figure><img src="https://328555605-files.gitbook.io/~/files/v0/b/gitbook-x-prod.appspot.com/o/spaces%2Fqbl3tKh4Tqarpg8Dmgw2%2Fuploads%2Fipy6yLqebs6qzxsbhbtq%2Fsnapchat%20download.png?alt=media&amp;token=3987002a-c569-4435-9055-1bc4b649e4b9" alt=""><figcaption></figcaption></figure>

3. Download the[ Lens Studio](https://docs.snap.com/lens-studio/home) and upload files according to the guidelines.

<figure><img src="https://328555605-files.gitbook.io/~/files/v0/b/gitbook-x-prod.appspot.com/o/spaces%2Fqbl3tKh4Tqarpg8Dmgw2%2Fuploads%2FXIihFBvfWuLcwbbr6phU%2Fimage%20(105).png?alt=media&amp;token=64d0a980-10ce-4bbf-8234-7a86a3fabe91" alt=""><figcaption></figcaption></figure>

### **Please check!**

{% hint style="success" %}
When applying clothing mesh, change Mesh Pose to A-Pose.
{% endhint %}

<figure><img src="https://328555605-files.gitbook.io/~/files/v0/b/gitbook-x-prod.appspot.com/o/spaces%2Fqbl3tKh4Tqarpg8Dmgw2%2Fuploads%2Fssap5CeI6SBfjfIlAU2S%2Fimage%20(78).png?alt=media&amp;token=20b683b3-3fbd-4b25-a37a-b92dd10017d3" alt=""><figcaption></figcaption></figure>

{% hint style="success" %}
After registering the clothing mesh, set the X-axis rotation value to -90 degrees.
{% endhint %}

<figure><img src="https://328555605-files.gitbook.io/~/files/v0/b/gitbook-x-prod.appspot.com/o/spaces%2Fqbl3tKh4Tqarpg8Dmgw2%2Fuploads%2F9oQPcdm27fD56Kf6Qr1M%2Fimage%20(79).png?alt=media&amp;token=bc37970d-0f51-4de8-8326-eb6d56c75f05" alt=""><figcaption></figcaption></figure>